With VeryPDF HTML Converter Command Line installed in your computer, you can set bit depth and convert EMF to TIFF via a command line very easily. In terms of bit depth, it quantifies how many unique colors are available in an image's color palette in terms of the number of 0's and 1's, or bits, which are used to specify each color. Bit depth is also called bit depth. VeryPDF HTML Converter Command Line is a powerful conversion product, which can convert EMF to TIFF, PNG, JPG, GIF PCX, TGA, JP2, PNM, etc.
If you want to set bit depth and convert EMF to TIFF via a command line, the following command must be concluded in the command line: -bitcount <int>, which is for bit depth setting. The following part of this article will focus on how to set bit depth and convert EMF to TIFF via a command line, please go on reading.
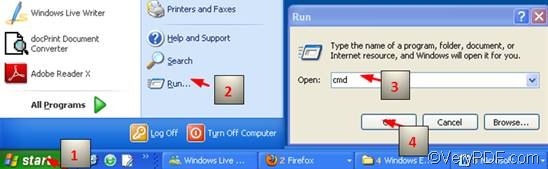
1. Run the command prompt window
Normally, it will take four steps to run the command prompt window: click “Start” and the home menu will appear on the computer screen; > click “Run” on the home menu; > enter “cmd” in the “Run” dialog box that pops out; >click on “OK” in the “Run” dialog box. Then the black and white command window will appear on the desktop.
2. Enter a command line
Since you want to set bit depth and convert EMF to TIFF via a command line, the command line should be made up of four factors: one command which we have mentioned before and three files. You can refer to the following pattern:
htmltools -bitcount <int> <EMF file> <TIFF file>
- htmltools refers to the executable file, whose name is htmltools.exe, which is included in the folder titled htmltools in your computer by default.
- -bitcount <int> is the command that can be used to set bit depth. -bitcount is the parameter and<int> is the parameter value. int stands for integer, and here 1, 8 and 24 are permitted to be parameter values. The Angle brackets, which are used to mark essential contents, seldom appear in the command prompt window.
- <EMF file> stands for the input file in EMF format.
- <TIFF file> represents the output file in TIFF format.
When enter a command line in the command prompt window, you should remember that the whole directories of the executable file, instead of only their names, must occur in the command line. Taking the following command line as an example,
D:\htmltools\htmltools.exe -bitcount 24 D:\in\lotus.emf D:\out\lotus.tiff
In the command line above, the whole directories of the executable file, the input file and the output file instead of only the names appear.
- D:\htmltools\htmltools.exe is the directory of the executable file htmltools.exe, which is placed in the folder called htmltools on disc D.
- -bitcount 24 represents the command which specifies 24-bit as the bit depth for the output file converted from EMF to TIFF. You can replace 24 with either 1 or 8.The higher the bit depth, the more the colors appear in the image, if it is necessary.
- D:\in\lotus.emf is the directory of the input EMF file. It indicates that the input file named lotus is in the folder in on disk D.
- D:\out\lotus.tiff represents the directory of the output file. It specifies TIFF as the format of the output file, names the output file lotus, and indicates to export the output file in the folder named out on disk D.
In addition, all the directories of the executable file, the input file and the output file in the example can be replaced, according to the place the files are stored your computer.
3. Press “Enter”
The last step is to press “Enter” on the keyboard, and the conversion will only cost 1 second or even less. You can view the original EMF file, and the files converted from EMF to TIFF as illustrated below.
The original EMF file

1-bit TIFF file

8-bit TIFF file

24-bit TIFF file