Converting document of Microsoft Office word to pnm format file is not so hard as you thought before. If you can choose a suitable tool and take a right conversion method, you will achieve to your goal at once.
In this article, an application called docPrint will be introduced and a method about converting word to pnm will be showed. If you are puzzled with this problem, just go on reading.
docPrint is a windows printer driver that saves ink, paper and time by controlling printed output, it supports print 2, 4, 6, 8 or 16 pages on a single sheet of paper, it also supports scale A0, A1, A2, A3 papers to standard Letter or A4 paper sizes. docPrint is also a document converter, it converts any printable document to 50+ graphics, it may be a Microsoft Word file, Adobe PDF file, HTML file, Excel file and others, Document Printer (docPrint) supports various image formats, resolutions and compressions. You can visit this website https://www.verypdf.com/artprint/index.html to see the supported file formats.
docPrint is a part of docPrint Document Converter Professional which is a professional document converter. It also has two other available applicaitons—GUI application and command line application. They can realize the functions respectively, but more or less the same. If you want to use docPrint, you should download docPrint Document Converter Professional which is also called docPrint Pro at https://www.verypdf.com/artprint/docprint_pro_setup.exe and install it in your computer. In the end of the installation, the wizard will remind you whether to set docPrint as default printer. If you convert files to files often, of course, “YES” is recommended.
The following contents are the details about converting word to pnm.
The first step is to run driver printer in your computer. If docPrint is default printer, you can right click the word document which needs to be converted and choose “Print” option in the dropdown list, which will save you a lot of time. If not, you should open the document and click “File”—“Print” to open “Print” dialog box. Then choose “docPrint” as current printer in “Name” combo box and click “OK” button to continue your work. Please see Figure1. You can also use the hot key “Ctrl”+ “P” to help you.
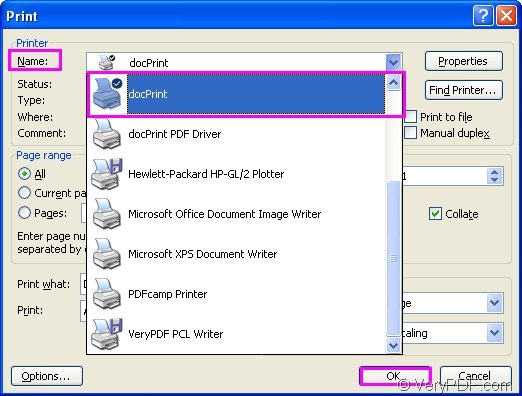
Figure1.
In the second step, you will see a dialog box named “docPrint”, please see Figure2. You should try to open “Save As” dialog box in this dialog box. The following methods are offered.
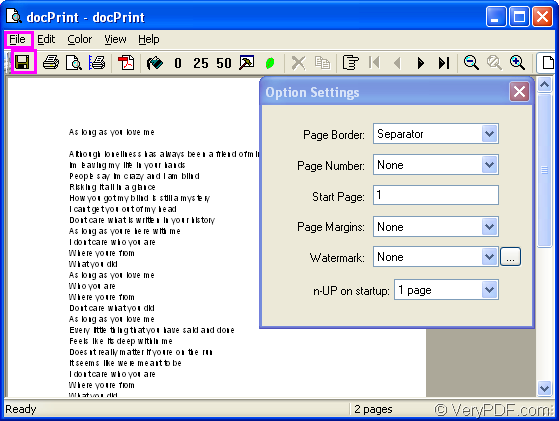
Figure2.
You can click “File” and click “Save as” in dropdown list. You can also click the “Save file” icon which locates below “File” in the toolbar. The hot key “Ctrl”+ “S” is recommended all the time.
The third step is also the last step. You can see “Save As” dialog box showed in Figure3. Just choose a location for the output file in “Save in” combo box, edit the name for the target file in “File name” edit box. Specify the output format for the target file in “Save as type” combo box and click “Save” button at last.
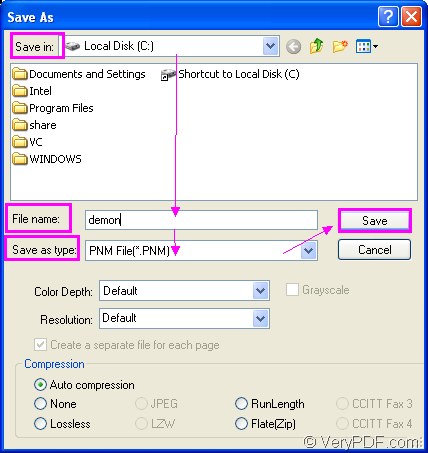
Figure3.
To find your target file in your computer marks the end of the conversion of word to pnm. So just like it, the process is easy enough that everyone can master it. If you want to learn more functions about docPrint, you can clicking on the following link: https://www.verypdf.com/artprint/index.html.