You are able to convert MS Office Excel document of xls to wmf or xlsx to wmf easily in a short time with the useful tool application—docPrint Document Converter Professional. Only three steps are required in this conversion with one available application of docPrint Pro which is short for docPrint Document Converter Professional. In this article, you will get the specific information about it.
Please get some acquaintance to docPrint Pro at first. docPrint Pro is a software product that dynamically converts MS Office Excel, PowerPoint, Word, AutoCAD DWG, WordPerfect, Adobe Acrobat PDF, PostScript and many other types of document to Adobe Acrobat PDF, JPEG, TIFF, PNG, PCX, EMF, PostScript, EPS, XPS, PCL,WMF, GIF, TGA, PIC, PCD and BMP etc formats. There are three applications in docPrint Pro, which are designed for different purposes. If you want to convert documents in batch, you can choose the GUI application; If you are a software developer, you may love to use the command line application. With the virtual printer application, you are able to save paper and ink.
At the same time, the virtual printer application is also a powerful document converter which can convert xls to wmf only with several clicks of the mouse. If you want to use docPrint, you should download docPrint Pro at https://www.verypdf.com/artprint/docprint_pro_setup.exe first. After installing docPrint Pro on the computer, you can see docPrint in the printer list when you click “Start”—“Printers and Faxes”.
Please see the conversion steps below.
1. Run the printer driver.
If docPrint is the default printer in your computer, you just need right click the Excel document and click “Print” to run the printer directly. If not, you should open the Excel document which needs to be converted and click “File”—“Print” to open “Print” dialog box in which you can set docPrint as the default printer in “Printer” combo box. Then please click “Print” button. You can also use the hot key “Ctrl”+ “P” to open the “Print” dialog box, which is a quick way.
2. Open “Save As” dialog box.
You will see the main interface of docPrint on the screen at once. Please use anyone of the following listed methods to open “Save As” dialog box in which you can save the target files and complete the conversion from xls to wmf. (1) You can click “File” and click “Save as” option in the dropdown list. (2) Please click the button which looks like a floppy disk in the toolbar. (3) You can also use the hot key “Ctrl”+ “S” to save file.
3. Save the target files.
In the “Save As” dialog box, you will see some combo boxes and one edit box. In the combo box “Save in”, you can choose the location for the target file. In the edit box “File name”, please input the name for the target file. In “Save as type” combo box, you should choose the right output format for the target file and then please click “Save” button to save all the changes. To learn the “Save As” dialog box, please see Figure1.
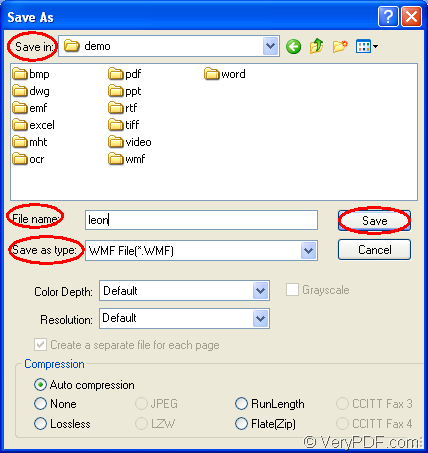
Figure1.
After clicking on “Save” button, the application will run and the conversion from xls to wmf will come to the end in no more than 10 seconds. You can browse the target files in the specified location then. To obtain more information about docPrint, please click here.