It is not a bad idea to save web pages which contain valuable information for you to image file format, say web page to jpg. Then you can save more web pages but taking up less space. In this article, I will talk about a way of converting web page to jpg by Document converter whose has a nick name as docPrint Pro.
This converter can be either used as a file format converter or can be used as a printer driver. When you use it as a file format converter, you can use it from two ways. One you can use its GUI version and the other is that you can call it from MS DOS Windows. But in this article, I will do the conversion from web page to jpg by its GUI version.
Get one copy of this converter.
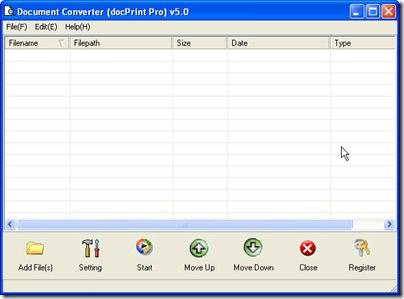
Here is the free downloading link for you, https://www.verypdf.com/artprint/docprint_pro_setup.exe. If you need to know more about it, you can visit its homage page, link is here, https://www.verypdf.com/artprint/index.html. This software is small in size but powerful in functions. So you can install it to your PC in a few seconds. Once you finish installing, there will be an icon on the desktop. Double click it then you can enter its interface. You can get a glance of its interface by the snap shot of it.
Add files to it.
This software can finish the conversion task in a few seconds no matter the single conversion or the batch conversion. So you can add all the files needed converting to this application. As to the adding ways you can choose it from the following ways.
1. Add files by dragging. Drag files needed converting from its containing folder to this software interface.
2. Click the button “Add Files”
3. Press the option “File” on the top.
Choose the output file format.
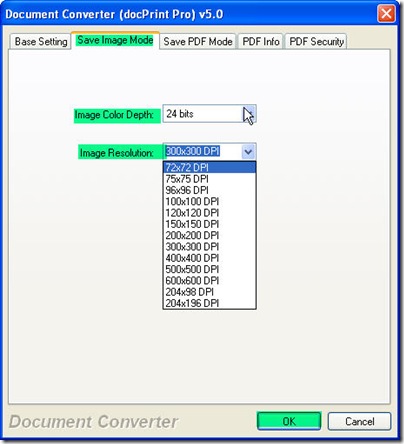
Click the button “Setting” to enter the main menu option. When you click it, you will find a tab named “Base Setting” in which you can find a drop-down list. In this list, you can choose jpg as the output file format. And please do not be in a hurry to back to the main interface. You can adjust the image resolution and color depth in the “Save image mode” tab. Then once you finish the setting, please end it by clicking the button “OK”.
Choose the out put folder.
This step can be processed by clicking the button “Start”. Then you will be reminded to choose a folder to save the output files. And the once the choosing end, the conversion from web page to jpg will be processed automatically. Give this converter a few seconds, and then you can witness the success of the conversion in the appointed folder.
Here I will call an end of the conversion from web page to jpg. Thanks for your reading.

