In this article, you will see how to convert the document of OpenOffice to dcx image format. You’d better choose docPrint Document Converter Professional as your tool because it is really a good document converter which can realize the conversion for you easily.
The leading role in this article is the virtual printer application docPrint Document Converter Professional—docPrint. It is a Windows printer which supports to print 2, 4, 6, 8 or 16 pages on a single sheet of paper and scale A0, A1, A2, A3 papers to standard Letter or A4 paper sizes. It is also a document converter which can convert any printable document to 50+ graphics. docPrint supports various image formats, resolutions and compressions.
Please download docPrint Document Converter Professional (docPrint Pro) at https://www.verypdf.com/artprint/docprint_pro_setup.exe for using docPrint. By printing the OpenOffice document to docPrint, you can launch it instantly.
At first, you need to run the printer driver and there are two situations that you should consider.
- If docPrint is the default printer, you should right click the OpenOffice document and choose the “Print” option to run docPrint directly, which is the most convenient and fast way for running the printer driver.
- If not, please press “Ctrl”+ “P” or click “File”—“Print” to open “Print” dialog box in which you should set “docPrint” as the current printer in “Printer” combo box and click “Print” button to close the dialog box and continue the work.
Then, in the docPrint window you should take one of the following offered ways to open the “Save As” dialog box.
- Just click “File” and click “Save as” in the dropdown list in “docPrint” window.
- You can click the “Save File” button in the toolbar for fast opening the “Save As” dialog box.
- Press “Ctrl”+ “S” on the keyboard at the same time.
At last, please save the target file in “Save As” dialog box through the following operations.
- You should ensure the output location for the target file in “Save in” combo box.
- Please name a good name for the target file in “File name” edit box.
- Just find the output format from the supported ones in “Save as type” combo box.
- Click “Save” button to end all the operations in the conversion from OpenOffice to dcx.
Figure1 shows you the “Save As” dialog box for your better understanding the last step.
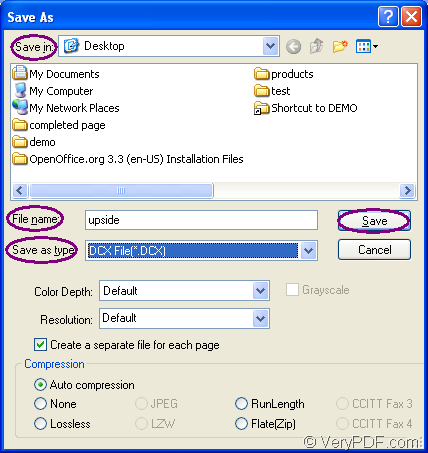
Figure1.
As the disappearing of the progress bar which appears at the bottom of “docPrint” window when you click on “Save” button, the conversion from OpenOffice to dcx comes to the end and you can find your target file in the specified location.