Photo CD which is also short as PCD file format is the Kodak's proprietary format designed for storing images on photo CDs. It is used for saving photographs scanned using Kodaks photo processing hardware. In this article, you will see how to convert document of OpenOffice to pcd with the professional document converter docPrint Document Converter Professional.
For the powerful functions of docPrint Document Converter Professional (docPrint Pro), it can convert any printable documents to various kinds of image formats. It also contains three available applications—GUI application, command line application and virtual printer application. What deserved to be mentioned is that the virtual printer application docPrint can also play the role as a document converter which enables you to convert any printable documents to 50+ image formats.
With docPrint, you will finish the conversion in no more than three steps. But you should download docPrint Pro for using docPrint at https://www.verypdf.com/artprint/docprint_pro_setup.exe. The installation of docPrint Pro is easy and you can do it perfectly. If you want make your conversion more convenient, you’d better set docPrint as the default printer in the end of the installation according to the prompt. Please see the specific conversion steps shown below.
- Run the printer driver
There are two situations you should think about before running the printer driver.
- If docPrint is not the default printer, you have to open the OpenOffice document and click “File”—“Print” or press “Ctrl”+ “P” to open the “Print” dialog box. Then please choose “docPrint” as the current printer in “Printer” combo box and click “Print” button.
- If docPrint is the default printer, you will save a lot of time by right clicking the OpenOffice document and clicking “Print” option in the dropdown list for directly running docPrint.
- Open the “Save As” dialog box
There are several ways here for your choice to open the “Save As” dialog box and you can choose any one. Of course, you can supply some other good ideas to share with us by leaving messages.
- Press “Ctrl”+ “S” on the keyboard at the same time.
- Click “File” and click “Save as” in the dropdown list.
- Use the “Save File” button which is like a floppy disk in the toolbar.
- Save the target file
The last step is to save the target file in “Save As” dialog box. To complete the conversion from OpenOffice to pcd, you should do the following operations. Please see the “Save As” dialog box in Figure1.
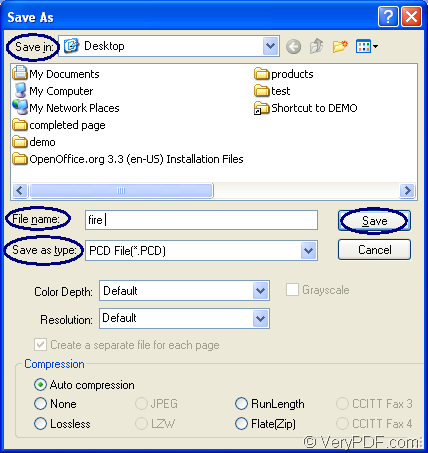
Figure1.
- Have the target file saved in some place of you computer by setting location in “Save in” combo box.
- Input the name of the target file in “File name” edit box.
- In “Save as type” combo box, please choose the right output format.
- Click “Save” button to save the changes you have made.
The green progress bar appears at the bottom of the “docPrint” window will remind you the conversion progress. When the conversion from OpenOffice to pcd is over, the progress bar will be empty again.