If there is an ODT document which must be converted to JP2 image format desperately, which kind of application will you choose and how to operate it? In this article, you will see a professional document converter which can realize the conversion from odt to jp2 in no more than two minutes only by three steps.
The application is docPrint Document Converter Professional. It also has a short name—docPrint Pro. It is a document converter which can convert any printable documents to various image formats (50+) and it is also easy enough for using. With three available applications in docPrint Pro, you can choose any one according to your needs.
The GUI application supports to make batch conversion. The command line application can be used by software developers for developing work. The virtual printer can be used as the tool to save paper and ink via controlling the page size. At the same time, the virtual printer also acts as a document converter which has a friendly interface.
The virtual printer application docPrint will play the leading role in this article. It can convert OpenOffice document of odt to jp2 easily. To use docPrint, you should download docPrint Pro for free at https://www.verypdf.com/artprint/docprint_pro_setup.exe and install it on your computer. After that, you can find docPrint in the printer list when you click “Start”—“Printers and Faxes”.
Step1. Run the printer driver
The printer driver can be run by two methods. (1). If docPrint is not default printer, please open the ODT document and click “File”—“Print” for opening the “Print” window. You can also use the hot key “Ctrl”+ “P” to open the same window. Then please choose “docPrint” as the current printer in “Printer” combo box and click “Print” button. (2). If docPrint is the default printer, please right click your ODT document and click “Print” option in the dropdown list for running docPrint directly.
Step2. Open the “Save As” dialog box
In the popup “docPrint” window, you can see there are some buttons in the toolbar and a small dialog box on the right. If you don’t want to set any parameters to the target file, there is no need to care about them. Just try to open the “Save As” dialog box by on of the following ways. (1). Click “File”—“Save as”. (2). Use the hot key “Ctrl”+ “S”. (3). Click the “Save File” button in the toolbar.
Step3. Save the target file
Then you will see the “Save As” dialog box on your screen, in which you should do the following operations. (1). Please find a location for the target file on the disk of your computer in “Save in” combo box. (2). You should input the name of the target file in “File name” edit box. (3). Please choose the right output format for the target file in “Save as type” combo box. (4). Click “Save” button for saving all the changes.
Please see the “Save As” dialog box in Figure1.
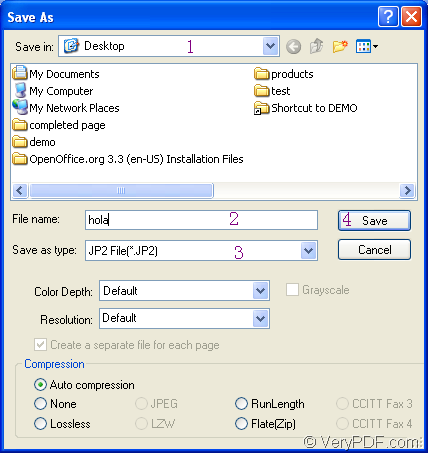
Figure1.
When you click on “Save” button, you will see there is a green progress bar appear at the bottom of the “docPrint” window and the bar will disappear when the conversion from odt to jp2 is finished. If you are interested in the application or the conversion, you’d better download the application and try it yourself.