Someone asks that whether the application docPrint Document Converter Professional can convert OpenOffice document of odt to jpc. The answer is “Yes”. In fact, docPrint Document Converter Professional is a kind of professional document converter which can convert any printable document including OpenOffice ODT document to many kinds of image formats including JPC format.
With three applications in docPrint Document Converter Professional (docPrint Pro), you can realize different kinds of functions. If you want to convert documents to images in batch, you can choose the GUI application. If you want to develop some new software, the command line application is offered. If you want to save paper and ink or scale page size, please choose the virtual printer application. In addition, the virtual printer application is also a good document converter.
When you download the docPrint Pro at https://www.verypdf.com/artprint/docprint_pro_setup.exe and install it on your computer, you can get the three applications. You may not able to find the virtual printer docPrint in the installation folder. Please click “Start” and click “Printers and Faxes” in the menu. In the printer list, you will see a new added printer named as docPrint which is the leading role in this article. Then please see the steps about converting odt to jpc.
The first step—Please run the printer driver. You should open the ODT document and click “File”—“Print” for opening the “Print” dialog box. Then in the “Printer” combo box of “Print” dialog box, please choose “docPrint” as current printer and click “Print” button to close the dialog box. You can also use the hot key “Ctrl”+ “P” to help you open the “Print” dialog box. If docPrint is the default printer, please right click the ODT document and click “Print”, which is for directly running the printer docPrint.
The second step—Please open the “Save As” dialog box. In the main interface of “docPrint”, you are ought to open the next dialog box—“Save As” dialog box in which you can set parameters to the target file. Please click “File”—“Save as” or click the “Save File” button in the toolbar. The button seems like a floppy disk. You can also take the combination “Ctrl”+ “S” on the keyboard to help you.
The last step—Please save the target file in “Save As” dialog box. You need to choose the location for the target file in “Save in” combo box, input the name for the target file in “File name” edit box, specify the output format for the target file in “Save as type” combo box and click “Save” button. You can see the “Save As” dialog box in Figure1 for you better understanding the step.
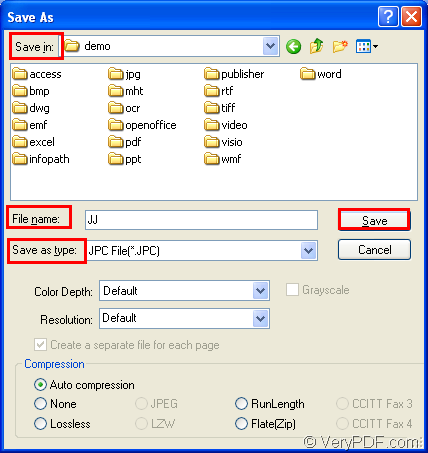
Figure1.
When the conversion odt to jpc comes to the end, you are able to find the target file in the location you have just set. If you want to know more information or function about the application docPrint Pro, you can click here to visit its homepage.