This article would like to show you a convenient way to convert RTF to TIF with HTML Converter. And for more knowledge of HTML Converter, welcome to visit homepage of HTML Converter. Also you can go to our official website, where more software can be overviewed accordingly and separately. 🙂
To convert RTF to TIF with HTML Converter, please refer to the following steps:
1. After you double click installer of HTML Converter, it can be complete and successful to install HTML Converter if you follow pop setup wizard step by step.
2. Run HTML Converter so that interface of HTML Converter can be popped on your screen.
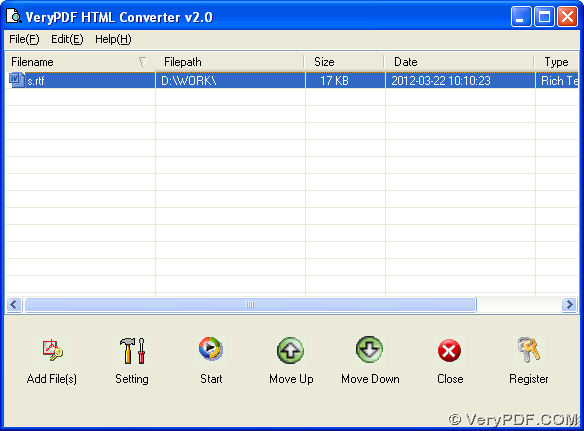
3. Add RTF file with one of following ways:
- Click “Add Files” > select one RTF file and click “open” in pop dialog box
- Drag and drop TIF file into processing form directly
Then, path of this RTF file can be shown in processing form automatically, which indicates it is complete and successful to add this RTF file.
4. To set properties of TIF file and edit targeting file type as TIF, please click button “Setting” on GUI interface > select “Base Settings” tab > click “.tif” on dropdown list of “output format” there, so it is finished to set targeting format as TIF. Then, it can be optional to do the followings to edit different targeting properties of TIF file:
- If you click one of options on dropdown list of “Rotate Angles”, one rotation on TIF image can be set accordingly
- If you click one of options on dropdown list “Image Color Depth”, 1 bit, 8 bits or 24 bits can be chosen as targeting image bit-count
- If you click one of options on dropdown list “Image Resolution”, a specified combination of resolution on X and Y can be set
- To edit page orientation, please click radio of “Portrait” or “Landscape”
- To preview TIF after process, please click check box of “View after conversion”
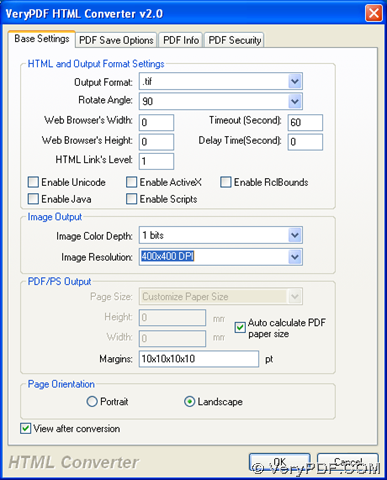
After you think it is enough and suitable for basic settings on properties of TIF image, please click “ok” on that panel so that your settings there can be save automatically and this panel can be closed, too. 🙂
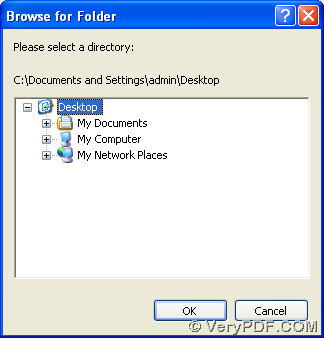
5. Then, it is time for editing destination folder and start this process, so you need to click button of “Start” on GUI interface. For more details, please continue to read this paragraph:
Once you get one click on “Start”, a dialog box named “Browse for folder” can pop out, where you need to select one folder as destination folder, then please click “ok” there, later on, your TIF file can be added into objective folder directly, which is previewed automatically because of one click on check box of “View after conversion”.
By now, if you feel a little confused, or you think it is enough for you to read the paragraphs above, which is about a convenient way to convert RTF to TIF with HTML Converter, please leave your comments here, our technique support will contact you as soon as possible based on your problems. Also please visit transaction page of HTML Converter, if you think there is a requirement on purchasing HTML Converter online. 🙂 Thank you for your support here. 🙂