To save WMF to PCX, HTML Converter can help you reach this goal on computers of Windows systems.
HTML Converter is a professional tool for converting different source formats to other types of targeting formats, such as PDF, TIFF, JP2, PNG etc.. You can log on official website of HTML Converter to know more information of HTML Converter. For other software, which can be used for other conversions on your computer, please go to our official website. 🙂
After you double click installer of HTML Converter, installation of HTML Converter can be installed successfully with setup wizard step by step on computers of Windows systems. Then you can start the process to save WMF to PCX with HTML Converter.
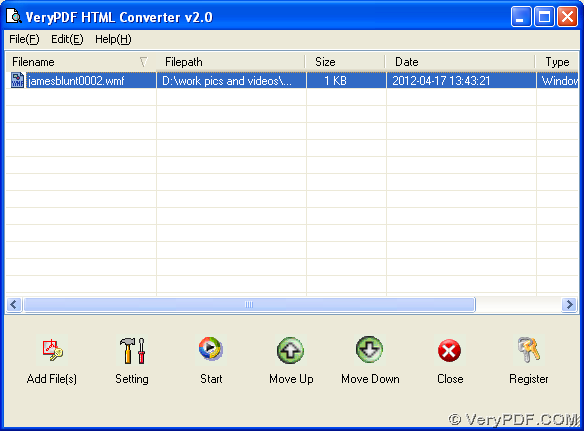
1. Launch HTML Converter on your computer, then add source WMF file:
Click “Add Files” > select WMF file in pop dialog box > hit “open”, so WMF file can be added for this process, and it appear as its path in processing form of GUI interface. And if you want to remove this added WMF file and add another one, please click this path > hit button of “Delete” on keyboard, then repeat steps above to add another WMF:
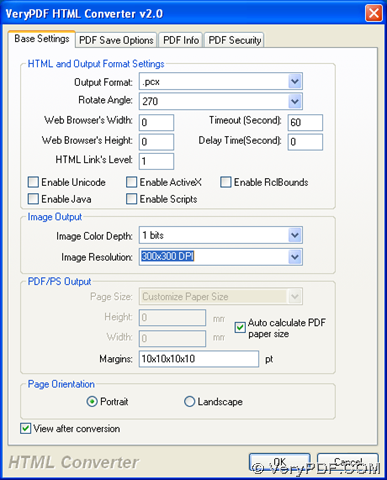
2. Please click button of “Setting” on GUI interface so that targeting format “PCX” can be set and its properties can be edited flexibly, too: click “Setting” > select “Base Settings” tab > click “.pcx” on dropdown list of “output format” so that targeting format is PCX. Then, if you would like to set targeting properties, please refer to the followings:
- Dropdown list of “Image Color Depth” can be used for editing image bit-count as 1 bit, 8 bits or 24 bits accordingly
- Dropdown list of “Image Resolution” can be used to setting targeting resolution of X and Y of PCX flexibly
- Radio of “Portrait” or “Landscape” can be used for editing objective orientation as portrait or landscape separately
- Check box of “View after conversion” can be used for previewing PCX file after conversion automatically
Finally, after you edit targeting properties, please click “ok” on that panel so that your settings can be saved, and program can jump back to GUI interface.
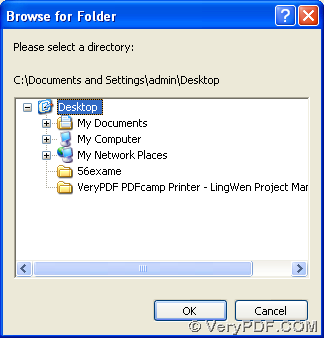
3. After basic settings, please click “start” so that destination folder can be set and conversion from WMF to PCX can be started: Click “start” on GUI interface > select one folder as targeting folder for saving PCX file on your computer later in pop dialog box, finally one click on “ok” in pop dialog box can help you produce PCX file with HTML Converter and add this PCX file into destination folder automatically.
So far, if you have questions on how to save WMF to PCX flexibly with HTML Converter, please leave your comments here, our technique support can help you with your questions asap! 🙂 If you have already understand how to save WMF to PCX with HTML Converter, and want to purchase this HTML Converter, please visit order page of HTML Converter.