Yes, in this article, you can know how to save WMF to JP2 with HTML Converter in Windows platforms. 🙂 If you never know what is HTML Converter, maybe you can go to homepage of HTML Converter to know more. In addition, if you think there is a need to know other applications, perhaps it is convenient for you to go to our official website to overview them.
Before illustration is started, which is about steps to save WMF as JP2, please do the followings to install HTML Converter on your computer:
- Download installer of HTML Converter
- Double click this installer > follow setup wizard to install HTML Converter step by step
Here are the steps to convert WMF to JP2 with HTML Converter below:
- Double click shortcut of HTML Converter in order to open GUI interface of HTML Converter
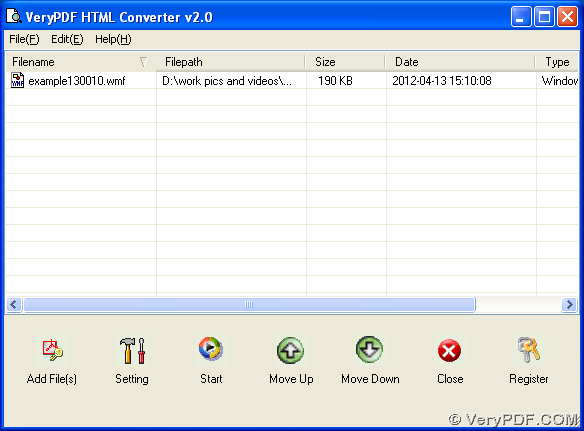
- Please add WMF file with this way: click “Add Files” on GUI interface > select one WMF file in pop dialog box > click “open” there, or drag and drop this WMF file into processing form, which can also make path of WMF file appear in processing form
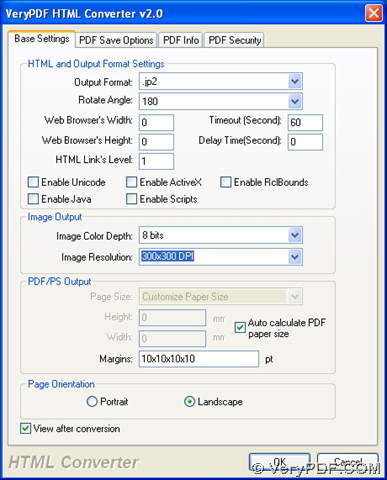
- Then, please set targeting format as JP2 and edit properties of JP2 with this way: click “setting” on GUI interface > choose “Base Settings” tab there > click “.jp2” on dropdown list of “output format”, then it is successful to edit objective format as JP2; to edit targeting properties, please refer to the followings:
to edit rotation of JP2, please click edit box of “Rotate Angle” > select one angle on dropdown list accordingly;
to set image color depth as 1 bit, 8 bits or 24 bits, please open up dropdown list of “Image Color Depth” > select one option;
to edit image resolution, please choose one combination of X and Y on dropdown list of “Image Resolution”;
to edit page orientation as portrait or landscape, please click radio of “Portrait” or “Landscape”;
to preview JP2 after process, please click check box of “View after conversion.
Finally, one click on “ok” can help you save your settings on this panel and close your panel automatically.
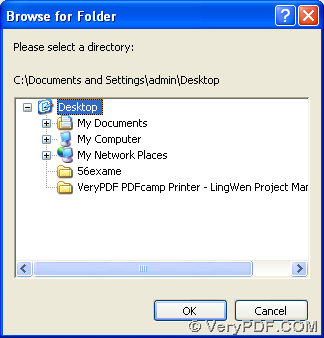
After program jump back to GUI interface, please click button of “start” so that targeting folder can be selected in pop dialog box of “Browse for Folder”, and then one click on “ok” will make HTML Converter start this process, and within several seconds, your JP2 image will be added into targeting folder. 🙂
Along with the epilogue of illustration about a method to save WMF to JP2, for any doubts about this process, please add your comments here. To buy HTML Converter, welcome to go to order page of HTML Converter. 🙂