When using software VeryPDF PDF Stamp GUI version, some customers respond that they do not know how to choose page to be stamped. Say they may ask that “How do you set stamping on (say) page 2 onwards”, if you have the same question, please read the following part. I will show you how to stamp PDF on specified pages.
Step 1. Download and Install
- Please download PDF Stamp and install it then you can follow my steps to try this software.
- Here I will take the GUI version for example if you need the command line version, there is also one available for you.
- Once the downloading finishes, there will be an exe file. Please install it by double clicking it and follow the installation message.
- Once the installation finishes, there will be an icon on the desktop. Simply click the icon then you can launch this software.
Step 2. Stamp PDF and Choose Page Range.
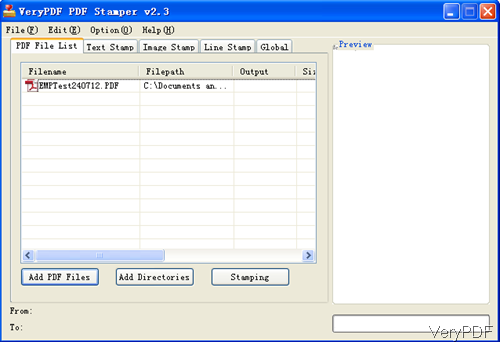
- Please drag files from its containing folder to software interface. Or click button Add PDF Files. For understanding this step easily, please refer to the following snapshot.
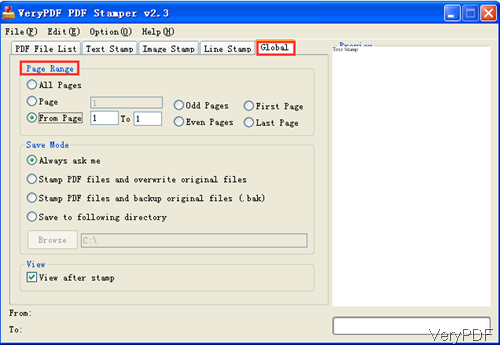
- For solving problem easily, now let us check how to specify pages directly. Please got to tab Global then you will see the following snapshot. Here you can choose to specify pages which you need to be stamped: All page, odd page or only first page. You can also choose page range by from N to Z way.
- Here you can also choose Save Mode. If you set output file path and specify save mode here, you will save lost of time during running batch conversion.
By here you can get a clear idea about how to stamp PDF and specify pages. As to how to add image stamp and text stamp, please go to corresponding tab. Meanwhile line stamp is also available. Here I will introduce another function that you may need. That is Monitoring Folder function. By this function, once you add files to the monitored folder, they will be added stamp at once. Now let us check how to set monitored folders.
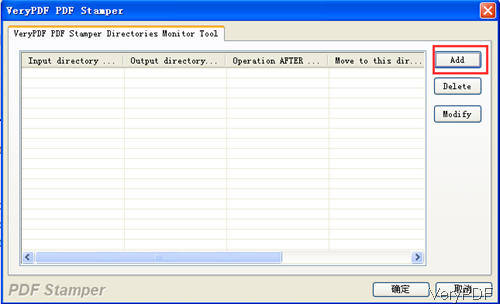
Please click option File on the top then you will see a dropdown list. Then go to Monitor Directories. Once click it then you will see the following dialogue box like the following snapshot.
- Click button Add then you can choose the monitored folder. Once you add some by mistake, please click Delete button to cancel them. Modify button can be used to change the monitored folders partly.
If you use the Monitoring Folder function together with specifying pages, you do not need to do anything, the batch conversion can be done perfectly. During the using, if you have any question, please contact us as soon as possible.


