pdf editor

How to add a smile-face comment to pdf files with VeryPDF PDF Editor?

Smile-face icon is used in service business where we are greeted with zealous service. Many saleman pin a smile-face icon on their clothes to tell customer that they serve well. Nowadays nearly everybody bears a heavy social pressure even the children who have a lot of homework to do, for that reason, these people like to wear clothes with smile-face pattern, to relieve their trouble and to conceal their bad mood. In a high-civilized country smile-face expression is polite symbolism and it’s on behalf of noble quality. VeryPDF PDF Editor provides pdf smile-face comment which can be added to a pdf file, when you or other readers look at a pdf file, pdf smile-face comment more or less may add a kind of pleasant atmosphere. Next the article says the process for adding pdf smile-face comment.

Download VeryPDF PDF Editor at www.verypdf.com and add a pdf file to it.

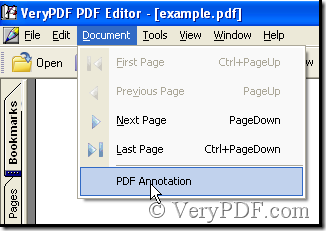
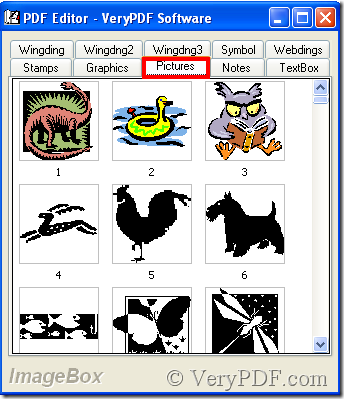
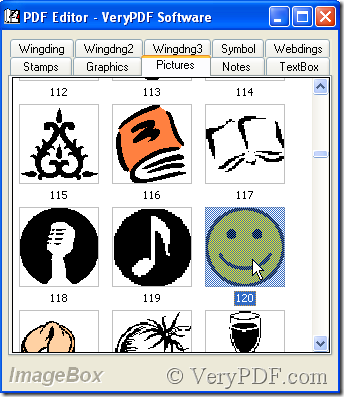
In the menu click Document>PDF Annotation, thus an ImageBox pops out. See the following illustration:

image

image

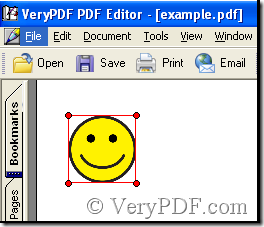
After the ImageBox pops out, choose Pictures option where you can find the pdf smile-face comment then double-click it, thus it appears in the pdf file.

image

image

Drag pdf smile-face comment you can alter its size and location.

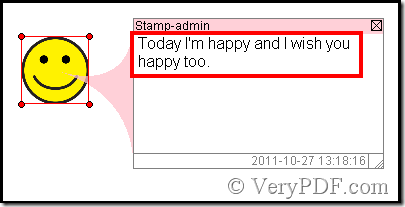
Double-click pdf smile-face comment a textbox will pop out where you can add some words.

image

VN:F [1.9.20_1166]
Rating: 0.0/10 (0 votes cast)
VN:F [1.9.20_1166]
Rating: 0 (from 0 votes)
image to pdf converter

How to convert PSD image to PDF file?

    PSD is Photoshop's native file format, it is also called PDD which is widely accepted . It supports all available image modes such as Bitmap, Grayscale, Duotone and so on. The PSD format is extremely useful as it can support duotones, clipping paths and channels. Moreover, PSD offers a unique feature - it supports layers while every other format must be flattened on export. Any program that supports PSDs directly can then leverage this layer information. Saving as layered images is quite handy as it allows to edit different parts of an image at a later date far easier.   

So when you finish making pictures by Photoshop, you can convert it to PDF file at once then you can reassuringly upload your masterpieces to website at once. Or else you will worry that someone copy your idea.

If you have concerned for this, you can convert them to PDF file by this software-Image2PDF. It is a converter which automatically clear and skew-correct B/W images by employing special techniques to insure high quality output after conversion.

  • Download it here:https://www.verypdf.com/tif2pdf/tif2pdf.htm#dl 
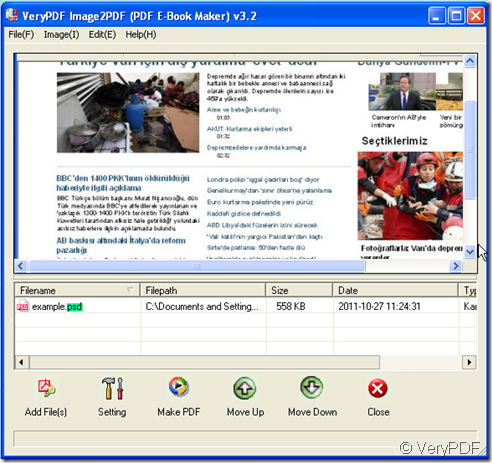
  • Add your file to Image2PDF.I take a PSD file for example. This example is a screenshot of news homepage, when you meet some information, you can convert it to PDF file then add it to your files by this way.

Snap1

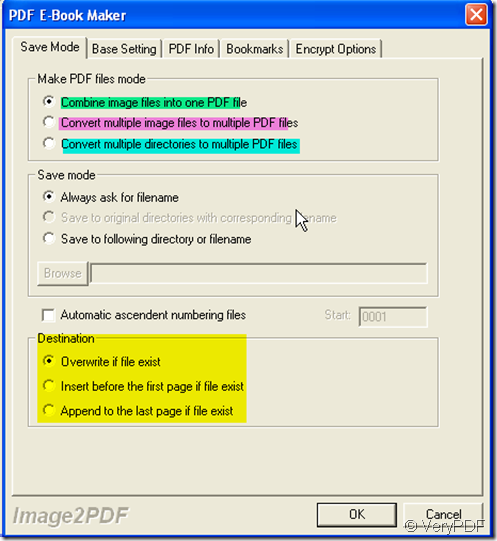
  • Generally speaking, we will convert all the image files to a PDF file. Then it will be more easy and clear to keep. However, if you want to keep each image in each PDF file, you can set it in the “Setting” menu. “Setting” - “Save Mode” then you will see a menu page like this picture. There are still many options here, you can choose it as you need for your PDF file.  When you finish the choosing, please click “OK” to close this page.  You can see many other menu options on the top menu bar, like “ Base Setting” “ PDF Info” and so on. You can restrict your PDF files in many aspects by doing options in each menu page.

Snap2

  • Then we can convert the PSD image to PDF file by clicking the button “Making PDF”.It takes one second to finish the converting. Then you can find your PDF file your chosen folder.
VN:F [1.9.20_1166]
Rating: 0.0/10 (0 votes cast)
VN:F [1.9.20_1166]
Rating: 0 (from 0 votes)
html converter (htmltools)

How to convert mhtml to tga?

TGA format supports 8, 16, 24, or 32 bits per pixel at a maximum of 24 bits for RGB colors and and 8-bit alpha channel; often used to store texture files referenced by 3D video games.TGA files commonly have the extension ".tga" on PC DOS/Windows systems and Mac OS X . Color data can be color-mapped, or in direct color or true color format. Image data may be stored raw, or optionally, a lossless PackBits RLE compression can be employed.

Now TGA files are in widespread use due to their simplicity and ease of implementation and lack of encumbering patents.

You can convert mhtml to tga format by HTML Converter Command Line which can be downloaded at https://www.verypdf.com/htmltools/htmltools.zip . But you should register the software with the code you get when buying HTML Converter Command Line in cmd.exe dialog box,or the functions will be limited when you use it.

NOTE:You should registet HTML Converter Command Line under the installation directory.

HTML Converter Command Line allows you to convert web pages to PDF, PS (postscript), WMF, EMF vector formats.It also allows you to create previews or thumbnails of web pages in a number of different formats, such as TIF, TIFF, JPG, JPEG, GIF, PNG, BMP, PCX, TGA, JP2 (JPEG2000), PNM, etc.

You can get some information about the conversion of mhtml to tga in this article.

Step1.Run cmd.exe program.

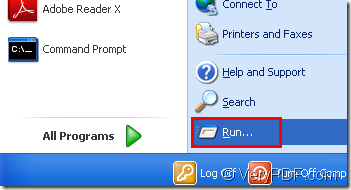
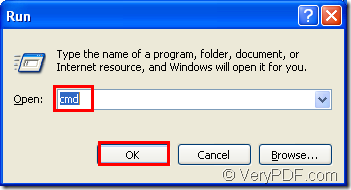
Please click “start”—“run” and input “cmd” in “open” edit box of the popup dialog box.Then click “OK” button.Please see Figure1 and Figure2.

image

                                      Figure1.

image

                                      Figure2.

You can also press “Windows” + “R” to open the dialog show in Figure2.

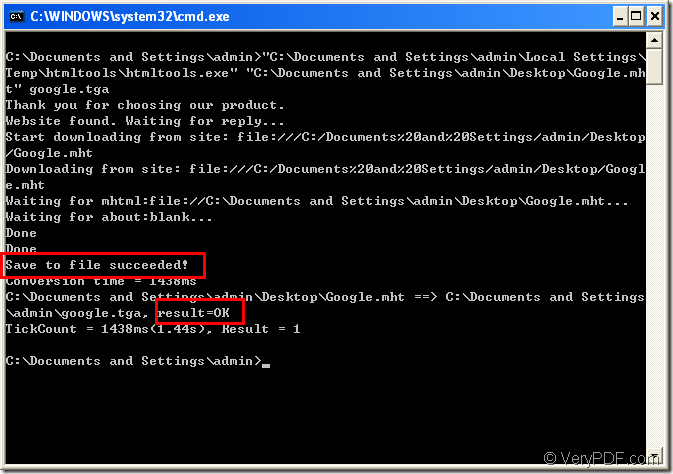
Step2.Input commands in cmd.exe dialog box.Please see Figure3.

image

                                                                        Figure3.

The commands here are "C:\Documents and Settings\admin\Local Settings\Temp\htmltools\htmltools.exe" "C:\Documents and Settings\admin\Desktop\Google.mht" google.tga

"C:\Documents and Settings\admin\Local Settings\Temp\htmltools\htmltools.exe"  stands for the path of called program—htmltools.exe which is the executable file in HTML Converter Command Line.

"C:\Documents and Settings\admin\Desktop\Google.mht"  is the path of source file. “.mht” is the extension name of mhtml format file.

google.tga is the name of target file.

If you can see the sentences “Save to file succeed!” and “result=OK” framed in the red rectangle showed in Figure3,it means the conversion of mhtml to tga is over and successful.

Step3.Find and view target file.

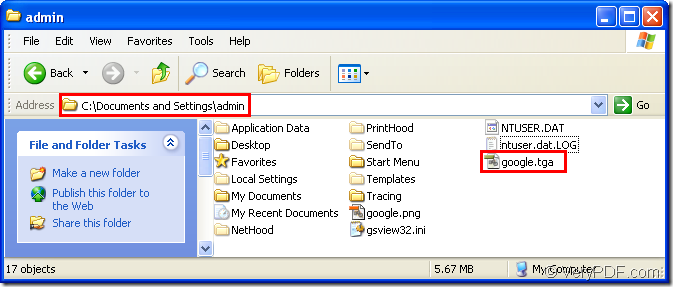
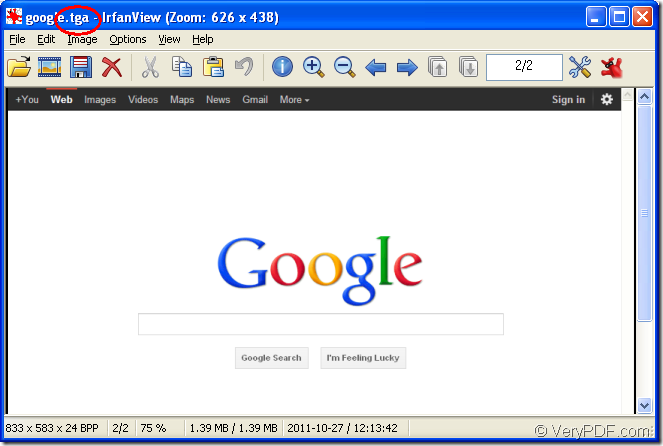
The tga format file is saved in current directory by default and you can view it by Photoshop,IrfanView,GSview or other graphic programs.Please see Figure4 and Figure5.

image

                                                                                 Figure4.

image

                                                                      Figure5.

VN:F [1.9.20_1166]
Rating: 0.0/10 (0 votes cast)
VN:F [1.9.20_1166]
Rating: 0 (from 0 votes)
pdf to image converter

How could we get a grayscale png through converting pdf to png?

To create a grayscale png, PDF To Image Converter v2.1 can solve it easily. You could download this converter v2.1 here: https://www.verypdf.com/pdf2tif/pdf2image.exe. Click this link>save it then, install PDF To Image Converter v2.1 in your pc.

Here is the method on how to make a grayscale png from pdf through PDF To Image Converter v2.1.

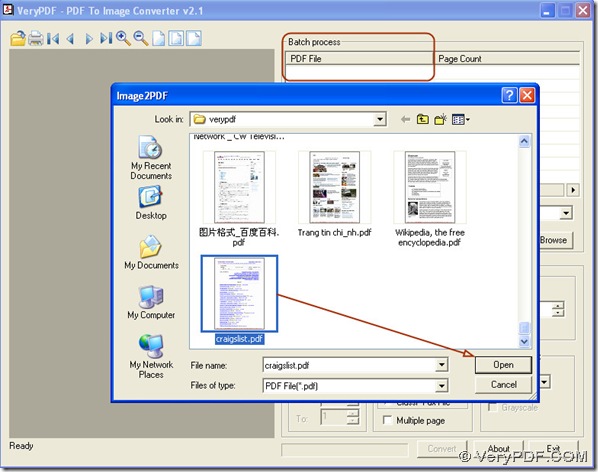
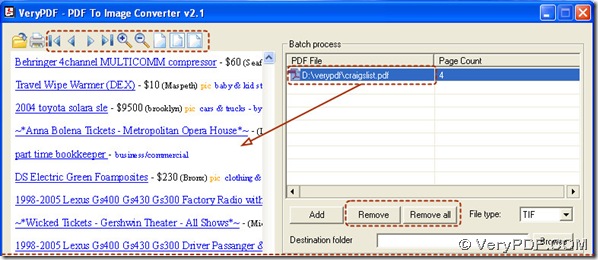
Step1. Click “Add” button>hit a pdf>press down “open” button in the pop window, your pdf will be displayed as its route in the form of “PDF File” in batch process field.

快照165

Step2. Click this route>preview your pdf in PDF To Image Converter v2.1, you also could use the icons above your pdf preview to look over your pdf carefully.

快照167

If you want to get rid of this pdf out of the batch process, click your pdf route>press down “Remove” button.

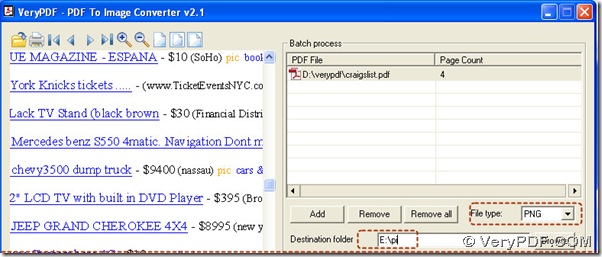
Step3. Choose your objective format: click the edit-box of “File type”>choose PNG in it.

Step4. Set a objective folder, it is used for placing your png: input a folder location in the edit-box of “Destination folder”.

快照170

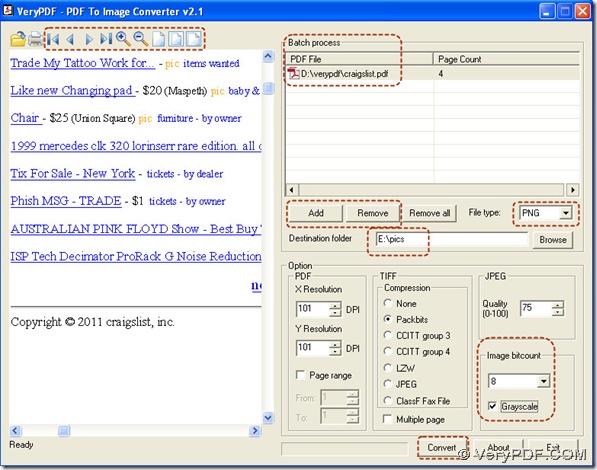
Step5. To set a grayscale mode in PDF To Image Converter v2.1, we need to mention what is grayscale: Grayscale images are composed exclusively of shades of gray between the weakest black and the strongest white. Grayscale is usually stored with 8 bit per pixel and could contain 256 different intensities. Grayscale mode is simple for programming cause in a grayscale image the value of each pixel is a single sample.

So here in the edit-box of “Image bitcount”, choose 8> click the check-box of “Grayscale”, this will guarantee your image is a grayscale png.

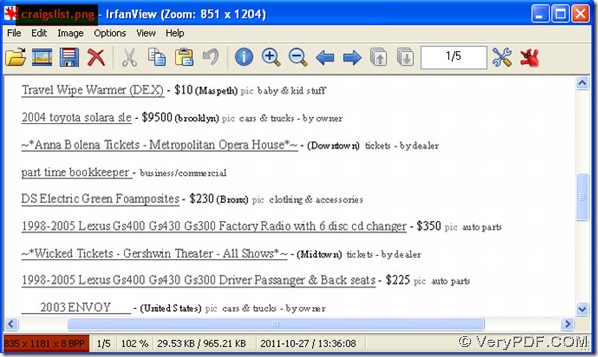
Step6. Process your pdf via clicking “Convert” button, then your grayscale png will be in destination folder, by now your converting pdf to png is complete, at last shut down your PDF To Image Converter v2.1.

快照171

快照172

VN:F [1.9.20_1166]
Rating: 0.0/10 (0 votes cast)
VN:F [1.9.20_1166]
Rating: 0 (from 0 votes)
docprint pro

How to change watermark content in docPrint preview application?

People usually use passwords and watermarks to protect their documents. Both methods have their advantages. To cite watermarks as an instance, if a publisher adds a watermark on each page of his  documents, it would be very hard for others to abuse the content of the documents.

VeryPDF supports users to add and edit watermarks on documents in docPrint preview application. In the preview application, you can change the watermark content, change the color  of watermarks, etc.. To download VeryPDF docPrint or get the latest information about VeryPDF docPrint,  please visit https://www.verypdf.com/artprint/index.html. In the following part of the article, I would like to show you how to change watermark content on documents like a PDF file.

Skip to step  4, if you are in the Watermark Options dialog box; otherwise, you’d better start from step 1.

Step 1: Open the document.

Since in this article, we take a PDF file as an example,  we should open the PDF file in Adobe. For another instance, if your document is a Word or an Excel, you can use MS Office to open it.

Step 2: Run docPrint

Press Ctrl+P, then a Print dialog box will pops out> select docPrint as the printer in the Print dialog box > press OK  to run docPrint dialog box.

Step 3: Open the Option Settings dialog box

Normally, you  can just skip to the next step, because when you open the docPrint dialog box, the Option Settings dialog box will appear on the computer screen at the same time. However, in case you don’t know how to open the Option Settings dialog box again after you close the Option Settings dialog box during the process, I would like to introduce how to open  the Option Settings dialog box here: click  View > Show/Hide Options to open the Option Settings dialog box .

Step 4 Change watermark content

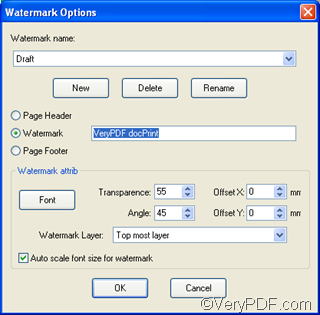
There are two ways to change watermark content on your document: you can select an option in the Watermark combo box in the Option Settings dialog box, or type the content you like in the edit box in the Font dialog box.

4.1 Select watermark content options 

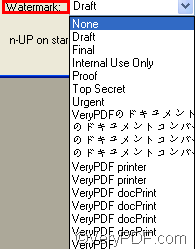
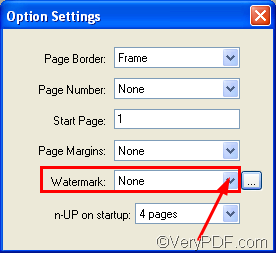
In the Option Settings dialog box , when you click the arrow on the Watermark combo box, a menu will appear on the screen.  As you can see on the menu as illustrated as following, there are some default watermark content listed. You can choose anyone to add on the document. 
image

image

4.2 Type a watermark

4.2.1 Open the Watermark Options dialog box

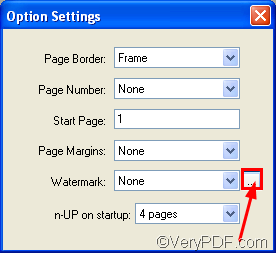
Click the button on the right of the Watermark combo box to open the Watermark Options dialog box, where you can change the content, color, size of watermarks. 
image

image

4.2.2  Change the watermark content 

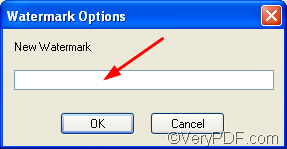
Click the New button in the Watermark Options dialog box to open the little dialog box as illustrated below>  type the content in the edit box> click OK  to close the little dialog box.
image  

4.2.3 Change the watermark color

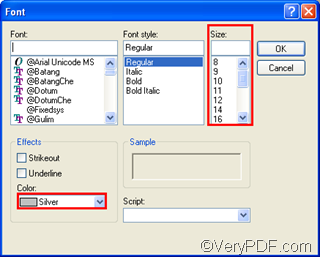
Click the Font button in the Watermark Options dialog box to open the Font dialog box> select red as the watermark color in the Color combo box> select 72 as the watermark size in the Size combo box.>OK in the Font dialog box > OK in the Watermark Options dialog box
image

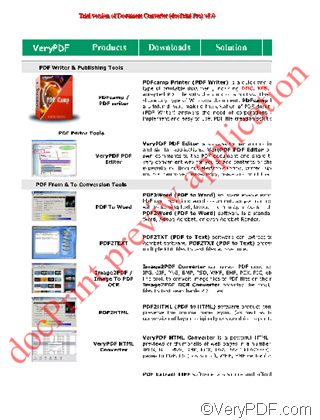
Step 5 view the effect of the watermark content change

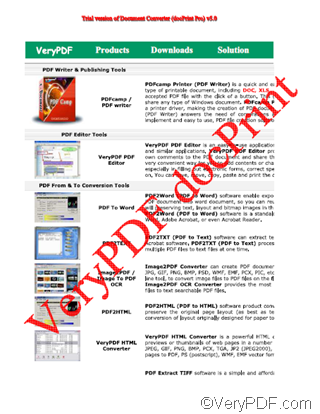
Before:
image

After:

image

VN:F [1.9.20_1166]
Rating: 0.0/10 (0 votes cast)
VN:F [1.9.20_1166]
Rating: 0 (from 0 votes)