docprint pro

How can I add lines on pages in docPrint preview application?

You can use the “Add Comments on Current Page”  option to add  lines, and text comments on the pages of documents in Verypdf docPrint preview application. You can add lines and lines with open arrows as well as close arrows on the pages. Moreover, you can change the color, style, and opacity of the lines.

This article will show you how to add various lines on pages in Verypdf docPrint preview application.

1 Open the selected document.

2 Run Verypdf docPrint preview application

Press “Ctrl+P” >select docPrint as the printer in the “Print” dialog box >press OK to run the VeryPDF docPrint preview application

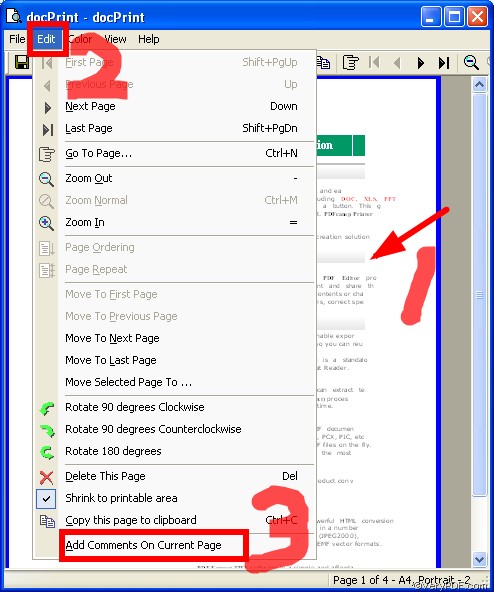
3 Open the “Annotated document” dialog box

Click the selected page >Click  “Edit” on the “docPrint” dialog box >Click  “Add Comments on Current Page” on the drop down menu to open the“Annotated document”dialog box

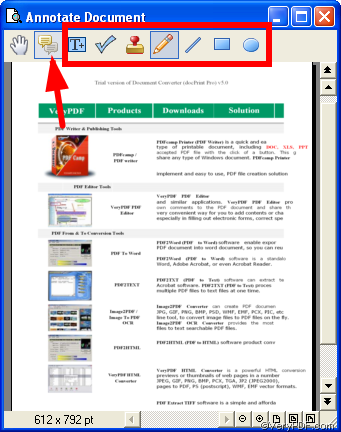
4 Trigger the comment buttons on the “Annotated document”dialog box

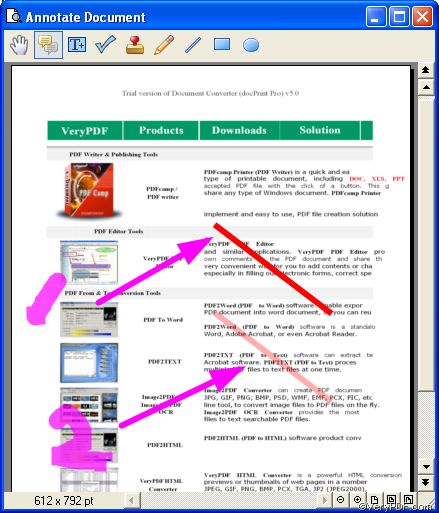
The following screen shot illustrates the “Annotated document” dialog box, where there are nine buttons marked by green rectangle. Seven of those buttons are gray, which are marked by a red rectangle. The grey buttons are comment buttons.

image

In order to trigger the comment buttons, you should click the second button image . Then  the following seven buttons image turn to be  colorful. It means you can use them to add comment now. The third button from the backimage   enables you to add lines to mark the important content on the page. Then let me show you how to add different lines on the page:

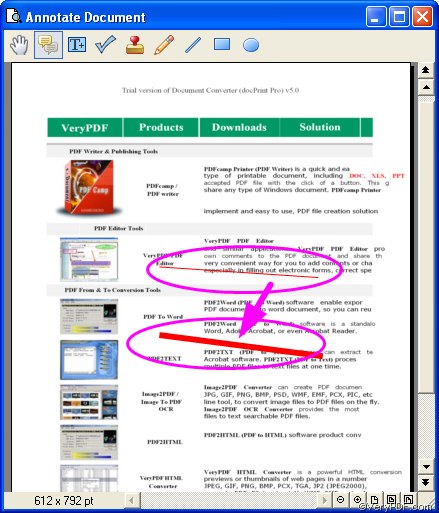
4.1    Add  pure line on page

Click image >with press the left mouse key down,  drag a line on the page.

4.2 add bold line on page

Repeat 4.1>select one line>right click this line>choose  “Properties” to open the “Properties” dialog box>select the proper number as the “Thickness”,  e.g., 12.>Click “Close” to close the “Properties” dialog box.

image 

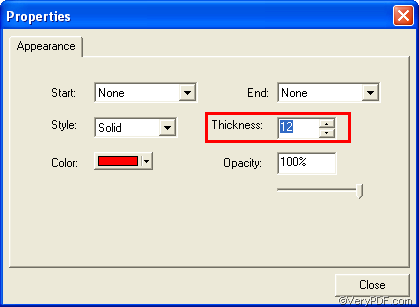
Then you will see a bold line on the page. The following screen shot shows the comparison between the original line with the thickness set as “1” by default and the bold one with the thickness specified as “12’.

image

4.3 Change the color of line

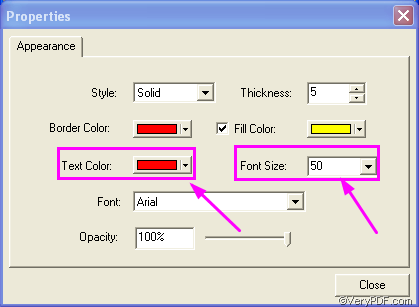
repeat 4.2 to draw a new bold line>right click this line>choose  “Properties” to open the “Properties” dialog box>select the color you like as the “Color” of the line,  e.g., green.>Click “Close” to close the “Properties” dialog box.

image

Then you will find a green bold line appear on the page

image

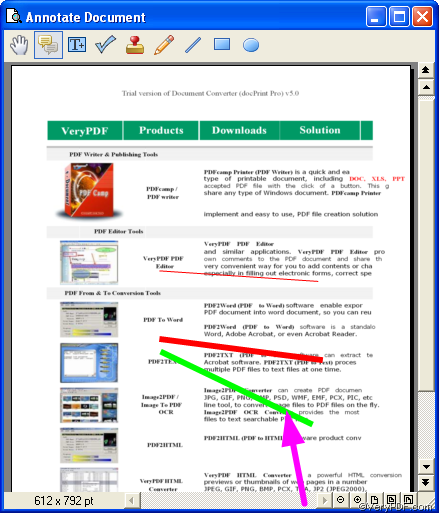
4.4 Add arrow on the line

You can add arrows including open arrow and closed arrow at the start point as well as the end point of a line.

Repeat 4.4  or copy and paste the green line to create a new green line> >right click this line>choose  “Properties” to open the “Properties” dialog box>specify “Open Arrow” as the “Start” >specify “Closed Arrow” as “End”>Click “Close” to close the “Properties” dialog box.

image

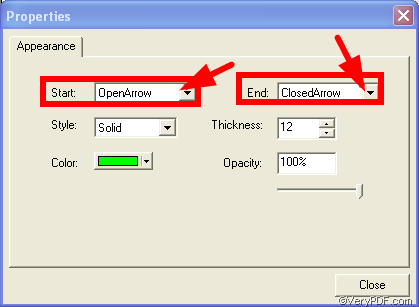
As you can see on the following screen shot, the marked line with arrows are the new created one. the arrow on the left is open arrow, while the arrow on the right is closed arrow. You can also use this method to create a line with only one arrow. 

image

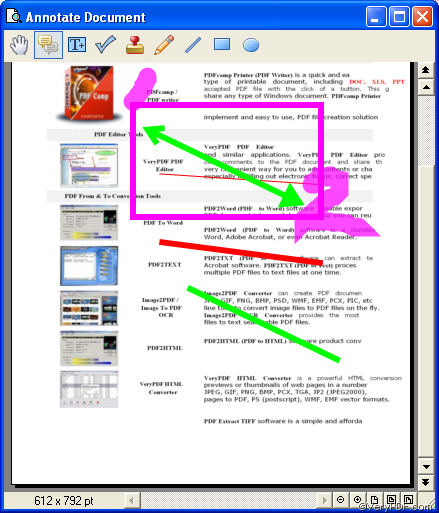
4.4 Change the opacity of line

Repeat 4.2 to create two  new lines>select the second line>right click this line>choose  “Properties” to open the “Properties” dialog box>change “Opacity to 52%>click “Close” to close the “Properties” dialog box.


image

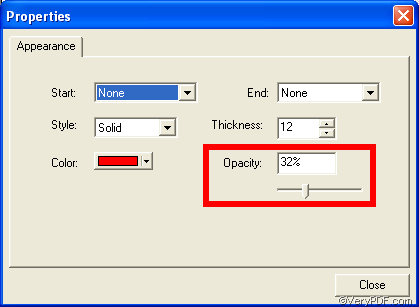
Then, compare the two lines on the page. the second one whose opacity is “32%” is transparent,  while the first one whose opacity is 100%  is opaque.

image 

This article only introduced a part of how to add comments on pages. To read more articles on VeryPDF docPrint, please go to visit  https://www.verypdf.com/wordpress

VN:F [1.9.20_1166]
Rating: 0.0/10 (0 votes cast)
VN:F [1.9.20_1166]
Rating: 0 (from 0 votes)
pdf to image converter

Besides converting pdf to jpg and bmp format, what about converting other image format? Cause we would like to convert pdf to wmf files.

Yes, PDF To Image Converter can convert pdf to wmf files easily like converting pdf into jpg and bmp format.

And WMF is a vector image file format. Proprietary Windows graphic format was developed by Microsoft; it contains a series of drawing operations, including commands for drawing lines, circles, and rectangles, which may also contain bitmap drawing operations and is used primarily for vector images, but can also include raster graphics.

You can operate this process with our following instruction.

1. Add your PDF file into the table of “PDF File” by clicking “Add” button and click open to get its preview in different angles with using the icons above its preview area.

2. To remove that route of your PDF in PDF To Image Converter v2.1, press down “Remove”/ “Remove all” button and repeat step1.

3. With the operation in last two steps, you can notice that 2 is under “Page Count” title, click “Page range” and set 2 in “From” that is same as “To”, which will lead to the 2nd page of your PDF file converted in PDF To Image Converter v2.1.

4. For “DPI”, “Quality” and “Image bitcount”, you should take their default setting in PDF To Image Converter v2.1 for WMF is a vector format image, however those options are just for improving dimension(also functional in vector images) with size, deepening color and clearness for raster images.

5. Other option such as “Compression” and “Multiple page” should be set in default mode for WMF do not support multiple pages in one file.

6. Click “Convert” button to convert pdf to wmf and shut down PDF To Image Converter v2.1.

WMF

If you want to buy PDF To Image Converter v2.1, click here: https://www.verypdf.com/pdf2tif/index.htm#dl, experience it with downloading here: https://www.verypdf.com/pdf2tif/pdf2image.exe.

Thank you for correcting it.

VN:F [1.9.20_1166]
Rating: 0.0/10 (0 votes cast)
VN:F [1.9.20_1166]
Rating: 0 (from 0 votes)
pdf editor

If I want to stamp a symbol as a comment, how can I do by use of VeryPDF PDF Editor?

In VeryPDF PDF Editor there is a function called PDF Annotation where you can find symbol signs. Next the article says the detail.

Download VeryPDF PDF Editor at www.verypdf.com, then open the software and add a PDF file to it, for all the function of VeryPDF PDF Editor is enabled when PDF files added. Next operation see the illustration below:

image

image

Then in the illustration choose symbol:

image

Double-click a symbol, then it’s added to the PDF file, so in the symbol box choose a desired symbol, there are 189 symbol signs including many universal symbols. Now the article supposes that No.23 of the 189 symbols is the aim, so double-click it, thus it’s added. Below is the illustration:

image

image

Double-click the symbol that now has been existed in the PDF file, then a window pops out where you can edit a comment about the symbol. Look at the illustration:

image

The symbol can be magnified or reduced and altered for a different location, the window can be concealed and its color and size also be changed.

VN:F [1.9.20_1166]
Rating: 0.0/10 (0 votes cast)
VN:F [1.9.20_1166]
Rating: 0 (from 0 votes)
docprint pro

How to use "Add Comments on Current Page" option in docPrint preview application?

The option the “Add Comments on Current Page”  enables you to add text comments, line, rectangle, annotation, etc. on the pages of the documents you want to print via VeryPDF docPrint. When you want to add some comments or annotation on a document, you can do as following:

1 Open the document you want to print. Here we use a Word document as an example.

2 Press “Ctrl+P” to open the “Print” dialog box>select VeryPDF docPrint as the printer here, and also select  range, etc in this box. >press OK to run the VeryPDF docPrint preview application

3 Click on the page you want to add comments> “Edit”> “Add Comments on Current Page” to open the dialog box titled “Annotated document”

 image

4 The following screen shot illustrates the “Annotated document” dialog box, where you can add various comments to the page.

image

As you can see, there are nine buttons listed on the tool tab.

In order to trigger the comment buttons, you should at first click the second button image. Then image the seven comment buttons following the second button  turn to be more colorful, which means all of them can be used. You can use them to

4.1 image   Add text comments on the page

Click this button>press the left key of the mouse down and drag a textbox>double click on the textbox> type words and sentences into the textbox. Moreover, if you want to change the color and size of the words you can

Right click on the textbox>choose “Properties” to open the “Properties” dialog box.

 image

>select the color you like as the “Font Color” , e. g., red, and select the proper number as the “Font Size”, e.g., 50 .

image 

>Click “Close” to close the “Properties” dialog box. Then the text comment will appear on the original page. The following screen shot shows the effect of the text comment.

image

4.2 image  Add icons on the page

You can add fifteen kinds of icons like comment, cross, and key icons on the page.  The comment icon is the default icon, so, when you click image, a comment icon will appear on the page. Then you can drag this icon wherever you like on the page. To change the comment icon to a key icon, you can do as follows:

Click on the comment icon, then the color of it will turn to be black>right click with the mouse>choose “Properties” on the drop down menu pops out to open the “Properties” dialog box>click the arrow beside the “Icon” combo box to drop down the menu>choose “Key” as the  icon>click “Close” to close the “Properties” dialog box

image

Then the selected comment icon  will become a key-like icon.

image

4.3 image Add image as comment

4.4 image Add Pencil comment. You can draw on the page like draw with a pencil.

4.5  imageAdd lines to mark the important content on the page.

4.6 imageAdd rectangle on the page

4.7 image Add ellipse on the page.

Click image, to stop adding comments on the page, and you can drag and view parts of this page.

5 After you add the comments, close the “Annotated document” dialog box.

This article only introduced only parts of the usages of the “Add Comments on Current Page” option. To get more information, you can read more articles at https://www.verypdf.com/wordpress

VN:F [1.9.20_1166]
Rating: 0.0/10 (0 votes cast)
VN:F [1.9.20_1166]
Rating: 0 (from 0 votes)
pdf to image converter

Can we convert PDF to JPG with good quality without enlarging DPI?

Well, we must recommend you to use PDF To Image Converter v2.1 to get your purpose. PDF To Image Converter v2.1 is a great converting tool converting PDF to JPG and other format image including raster and vector format image. You can try PDF To Image Converter v2.1 here: https://www.verypdf.com/pdf2tif/pdf2image.exe, we have a confidence that you will buy PDF To Image Converter v2.1, here is the purchase link: https://www.verypdf.com/pdf2tif/index.htm#dl.

For JPG:

JPEG - Joint Photographic Experts Group. JPG is JPEG file extension(. JPG), pronounced Jay Peg. This is the right format for those photo images which must be very small files, for example, for web sites or for email. However, this fantastic compression efficiency comes with a high price. JPG uses lossy compression (lossy meaning "with losses to quality"). Lossy means that some image quality is lost when the JPG data is compressed and saved, and this quality can never be recovered.

How to convert PDF to JPG without enlarging DPI to get qualified JPG in PDF To Image Converter v2.1? You will get this answer soon.

1. Click “Add” button to get your PDF file appear under “PDF File” and click this route again to get preview operation in PDF To Image Converter v2.1.

2. To preview your PDF file without error, click adjusting icons above it like 快照28 .

3. After previewing it, you can print your PDF file with using print if you would like.

4. Choose JPG in “File type” and select a folder in “Destination folder” for your JPG file.

5. Maintain “Page range” and “DPI” unchanged and hidden separately in their optional menus, which will guarantee your JPG(s) with the same pages and the same dimension as your PDF file.

6. Select “None” in “Compression” and keep “Auto” in “Image bitcount” menu.

7. Move your eyes onto “JPEG” field and you will see in “Quality”option, 75 is exist there, and all we should do is to change 75 into 100( or the value between 1 and 100), this will make your JPG file more clear with deepen color and bigger than the one on 75 in size without any dimension changed.

8. Convert PDF to JPG in PDF To Image Converter v2.1 by pressing down “Convert” button.

quality1

Thank you for rectifying this article on how to convert PDF to JPG with good quality without enlarging DPI in PDF To Image Converter v2.1.

VN:F [1.9.20_1166]
Rating: 10.0/10 (2 votes cast)
VN:F [1.9.20_1166]
Rating: 0 (from 0 votes)