Thanks for your support for image2pdf. I will show you how to add the files from scanner to image2pdf.
Maybe you have downloaded image2pdf successfully, but for other guys to use this software in the future, I will show the link one more time. https://www.verypdf.com/tif2pdf/tif2pdf.htm#dl
- When you click “Download”, there will bounce a package “image2pdf.exe”, please save it, unzip it and let it run in your computer. Then you can use it to convert nearly all kinds of formats pictures to PDF file.
- Connect your scanner with computer first then open image2pdf software.
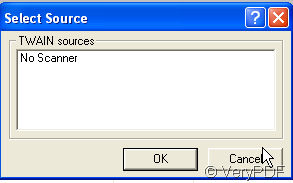
- Click “File” on the top of the interface of image2pdf then go to “Select source” you will see a interface like the following picture . If you do not connect the PC with the scanner successfully, image2pdf can not detect the scanner.If you do successfully, you can choose to add it here, then click “OK” to finish the setting.
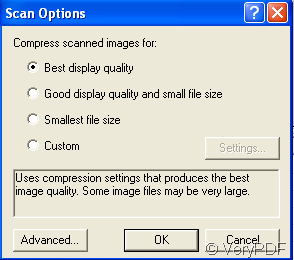
- After you add the files from scanner successfully, then please choose how to compress your scanned images. If you do not want to set it, image2pdf will compress automatically. Please click “File” again then go to “Set Scanner Option” this time, there will bounce a new menu label like the picture shows. You can choose to compress your scanned image for best quality or for smallest size or an eclectic selection between this two options. If you like, you can set your own quest for compressing at “Custom”. Then click “OK” to finish this menu setting.
- Please set the restrictive conditions for your PDF file. Say you want to convert all the scanned document into a PDF file or into separate PDF file, you can also add them to an existed PDF file. Say you want to set a high level for your newly produced PDF file. Please click “Setting”, then you will see the menu label. Here you can finish setting restrictive conditions. There are still many options, you can check it one by one then set it as you wish.

- Once you finish the setting, please click “Making PDF” to finish the setting. Name the newly produced PDF files and save it in a folder. You can also appoint a folder to save the converted scanned images in advance at “save mode” label. Then the PDF files will show up in that folder.