People may take it for granted that VeryPDF HTML Converter Command Line is just a HTML converter which can only convert web pages to files in formats like PDF,WMF and PS. As a matter of fact, it is a very powerful document converter, which can also be used to convert multiple documents like convert from EMF to BMP, EMF to JP2, and EMF to PNG. With regard to bit depth, it is also known as color depth. Bit depth can be used to present the number of colors that are available in an image's color palette in terms of the number of 0's and 1's, or bits, which are used to specify each color. VeryPDF HTML Converter Command Line is available at https://www.verypdf.com/htmltools/index.html#dl , you can free download it and try it yourself.
This article aims to introduce how to set bit depth and convert EMF to BMP via a command line. And the following command is very important: -bitcount <int>, which can be used to set bit depth.
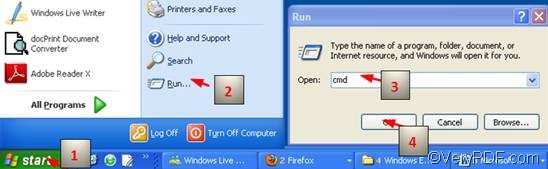
1. Run the command prompt window
The most commonly used method to run the command prompt window requires four steps: click “Start” to make the home menu appear on the computer screen; > click “Run” on the home menu to open the “Run” dialog box; > enter “cmd” in the “Run” dialog box;>click on “OK” in the “Run” dialog box. The black and white command window will appear on the screen without delay.
2. Enter a command line
For setting bit depth and converting EMF to BMP, the command line should contain four factors: the command mentioned and three files. Please take a look at the following pattern:
htmltools -bitcount <int> <EMF file> <BMP file>
- htmltools refers to the executable file, whose name is htmltools.exe, which is included in the folder titled htmltools in your computer by default.
- -bitcount <int> is the command that can be used to set bit depth. -bitcount is the parameter and<int> is the parameter value. int stands for integer, and here 1, 8 and 24 are permitted to be parameter values. The Angle brackets, which are used to mark essential contents, seldom appear in the command prompt window.
- <EMF file> stands for the input file in EMF format.
- <BMP file> represents the output file in BMP format.
Pay attention, when you enter a command line in the command prompt window, you must enter the whole directories of the executable file, instead of only their names. Taking the following command line as an example,
D:\htmltools\htmltools.exe -bitcount 24 D:\in\bird.emf D:\out\bird.bmp
In this command line, the whole directories of the executable file, the input file and the output file, but not the bare names of the three files appear in the command line. You can also replace the directories the executable file, the input file and the output file in the example with the real directory of the executable file, the input file and the output file in your computer, depending where you store them.
- D:\htmltools\htmltools.exe is the directory of the executable file htmltools.exe, which is placed in the folder called htmltools on disc D.
- -bitcount 24 represents the command which specifies 24-bit as the bit depth for the output file converted from EMF to BMP. You can replace 24 with either 1 or 8.The higher the bit depth, the more the colors appear in the image, if it is necessary.
- D:\in\bird.emf is the directory of the input EMF file. It indicates that the input file named bird is in the folder in on disk D.
- D:\out\bird.bmp represents the directory of the output file. It specifies BMP as the format of the output file, names the output file bird, and indicates to export the output file in the folder named out on disk D.
3. Press “Enter”
Press “Enter” on the keyboard, and you can check the results right away. The following images are the original EMF file, and the files converted from EMF to BMP.
The original EMF file

1-bit BMP file

8-bit BMP file

24-bit BMP file