VeryPDF HTML Converter is a wonderful solution to be setup on web-servers, used from service, launched within other programs from the command line. With the help of VeryPDF HTML Converter Command Line, you can easily, correctly can quickly convert EMF to PNM file and other files like PDF, PS (Postscript), TIF, TIFF, JPG, and JPEG. VeryPDF HTML Converter Command Line is available at the following website https://www.verypdf.com/htmltools/htmltools.zip .
The rest part of this article will take three steps to introduce a method to set color depth and convert EMF to PNM via a command line. And the following command -bitcount <int> which can be used to set color depth, is totally worthy of your attention.
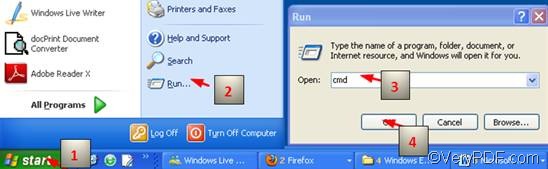
1. Run the command prompt window
The most commonly used way to run the command prompt window requires four steps: click “Start” > click “Run” > enter “cmd” in the “Open” edit box in the “Run” dialog box that pops out; >click on “OK”. When the black and white command window appears on the computer screen, you can proceed to the next step.
2. Type a command line
If you want to set color depth and convert EMF to PNM, you should type a command line which consists of one command and three files, as illustrated in the following pattern:
htmltools -bitcount <int> <EMF file> <PNM file>
- htmltools rerpesents the executable file, htmltools.exe in the folder titled htmltools in your computer.
- -bitcount <int> is the command that can be used to set color depth. int stands for integer. Here, you can select one from the three numbers 1, 8 and 24 as the parameter value. The Angle brackets are used to mark the essential contents, but they seldom appear in the command prompt window.
- <EMF file> stands for the input file in EMF format.
- <PNM file> represents the file converted from EMF to PNM.
As a matter of fact, in the command prompt window, the directories of the executable file, the original file and the output file must appear, instead of their names. In an other word, you should seldom type only the name in the command prompt; in stead, you type the whole directory of a file. Take the following command line as an example,
D:\htmltools\htmltools.exe -bitcount 24 D:\in\bu.emf D:\out\bu.pnm
In the command line above, the whole directories of the executable file, the input file and the output file are listed instead of their bare names. Moreover, these directories can be replaced by the directories of the executable file, the input file and output file in your computer respectively, depending on your priorities.
- D:\htmltools\htmltools.exe is the directory of the executable file htmltools.exe, which is in the folder called htmltools on disc D.
- -bitcount 24 represents the command which specifies 24-bit as the color depth for the output image file converted from EMF to PNM. The number can be replaced by either 1 or 8.The higher the color depth, the more colors appear in the image. You can view the effect of the output files later.
- D:\in\bu.emf is the directory of the input EMF file. It leads the computer to find the input file named bu in the folder in on disk D.
- D:\out\bu.pnm represents the directory of the output file. It specifies PNM as the format of the output file, names the output file as bu, and indicates to export the output file in the folder named Out on disk D.
3. Press “Enter”
Press “Enter” on the keyboard, and you can check the effect of conversion from EMF to PNM right away. The following can show you the original EMF file, and the files converted from EMF to PNM.
The original EMF file

1-bit PNM file

8-bit PNM file

24-bit PNM file
![]()
![]()
