It will be a good idea to choose docPrint Document Converter Professional as your helper when you convert document of Microsoft word to xbm. XBM images are compiled by a C compiler instead of an image program. They are used for storing icon and cursor bitmaps for X11.
docPrint Document Converter Professional is a software product that dynamically converts MS Office 97/2000/XP/2003/2007, WordPerfect, AutoCAD DWG, PostScript, Adobe Acrobat PDF and many other document types to Adobe Acrobat PDF, PostScript, EPS, XPS, PCL, JPEG, TIFF, PNG, PCX, EMF, WMF, GIF, TGA, PIC, PCD and BMP etc formats. With docPrint Document Converter Professional you can convert your documents from and to 50+ formats easily. XBM is one of supported output format in docPrint Document Converter Professional. So converting word to xbm is a piece of cake to docPrint Document Converter Professional.
There are three applications in docPrint Document Converter Professional, GUI application, command line application and virtual printer. They can realize the functions respectively, but more or less the same. The virtual printer—docPrint will be introduced in this article. It is not only a virtual printer, but also a powerful document printer which can convert word to xbm in a short time only via some easy clicks.
Please download docPrint Document Converter Professional at https://www.verypdf.com/artprint/docprint_pro_setup.exe if you want to use docPrint. After installing it on your computer, you are able to use the virtual printer by printing the word document to the printer.
The first step is to run the printer driver on your computer. You can open a word document and click “File”—“Print” or use the hot key “Ctrl”+ “P” to open “Print” dialog box in which you can choose the current printer as “docPrint” in “Name” combo box. Then click “OK” button. If docPrint is the default printer, you can right click on the word document and choose “Print” option to run docPrint instead of opening the file and “Print” dialog box.
The second step is to open “Save As” dialog box in “docPrint” dialog box showed in Figure1. You can take the following ways to open “Save As” dialog box. The first one is clicking “File” and clicking “Save as” in dropdown list. The second one is clicking the icon which looks like a floppy disk in the toolbar. The third one is using the hot key “Ctrl”+ “S”.
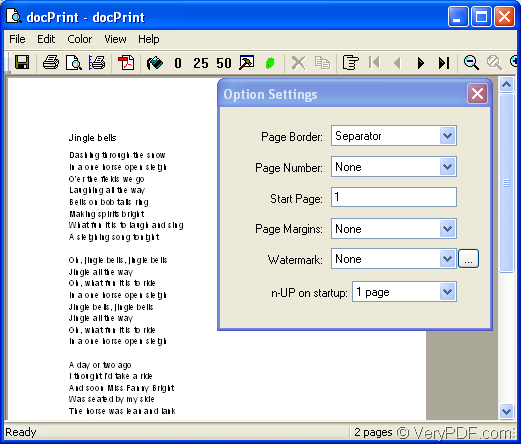
Figure1.
The last step in the conversion of word to xbm is making some changes and saving your target file in “Save As” dialog box showed in Figure2. You should find a location for your target file in “Save in” combo box such as “Local Disk (C)”. Then edit a name for the target file in “File name” edit box such as “tintin”. In “Save as type” combo box, please choose the right file type for the target file, here you should select “XBM File(*.XBM)”. Then click “Save” button to run the conversion.
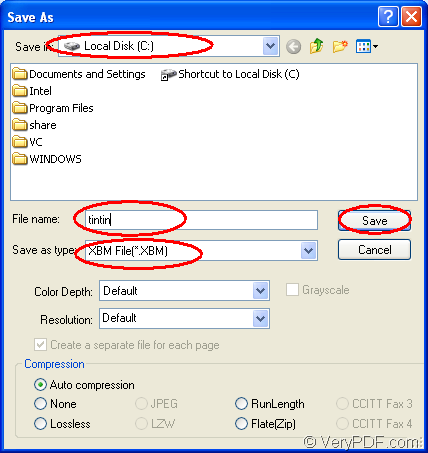
Figure2.
You can get your target file in no more than 10 seconds. The whole conversion process will cost you no more than 2 minutes because it is easy enough as you see. If you want to know more things about docPrint, please visit https://www.verypdf.com/artprint/index.html.