With the help of docPrint which is one application of docPrint Document Converter Professional, you can convert OpenOffice of odt to dcx easily within three steps. DCX is the index used by a FoxPro database, which improves the efficiency of searching and sorting items in the database.
Please see the introduction to docPrint here. docPrint is a Windows printer driver. It supports to scale the page size to various kinds. It also can print many pages in one sheet, which can save paper and ink effectively.
docPrint is also a document converter which can convert any printable documents to many kinds of image formats. To use docPrint, you just need to print the printable document to docPrint.
You should download docPrint Document Converter Professional at https://www.verypdf.com/artprint/docprint_pro_setup.exe for smoothly using docPrint. Please see the steps about converting odt to dcx in the following contents.
- Print ODT document to docPrint (There are two situations)
- If docPrint is the default printer in your computer, you should right click the ODT document and choose “Print” option to directly run docPrint.
- On the contrary, you should open the ODT document in OpenOffice and click “File”—“Print” or use the hot key “Ctrl”+ “P” to open the “Print” dialog box. In the dialog box, you will see a Tab Control which contains four Tabs on the right. In “General” Tab, you should choose “docPrint” as the current printer in “Printer” group box and click “Print” button.
- Open “Save As” dialog box (There are three methods offered)
- For saving odt to dcx, you should open the “Save As” dialog box in the popup docPrint main window. You can click “File”—“Save as”.
- Click the “Save File” button which looks like a floppy disk in the toolbar.
- Use the hot key “Ctrl”+ “S” to help you.
- Save the target files (There are four operations)
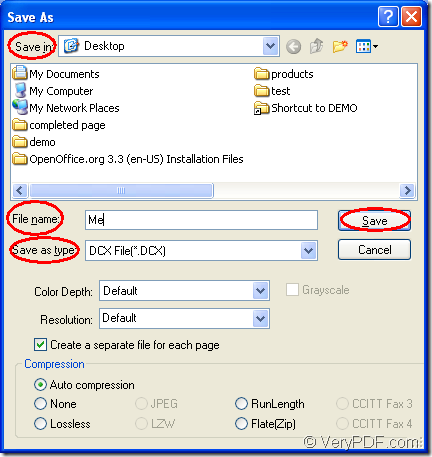
- Please find a location for the output file in “Save in” combo box.
- Input a good name for the output file in “File name” edit box.
- Ensure the output format for the output file in “Save as type” combo box.
- Click “Save” button.
The “Save As” dialog box in Figure1 enables you to learn the last step better.
Figure1.
You will get the target file in the specified location when the conversion from odt to dcx is over. Please browse it with some kind of image editing or viewing program such as IrfanView, Photoshop. For the purpose of getting more information of docPrint, you can click here.
