The professional document converter docPrint Document Converter Professional supports to convert OpenOffice document of odt to pcd with only some easy clicks because docPrint Document Converter Professional is a such application which is able to convert any printable documents to various image formats.
For your better understanding docPrint Document Converter Professional which is also called as docPrint Pro for short, here are some introductions to the application. docPrint Pro is an expert in converting printable documents such as MS Excel, Word, PowerPoint, PDF, OpenOffice, etc. to image formats such as GIF, BMP, TIFF, MNG, JPG, etc. docPrint Pro contains three applications which are designed for different purposes.
If you want to do a batch conversion, you can choose the GUI version of docPrint Pro. If you want to develop software, you can choose the command line version. If you want to combine many pages to one page when printing the documents, please use the virtual printer version. In addition, the virtual printer is also able to act as a document converter which has a friendly and clear interface. In this article, you will see how to convert odt to pcd with the virtual printer docPrint.
After you download docPrint Pro at https://www.verypdf.com/artprint/docprint_pro_setup.exe and install it on your computer, you can see docPrint in the printer list by clicking “Start”—“Printers and Faxes”. The following contents are the steps to convert odt to pcd.
Please open the ODT document in OpenOffice and click “File”—“Print” to open “Print” dialog box. Then you should choose “docPrint” as current printer in “Printer” combo box and click on “Print” button to close the dialog box and continue the work. You can also use the hot key “Ctrl”+ “P” to open “Print” dialog box.
The next step is to open the “Save As” dialog box in the popup “docPrint” window. There are three supplied methods in this article for you to open “Save As” dialog box. The first one is to click “File” and click “Save as” in the dropdown list. The second one is to click the “Save File” button which seems like a floppy disk. The third one is to use the hot key “Ctrl”+ “S” on the keyboard.
The last step in the conversion from odt to pcd is to save target file in “Save As” dialog box. You should choose the location for the target file in “Save in” combo box, edit the name for the target file in “File name” edit box, choose the right output format for the target file in “Save as type” combo box and click “Save” button to save all the changes. Please see the “Save As” dialog box in Figure1.
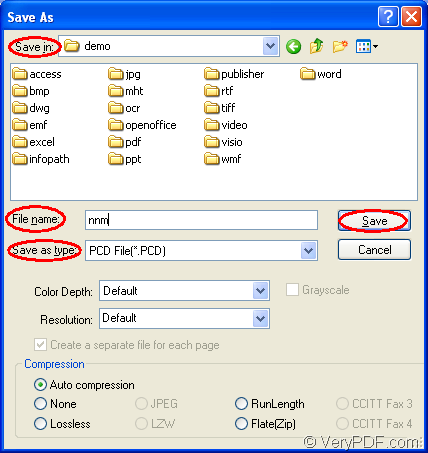
Figure1.
Then you will see a green progress bar at the bottom of docPrint window and the progress bar will disappear when the conversion is over. You can find the target file in the specified location several seconds later.