Sometime you may have such needs that you need to convert multipage page PDF to one image like Png file. However, we know that png image file format can not be used to show multipage .png files in one file. So here is one method for you to choose, you can stitch many pages PDF file in one page PDF and then convert this big page PDF file to image. If you feel this method is available, please read the following content.
When stitch PDF, maybe you can have a free trial of this software: VeryPDF PDF Stitcher, by which you can stitch multiple PDF pages into one PDF page no matter under Mac or Window system. When converting PDF to image, please use this software VeryPDF PDF to Image Converter, by which you can convert PDF to image quite easily. In the following part, I will show you how to use this software.
Step 1. Stitch multipage PDF into one page PDF.
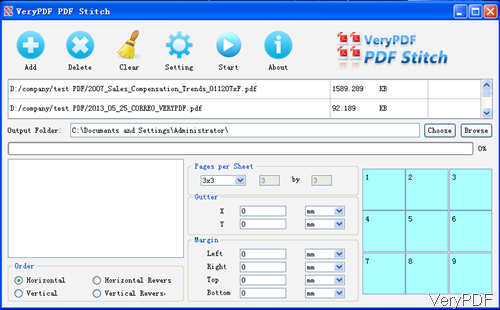
- Download PDF Stitcher. When downloading finishes, there will be an exe file. Please install this software by double clicking the exe file till show cut icon showing up on desktop. Simply click it then you can launch this software. The following snapshot is from the software interface, please have a check.
- Please click button Add to add PDF files to software interface. Click option Choose the specify the output folder. In the bottom part, you can choose pages per sheet, the gutter space and specify margins of the output PDF.
- In order part, you can choose how to arrange page order about how to pages arranged in big page PDF.
- Click button Setting, then you can specify output PDF page size, lines and others.
- When you finish setting, please click button Start to run the conversion. A few seconds later, you can check the stitch PDF in output folder.
Step 2. Convert big page PDF to Png image file.
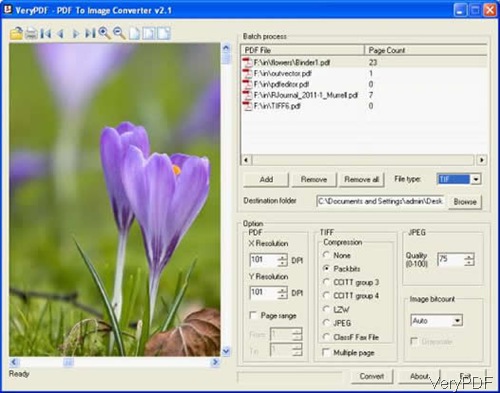
- Free download PDF to Image Converter and install this software by the same way as the above software. The following snapshot is from the PDF to image, please have a check.
- In the file type part, please set the output image format as png. Click button Add to add PDF file to software interface.
- In the bottom setting menu part, you can specify image bitcount, resolution in X and Y directions.
- Click button Browse to specify the output folder to save output image files.
- When you finish setting part, please click button Convert to run the conversion. A few seconds later, you can check the output image png file in specified output folder.
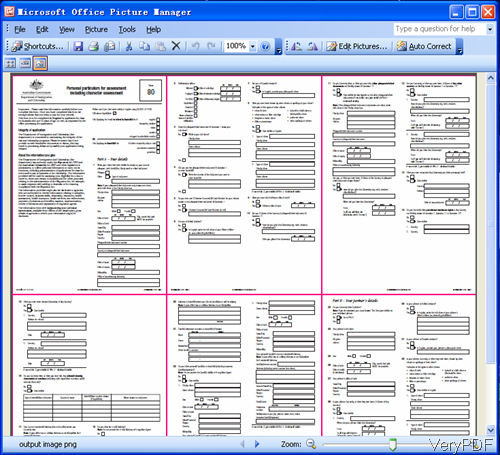
Now let us check the output image effect from the following snapshot. During the using, if you have any question, please contact us as soon as possible.


