docPrint Document Converter Professional enables users to convert MS Office Excel document of xls to emf or xlsx to emf only by some easy clicks. In this article you will see there are only three steps in the conversion from xls to emf with one application of docPrint Document Converter Professional which is also called as docPrint Pro. Before that, let’s learn something about docPrint Pro together.
docPrint Pro is a software product which can convert any printable documents to many kinds of graphics such as xls to emf. The input format include: MS Office Word, Excel, PowerPoint, OpenOffice, PDF, etc. The output format contains: TIF, PNM, PDF, GIF, JPG, BMP, MNG, PNG, etc. It works in GUI version, Command Line version and virtual printer version.
The GUI version can be taken in batch conversion, the command line version is often used by many software developers while the virtual printer is a good helper in saving paper and ink when you print documents. In addition, the virtual printer docPrint is also a powerful document converter which can convert xls to emf easily within three steps. For the purpose of using docPrint, you should download docPrint Pro at https://www.verypdf.com/artprint/docprint_pro_setup.exe first and install it on your computer. Please see the steps about this conversion below.
- To run the printer driver is the first step. You should click “File”—“Print” to open “Print” dialog box in an opened Excel document. Then please choose “docPrint” as the current printer in “Printer” combo box and click “Print” button. The hot key “Ctrl”+ “P” also allows you to open “Print” dialog box. If you have set docPrint as default printer in the end of the installation of docPrint Pro, the work will be easier. You just need to right click the Excel document and click “Print” to run docPrint directly.
- The second step is to open “Save As” dialog box in the docPrint main window form. After the fist step, you can see the window form of docPrint on the screen at once. There are some buttons in the toolbar and a small dialog box on the right. If you want to convert xls to emf without setting any other parameters, please open “Save As” dialog box with one of the given ways. You can click “File” and click “Save as” in the dropdown list. You can also use the “Save File” button in the toolbar. The hot key “Ctrl”+ “S” is OK, too.
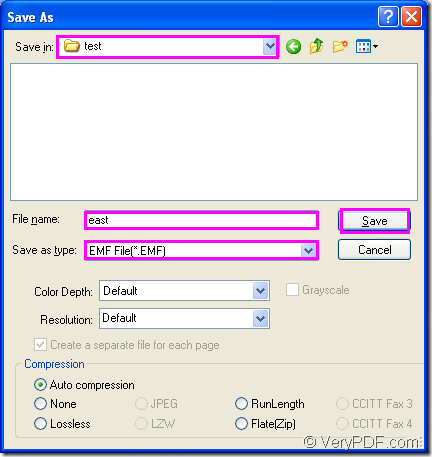
- The last step is to save the target files in “Save As” dialog box. Please see the dialog box in Figure1. You should choose a suitable location for the target files in “Save in” combo box and input the name of the target files in “File name” edit box. Then please specify the right output format in “Save as type” combo box and click “Save” button to save all the changes.
Figure1.
You will get your target files several seconds later. The conversion speed depends on the original file size and the computer configuration. To browse the target files with some kind of image viewing or editing program marks the end of the conversion from xls to emf.
