docprint pro

How to add page numbers in docPrint preview application?

VeryPDF  docPrint is not only a Windows printer driver which can help you save ink, paper and time by controlling printed output, but a document converter which has the ability to convert any printable document to 50+ graphics.Having the Universal print preview application with editing capability, VeryPDF  docPrint enables you to  add page number, comment, watermarks, etc on your documents before you sending  them to real printer.

When you print multiple files,  you may want to reorder the pages of the combined file. docPrint can help you easily solve this problem. This article would show you how to add page numbers on a PDF file converted from a Word document and a htm file.

Step 1: Input the Word document and the htm file into docPrintinto docPrint

1.1 Open one of the source document, for instance, the Word document>press Ctrl+P or right click with the mouse and select Print  to open the Print dialog box> select docPrint as the printer in the Print dialog box > press OK in the Print dialog box  to run the docPrint dialog box. Then you can view the document in the docPrint preview window as illustrated below:

image

1.2  Input the htm file into docPrint in the same way as 1.1. Then, we can view both the Word document and the htm file in the docPrint preview window as illustrated as following  

image

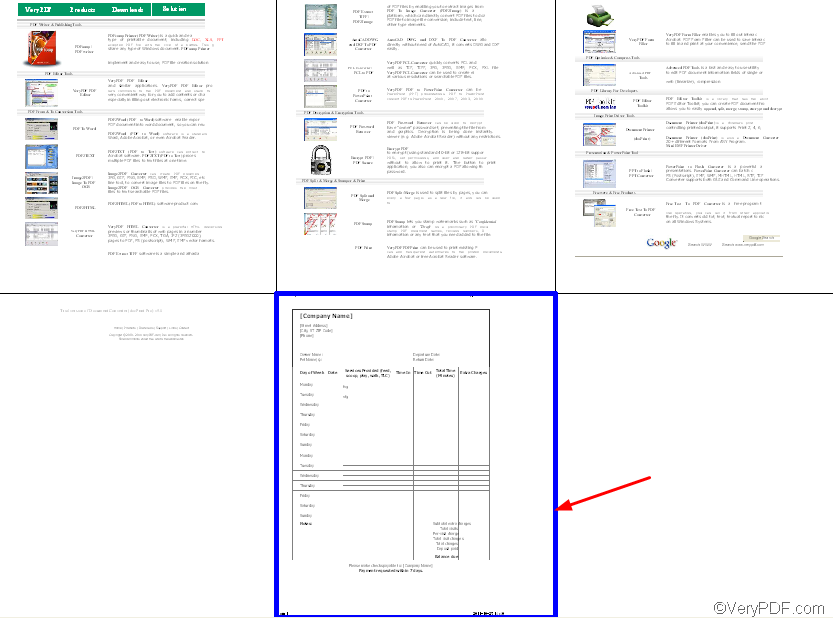
You can repeat 1.1 to combine more files into one file and add page numbers .

Step 2 Add page numbers.

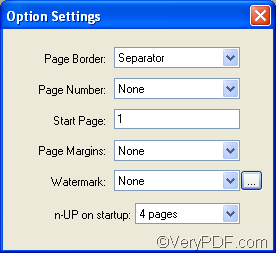
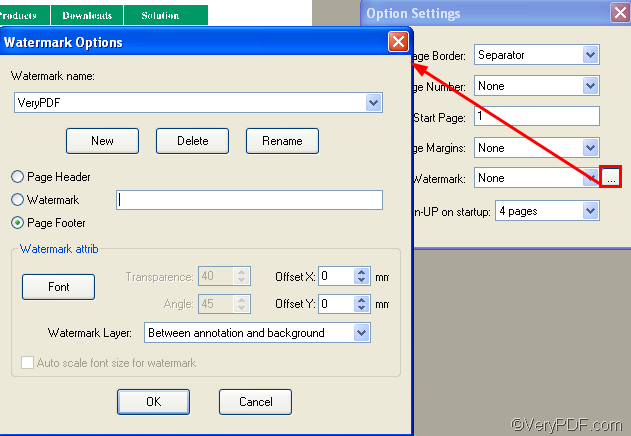
2.1 Open the Option Settings dialog box

  If there is a dialog box titled Option Settings, you can skip to 2.2; otherwise click View > Show/Hide Options to open the Option Settings dialog box again.

image 

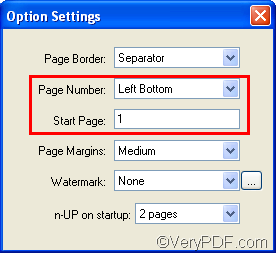
As you can see in the Option Settings dialog box, the second and the third items titled Page Number  and Start Page  are useful for adding page numbers.

2.2 select an option in the Page Number combo box

There are seven options listed on the drop down menu of the Page Number combo box. If you choose the first one None, no page number will appear on any page. If you choose one from the rest ones, page numbers will appear on the corresponding place.

image

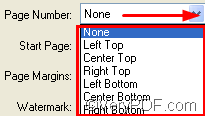
For instance, if you choose Center Bottom, then,  you can find page numbers at the bottom of each page.

image

2.3 set start page

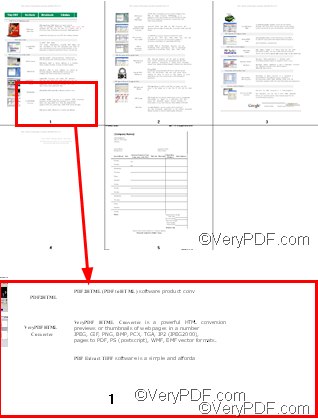
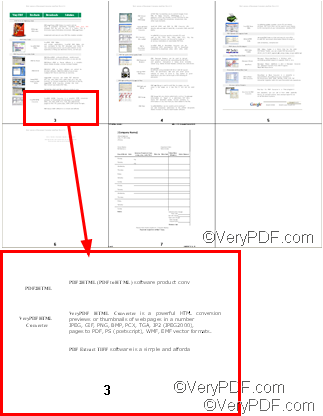
The number you type in the Start Page edit box is the page number which is going to be printed at the first page of the combined file you want to print.

image

For instance, if you type 3  in the the Start Page edit box, you can see that the first page number of the combined file will start from 3.

image

To learn more about how to use docPrint, you can read articles at https://www.verypdf.com/wordpress. If you want to get more information about VeryPDF docPrint,  please visit https://www.verypdf.com/artprint/index.html.

VN:F [1.9.20_1166]
Rating: 0.0/10 (0 votes cast)
VN:F [1.9.20_1166]
Rating: 0 (from 0 votes)
image to pdf converter

How to convert EMF image to PDF file?

EMF can keep image manipulation capabilities and works quite well if your working platform is Windows based applications and it is primarily associated with Enhanced Windows Metafile Format. A metafile is played when its records are converted to device commands and processed by the appropriate device. After a picture is complete and the last record is stored, you can pass the metafile to another application by using the clipboard, Embedding it within another file and store it on disk then you can play it repeatedly. A drawback of using EMF files is that they are generally only supported by Windows-based applications, if you change your working platform, the EMF file can not be read.

In order to avoid this kind of troubles occur, we can convert the  EMF file to PDF file first then we show it or read it anywhere. I convert my EMF file by the following steps:

  • Downloading a software here: https://www.verypdf.com/tif2pdf/tif2pdf.htm#dl  It is Image2PDF v3.2 which can convert automatically clear and skew-correct B/W images by employing special techniques to insure high quality output after conversion.
  • When you enter the downloading page, please save this file, unzip it and let it run in your computer.

Snap6

  • Add your file to Image2PDF. I will take a random EMF picture for example,name it as “example.emf”. 1  If you feel the picture in the interface screen is a little small, you can adjust the size by clicking “Image” on the top menu bar. Also draging the frame of interface screen is to  adjust the display Scale.

Snap1

  • Then you can click the button “Making PDF” to finish the converting.  When you click it, there will bounce a dialog box to let you name the new PDF file and save it. You’d better name it the same as the source file, it will be convenient for your future searching. It is not hard to find that all the menu buttons go grey which means you can not edit it now. If you find you edited by mistake, you have to click “Cancel” and redo it.

Snap2

  • One to three seconds, there will be a PDF file on the desktop. The EMF image is in the format of PDF now.
VN:F [1.9.20_1166]
Rating: 0.0/10 (0 votes cast)
VN:F [1.9.20_1166]
Rating: 0 (from 0 votes)
pdf editor

Can I import comments to pdf files from other comment files with VeryPDF PDF Editor?

Importing comment in usual way need copy the comment then import it to another file, but we know pdf files can’t be allowed to edit. With the software of VeryPDF PDF Editor we have many methods to import something to a pdf file. The article referring to the method characterizes among many pdf files.

Now there are three pdf files that have been added to VeryPDF PDF Editor, the task needs to import a comment from one pdf file of the three to the left. We use the function of pdf import comment to complete.

image  

This is the illustration that there are three pdf files in VeryPDF PDF Editor, and in one pdf file contain our need.

image

This is the pdf file whose comment is our need. Click the comment or click the Edit Comment in the toolbar thus pdf import comment is enabled.

image

In the menu click File>Export>Export Comments, after that a dialog box pops out.

image

Enter a name and keep it in a place, then click Save. Thus on your Desktop a Comment format file has been stored.

Open the other two pdf files one by one and do the operation as the illustration below:

image

File>Import>Import Comments, then that that dialog box pops out again.

image

Double-click the file or click it and click Open. Thus the comment has been added to the pdf file, and you can repeat the operation, then you will get many a comments.

image

Maybe now you have got an idea, that in one time import many comments to pdf files by use of pdf import comment. Next in the third pdf file the article brings you to complete the idea.

Step 1: See the illustration below:

image

image

This time save the Comment format file as NewVeryPDF PDF Editor to distinguish VeryPDF PDF Editor.

Step 2: Open the third pdf file, do the operation as follows:

image

image

Step 3: Then choose NewVeryPDF PDF Editor.comment and double-click it, thus the comment has been imported.

image

VN:F [1.9.20_1166]
Rating: 0.0/10 (0 votes cast)
VN:F [1.9.20_1166]
Rating: 0 (from 0 votes)
html converter (htmltools)

How to convert mhtml to wmf?

WMF is short for Windows Metafile.It contains a series of drawing operations, including commands for drawing lines, circles, and rectangles.It also contain bitmap drawing operations,used primarily for vector images, but can also include raster graphics.WMF files have largely been replaced by more standard formats, such as .jpg and .gif images. The WMF format is still supported by various programs, including Microsoft's Windows Photo Viewer, which is included in Windows 7.

If you want to convert mhtml to wmf format,HTML Converter Command Line can help you.

HTML Converter Command Line is a very powerful software which can allow you to convert web pages to PDF, PS (postscript), WMF, EMF vector formats,also allow you to create previews or thumbnails of web pages in a number of different formats, such as TIF, TIFF, JPG, JPEG, GIF, PNG, BMP, PCX, TGA, JP2 (JPEG2000), PNM, etc.

The command line application of HTML Converter is very convenient and easy to use,you can realize the conversion of mhtml to wmf only by some dos commands.You should only need the called program,source file.

HTML Converter Command Line can be downloaded at https://www.verypdf.com/htmltools/htmltools.zip. You can get more information about  HTML Converter Command Line at https://www.verypdf.com/htmltools/index.html and https://www.verypdf.com/htmltools/htmltools-manual.htm.

The contents below are the details to the conversion of mhtml to wmf.

Step1.Please click image button and click “run” in start menu.Then input “cmd” in “open” edit box and click “OK” button.Please see Figure1.

image

                                   Figure1.

“Windows” + “R” can also open the dialog in Figure1.

Step2.In popup cmd.exe dialog box,you should input command lines.If the screen of the dialog box is disordered,you can use command “cls” to clear screen.Please see Figure2.

image

                                                                    Figure2.

The conversion command lines are "C:\Documents and Settings\admin\Local Settings\Temp\htmltools\htmltools.exe" "C:\Documents and Settings\admin\Desktop\Google.mht" google.wmf

"C:\Documents and Settings\admin\Local Settings\Temp\htmltools\htmltools.exe"  is the directory of htmltools.exe which is the called program in the conversion of mhtml to wmf.

"C:\Documents and Settings\admin\Desktop\Google.mht"  is the directory of source file.

google.wmf  is the name of target file.

When the sentences framed in red rectangle showed in Figure2 appear,it means the conversion is successful.

Step3.Find the target file in current directory.Please see Figure3.

image

                                                                          Figure3.

VN:F [1.9.20_1166]
Rating: 0.0/10 (0 votes cast)
VN:F [1.9.20_1166]
Rating: 0 (from 0 votes)
docprint pro

How to change the watermark size on current page in docPrint preview application?

Assuming you are using VeryPDF docPrint to add a watermark on your document, and are in the docPrint preview window,  if you want to change the watermark size on current page in docPrint preview application, you can do as follows:

Step 1 Find the Option Settings dialog box

The Option Settings dialog box is illustrated as following.

image

If you cannot find it on the screen, you should click  View > Show/Hide Options to open the Option Settings dialog box again.

Step 2: Click the little button on the right of Watermark combo box to open the Watermark Options dialog box.

image

Step 3 Click the Font button in the Watermark Options dialog box to open the Font dialog box

image

Step 4 Change the size of the watermark on current page.

You should select the proper number in the Size list box as the watermark size. 8 is the smallest size of watermark, while 72 is the largest size of watermark. Then press OK in every suspending dialogs until you see that the watermark size changes.

The following watermark is an example of the largest size 72.

image

The following watermark is an example of the smallest size 8.

image

The last watermark is an example of the size 22.

image

Adding watermarks on documents is one of the best ways to protect your document content  from being copied by others . VeryPDF supports you to add and edit watermarks on documents in docPrint preview application. Not only can you change the size of watermark, you can also change the transparence, color, font, font style, location, etc. To update or get more information about VeryPDF docPrint, please visit the following website: https://www.verypdf.com/artprint/index.html. If it is necessary,  you can read related articles on how to add watermarks, how to edit watermarks, and how to use other applications about docPrint at the VeryPDF knowledge basement at the following website: https://www.verypdf.com/wordpress

VN:F [1.9.20_1166]
Rating: 0.0/10 (0 votes cast)
VN:F [1.9.20_1166]
Rating: 0 (from 0 votes)