PNM is a kind of bitmap image created in the Portable Any Map format, which was designed to handle several types of portable monochrome, grayscale, and color images. PNM may include raster graphic data in a .PBM, .PGM, or .PPM format. PNM files store one image and do not use compression. If you want to convert ppt to pnm or pptx to pnm, you can use docPrint Document Converter Professional.
docPrint Document Converter Professional is a software product that dynamically converts MS Office 97/2000/XP/2003/2007, WordPerfect, AutoCAD DWG, PostScript, Adobe Acrobat PDF and many other document types to Adobe Acrobat PDF, PostScript, EPS, XPS, PCL, JPEG, TIFF, PNG, PCX, EMF, WMF, GIF, TGA, PIC, PCD and BMP etc formats. With docPrint Document Converter Professional you can convert your documents from and to 50+ formats easily.
With three applications in docPrint Document Converter Professional (docPrint Pro), you can meet different requirements. For example, you can use the GUI application to convert documents to images in a batch. Software developers can use the command line application to develop software. The virtual printer application can be used to save pager and ink.
The virtual printer docPrint can also act as a document converter at the same time. Just print a printable document to docPrint, you can launch the application easily. To use docPrint, you should download docPrint Pro at https://www.verypdf.com/artprint/docprint_pro_setup.exe and install it on your computer.
Please see the process of converting ppt to pnm in the following contents.
Firstly, you should open a PPT document and click “File”—“Print” to open “Print” dialog box in which you should choose “docPrint” as current printer in “Printer” combo box. Then click “Print” button to continue the work. The hot key “Ctrl”+ “P” can also help you open “Print” dialog box. If you have set docPrint as the default printer, please right click the PPT document and choose “Print” option to run docPrint directly instead of opening the PPT document.
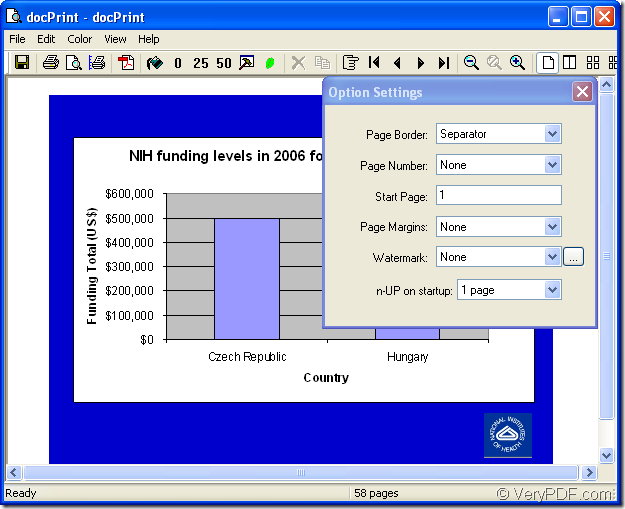
Secondly, you are able to see a dialog box named as “docPrint”, please see it in Figure1. You should try to open the “Save As” dialog box in this dialog box. Three methods are given. The first one is to click “File”— “Save as”. The second one is to click the “Save File” icon in the toolbar. The third one is to use the hot key “Ctrl”+ “S”. If you have some other good ideas, welcome to share with us.
Figure1.
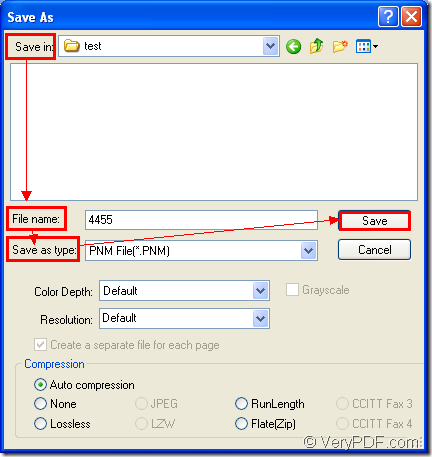
Lastly, you should save the target files in “Save As” dialog box which is showed in Figure2. There are four operations to be done before running the conversion from ppt to pnm format file. You should choose the directory for the target files in “Save in” combo box. In “File name” edit box, please input the name of the target files. In “Save as type” combo box, please select the file type for the target files. Then click “Save” button.
Figure2.
When the conversion from ppt to pnm is over, the progress bar appears at the bottom of docPrint dialog box just now will be empty again. It will only cost you several seconds.
If you want to read more articles about docPrint Pro, please visit the blog—VeryPDF Knowledge Base at https://www.verypdf.com/wordpress/

