pdf to image converter

How could we get a grayscale png through converting pdf to png?

To create a grayscale png, PDF To Image Converter v2.1 can solve it easily. You could download this converter v2.1 here: https://www.verypdf.com/pdf2tif/pdf2image.exe. Click this link>save it then, install PDF To Image Converter v2.1 in your pc.

Here is the method on how to make a grayscale png from pdf through PDF To Image Converter v2.1.

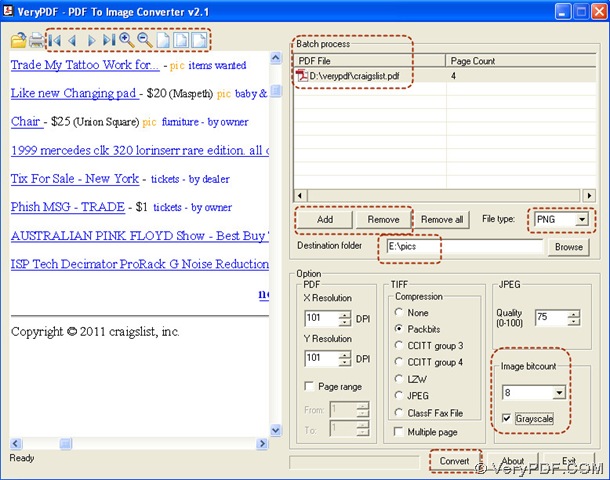
Step1. Click “Add” button>hit a pdf>press down “open” button in the pop window, your pdf will be displayed as its route in the form of “PDF File” in batch process field.

快照165

Step2. Click this route>preview your pdf in PDF To Image Converter v2.1, you also could use the icons above your pdf preview to look over your pdf carefully.

快照167

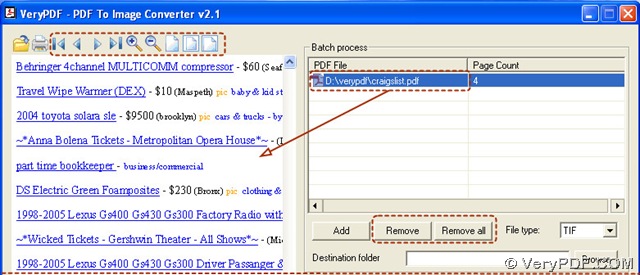
If you want to get rid of this pdf out of the batch process, click your pdf route>press down “Remove” button.

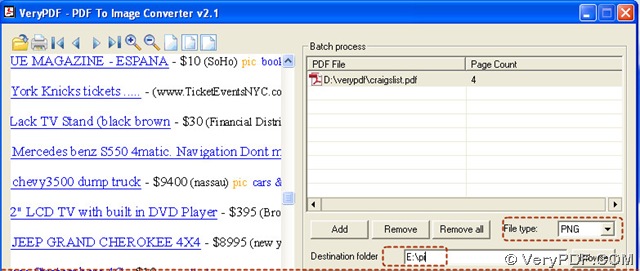
Step3. Choose your objective format: click the edit-box of “File type”>choose PNG in it.

Step4. Set a objective folder, it is used for placing your png: input a folder location in the edit-box of “Destination folder”.

快照170

Step5. To set a grayscale mode in PDF To Image Converter v2.1, we need to mention what is grayscale: Grayscale images are composed exclusively of shades of gray between the weakest black and the strongest white. Grayscale is usually stored with 8 bit per pixel and could contain 256 different intensities. Grayscale mode is simple for programming cause in a grayscale image the value of each pixel is a single sample.

So here in the edit-box of “Image bitcount”, choose 8> click the check-box of “Grayscale”, this will guarantee your image is a grayscale png.

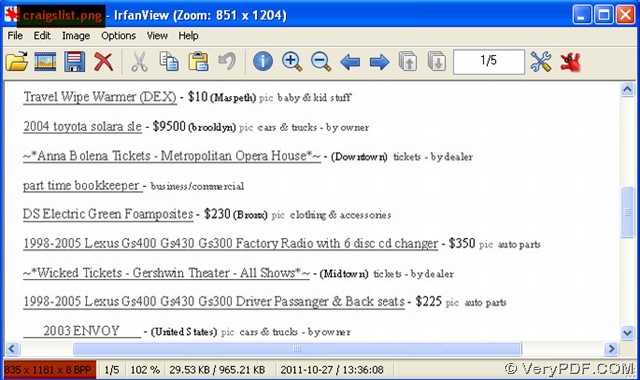
Step6. Process your pdf via clicking “Convert” button, then your grayscale png will be in destination folder, by now your converting pdf to png is complete, at last shut down your PDF To Image Converter v2.1.

快照171

快照172

VN:F [1.9.20_1166]
Rating: 0.0/10 (0 votes cast)
VN:F [1.9.20_1166]
Rating: 0 (from 0 votes)
docprint pro

How to change watermark content in docPrint preview application?

People usually use passwords and watermarks to protect their documents. Both methods have their advantages. To cite watermarks as an instance, if a publisher adds a watermark on each page of his  documents, it would be very hard for others to abuse the content of the documents.

VeryPDF supports users to add and edit watermarks on documents in docPrint preview application. In the preview application, you can change the watermark content, change the color  of watermarks, etc.. To download VeryPDF docPrint or get the latest information about VeryPDF docPrint,  please visit https://www.verypdf.com/artprint/index.html. In the following part of the article, I would like to show you how to change watermark content on documents like a PDF file.

Skip to step  4, if you are in the Watermark Options dialog box; otherwise, you’d better start from step 1.

Step 1: Open the document.

Since in this article, we take a PDF file as an example,  we should open the PDF file in Adobe. For another instance, if your document is a Word or an Excel, you can use MS Office to open it.

Step 2: Run docPrint

Press Ctrl+P, then a Print dialog box will pops out> select docPrint as the printer in the Print dialog box > press OK  to run docPrint dialog box.

Step 3: Open the Option Settings dialog box

Normally, you  can just skip to the next step, because when you open the docPrint dialog box, the Option Settings dialog box will appear on the computer screen at the same time. However, in case you don’t know how to open the Option Settings dialog box again after you close the Option Settings dialog box during the process, I would like to introduce how to open  the Option Settings dialog box here: click  View > Show/Hide Options to open the Option Settings dialog box .

Step 4 Change watermark content

There are two ways to change watermark content on your document: you can select an option in the Watermark combo box in the Option Settings dialog box, or type the content you like in the edit box in the Font dialog box.

4.1 Select watermark content options 

In the Option Settings dialog box , when you click the arrow on the Watermark combo box, a menu will appear on the screen.  As you can see on the menu as illustrated as following, there are some default watermark content listed. You can choose anyone to add on the document. 

image

image

4.2 Type a watermark

4.2.1 Open the Watermark Options dialog box

Click the button on the right of the Watermark combo box to open the Watermark Options dialog box, where you can change the content, color, size of watermarks. 

image

image

4.2.2  Change the watermark content 

Click the New button in the Watermark Options dialog box to open the little dialog box as illustrated below>  type the content in the edit box> click OK  to close the little dialog box.

image  

4.2.3 Change the watermark color

Click the Font button in the Watermark Options dialog box to open the Font dialog box> select red as the watermark color in the Color combo box> select 72 as the watermark size in the Size combo box.>OK in the Font dialog box > OK in the Watermark Options dialog box

image

Step 5 view the effect of the watermark content change

Before:

image

After:

image

VN:F [1.9.20_1166]
Rating: 0.0/10 (0 votes cast)
VN:F [1.9.20_1166]
Rating: 0 (from 0 votes)
verypdf blog

Set open password to PCL converted PDF file

VeryPDF Support,
 
We purchased a VeryPDF developer license back in December 2008, and it has been a great tool...thank you!  We sometimes use the -openpwd option to encrypt the pdf and require a password to open it.  We've always thought that the resulting pdf was, in fact, encrypted and protected from anybody being able to view it without the correct password.  Today, however, something disturbing happened:  We emailed a password-protected pdf to a client.  When he opened it on his Windows computer, it required the password, as expected.  But, when he opened it on his iPad, it opened without even requesting a password!  How can this be?
 
It sounds like the encryption option doesn't actually encrypt the document...it just encrypts a password.  Then, any program following the rules (such as Adobe Reader) will not open the document; but if a program is designed to ignore the password (such as that used on the iPad?), it can open and display the document as it would any other document.
 
I played around with various parameters, without any success.  Is there some way to really make the pdf secure?  Perhaps an update to the program?  Thank you.
 
Sincerely,
==============================
Hi,

Thanks for your message, yes, you are right, -openpwd option to encrypt the pdf and require a password to open it, nobody can open this PDF file if he unknow the password, also, you may use both -openpwd and -ownerpwd parameters to try again, we hoping these parameters will solve this problem to you,

-openpwd <string>          : Set 'open password' to PDF file
-ownerpwd <string>         : Set 'owner password' to PDF file

VeryPDF
==============================
Thanks for getting back to me. Unfortunately, even when I use both -openpwd and -ownerpwd, the pdf can be opened on an Apple iPad without requesting a password!  How can we make it secure?

By the way, when I tried specifying both passwords yesterday, pcltool.exe kept aborting, with no error message.  When I tried again today, I discovered if I did not also use the -view parameter, the two password parameters could work together.  When -view is used, either one but not both can be specified.  Odd, but not a big problem.  If we cannot make the pdf secure, that is a big problem.
==============================
Just for checking, can you open this PDF file on your Apple iPad without requesting a password? This PDF file was created by pcltool.exe by -openpwd and -ownerpwd parameters.

VeryPDF
==============================
Thank you for your patience.  It turns out with both passwords, the document is secure (while it is not if only one password or the other is used).

When I sent a test document using both passwords to my client yesterday, he replied last night, "Unfortunately it didn't work."  I assumed he meant it was still opening without a password as the previous (one-password) documents had.  That's when I emailed you again.

However, when I talked to him today, he explained that he meant he could not open it at all, and only later found by tapping around on the iPad it eventually asked for the password.

Problem solved...I will program to always use both password parameters.  Thanks again.
==============================
Thank you for your message, if we can be of any other assistance, please feel free to let us know.

VeryPDF
==============================

VN:F [1.9.20_1166]
Rating: 0.0/10 (0 votes cast)
VN:F [1.9.20_1166]
Rating: 0 (from 0 votes)
pdf editor

Can I set transparency to my comment in PDF files with VeryPDF PDF Editor?

When two comments are put together, in their common part we can’t see clearly. Generally we give up one of the pair, that means there is one comment that must be covered. pdf comment transparency of VeryPDF PDF Editor is able to solve the problem. Besides pdf comment transparency can make comments have an artistic sense, such as sense of distance. Next give an example to explain.

Download VeryPDF PDF Editor at www.verypdf.com then add a pdf file to it.

Insert two comments in the pdf file.

image 

Click Document>PDF Annotation.

image

Then the ImageBox pops out where you can select pictures as comment. Double-click the pictures thus the operation is finished.

image 

image

Repeat the operation, we get two pictures.

image

By then you find that the common part of the two pictures is represented by only one. Now we use pdf comment transparency to change the defect. Choose one picture and right-click, then choose Properties.

image

image

Slide the slider marked by the red rectangle. The picture is being fading or deepening.

By the same way, use pdf comment transparency to change another picture. Here the article omits the process. Next is the result after the process.

image

By use of pdf comment transparency the common part we can see clearly now, if you have interest, through pdf comment transparency we can further make the two pictures produce a sense of distance. Here the article set an example. See below:

image

With pdf comment transparency the common part is not only can be seen but also a sense of distance be represented.

VN:F [1.9.20_1166]
Rating: 0.0/10 (0 votes cast)
VN:F [1.9.20_1166]
Rating: 0 (from 0 votes)
html converter (htmltools)

How to convert mhtml to postscript?

HTML Converter Command Line allows you to convert mhtml to postscript format.Because it is a powerful HTML conversion software which can convert web pages to PDF, PS (postscript), WMF, EMF vector formats,also allows you to create previews or thumbnails of web pages in a number of different formats, such as TIF, TIFF, JPG, JPEG, GIF, PNG, BMP, PCX, TGA, JP2 (JPEG2000), PNM, etc.

PostScript(PS),with the extension name .ps is a programming language for describing how a page is to be printed or displayed. It is best known for its use as a page description language in the electronic and desktop publishing areas. PostScript consists of functions for describing and positioning lines, shapes, fills, and other graphical elements, and for placing and formatting text.

HTML Converter Command Line can be downloaded at the website https://www.verypdf.com/htmltools/htmltools.zip .When you finish loading it,you should unzip the file to use it.There is also a very important point you should pay attention to.HTML Converter Command Line need to be registered,or you will be limited in some functions.

The register steps are as follows.

1.Run cmd.exe program by clicking “start” – “run” and input “cmd” in “edit” box,then click “OK” button.

2.Change the current directory to the installation directory of HTML Converter Command Line by command “cd”.

3.Input the register code of HTML Converter Command Line in cmd.exe dialog box and press “Enter” button.

Then you can use HTML Converter Command Line freely.

The next part of this article are the details to convert mhtml to postscript.

1.Run cmd.exe.You can follow step1 above to run cmd,you can also press “Windows” + “R” on your keyboard to realize the same operation.

2.Input command lines in cmd.exe dialog box.Please see Figure1.

image

                                                                         Figure1.

The commands are "C:\Documents and Settings\admin\Local Settings\Temp\htmltools\htmltools.exe" "C:\Documents and Settings\admin\Desktop\Google.mht" google.ps

"C:\Documents and Settings\admin\Local Settings\Temp\htmltools\htmltools.exe"  stands for the path of called program—htmltools.exe.

"C:\Documents and Settings\admin\Desktop\Google.mht"   stands for the path of source file.

google.ps  stands for the name of target file.

3.If you didn’t specify the path of target file,the file will be saved in current directory by default.Please see Figure2.

image

                                                                          Figure2.

If you have finished all the steps above,the conversion of mhtml to postscript is done.

VN:F [1.9.20_1166]
Rating: 0.0/10 (0 votes cast)
VN:F [1.9.20_1166]
Rating: 0 (from 0 votes)