If you can use Document Converter of VeryDPF, you can convert webpage to pbm perfectly with easy steps in a short while. Document Converter is a professional document converter which enables you to convert any printable documents to many kinds of image formats (50+). If you need Document Converter, you can download it at https://www.verypdf.com/artprint/docprint_pro_setup.exe for free.
Document Converter works in three applications—GUI application, command line application and the virtual printer application. Please use the GUI application to convert many documents to many images,which means the GUI application suites for the batch conversion. You can use the command line application for developing software. The virtual printer application is a good tool which can save paper and ink by scaling page size and combining several pages in one only sheet.
In this article, you will see how to convert webpage to pbm with the virtual printer docPrint because it is not only a simple Windows printer, but also a document converter. docPrint is easy to use and you just need to print some document to it for launching it. Three steps are required and please follow the steps below.
1. You should open the Webpage that you want to convert in a browser such as Chrome. Then please click “File”—“Print” or use the hot key “Ctrl”+ “P” to open the “Print” dialog box. You will see all the installed printers on your computer in “Printer” combo box of the “Print” dialog box in which you should choose “docPrint” as current one. Click “OK” button.
2. You have to open the “Save As” dialog box in popup docPrint main window because in this dialog box you can set some parameters to the target file and run the conversion from webpage to pbm. You can use one of the following ways to open the “Save As” dialog box. You can click “File” and click “Save as” in the dropdown list. Or click the “Save File” button in the toolbar. The hot key “Ctrl”+ “S” will also do you a great favor.
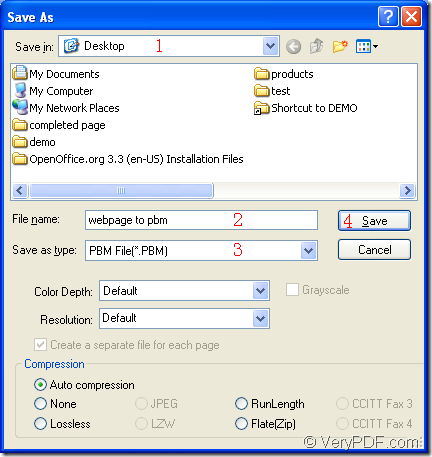
3. To save webpage to pbm is the last step in this conversion. The operations mentioned below must be done before you click the “Save” button. Just choose the location for the target file in “Save in” combo box and input the name for the target file in “File name” edit box. Then specify the output format in “Save as type” combo box and click “Save” button. Please see the “Save As” dialog box in Figure1.
Figure1.
If all the operations have been done, you will get you target file in the specified location successfully. You can view the target file with some kind of image processing or viewing program such as Photoshop, IrfanView, etc.
