pdf editor

What is the relation between annotation and comment of the VeryPDF PDF Editor?

They have common points and different points.

Common points: Both of them supply a picture for users with which users can express their intention instead of writing some words. For example, I need add a pdf note comment. I have two methods to complete. See the illustration below:

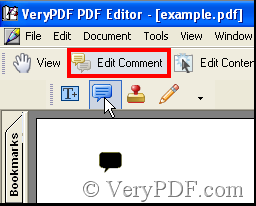
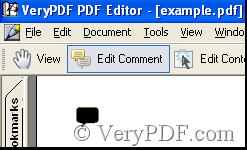
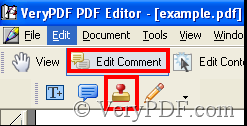
Method 1: in the toolbar of VeryPDF PDF Editor click Edit Comment, then click Add note icon

image

Thus a pdf note comment has been added. Go on seeing Method 2.

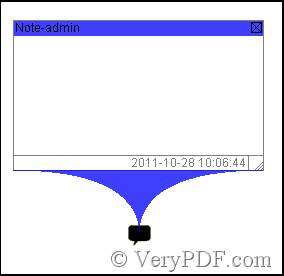
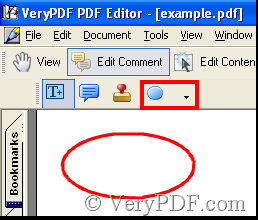
Method 2: in the menu click Document>PDF Annotation, then the ImageBox pops out

image 

image

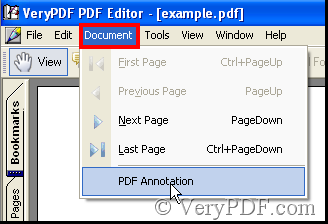
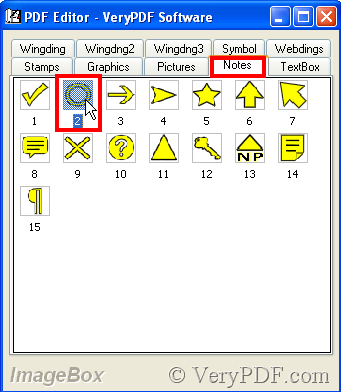
In the ImageBox choose Notes option and find the pdf note comment out.

image

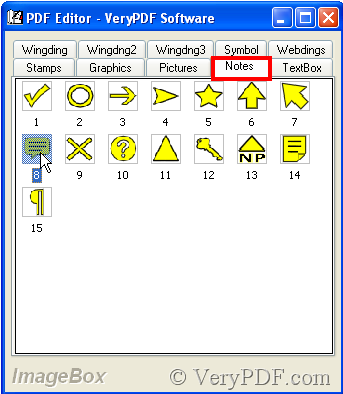
Double-click the pdf note comment, thus it’s added to the pdf file.

image

Moreover, it doesn’t matter which method you use, both of the two pdf note comment can be added a comment.

Double-click pdf note comment then a textbox pops out where you can edit.

image

This is the first common point, next say the second common point.

Both of Annotation and Comment supply drawing function. Let me direct with Annotation method and Comment method in turn.

Annotation method:

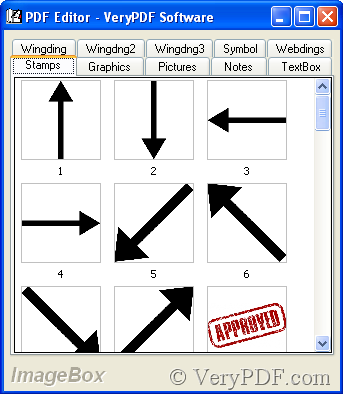
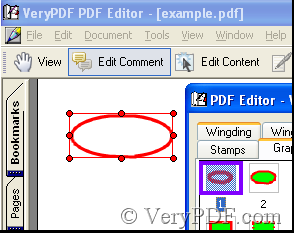
As same as the preceding narration, open ImageBox and choose Graphics.

image 

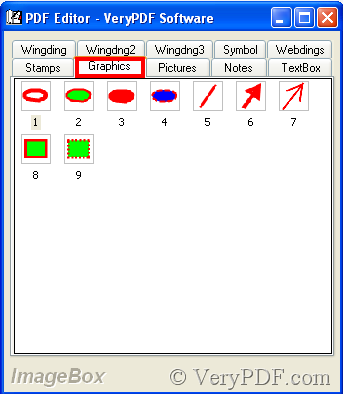
Choose and click anyone of the nine samples, then move the cursor to the pdf file and begin to draw.

image

Comment method:

Because the beginning operation is the same, the article omits. Users can refer to the preceding narration where the article once mentioned.

image

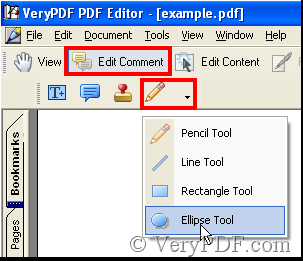
After click Ellipse Tool slide the cursor in the pdf file, thus you can build an ellipse drawing.

image

Next the article says the different points between Annotation and Comment.

1. Some functions can only be achieved in Annotation but Comment. For example, users need cartoon pictures or symbol pictures only to get them by use of Annotation. Symbol, Wingding, Wngdng2 and Wngdng3 are only contained in Annotation.  

2. In Annotation we can take some ready pictures to the pdf file while in Comment you can’t. In Comment you need change the picture’s property then achieve your need. Here the article gives an example to explain.

I still add a pdf note comment like the preceding mention.

image

Double-click the pdf note comment, you will get it, but in Comment you must change a pdf note comment before you succeed.

image

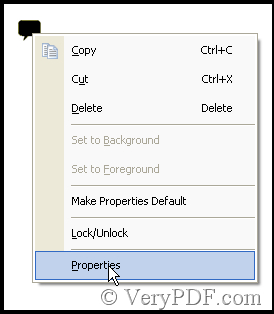
After add a pdf note comment by use of Comment, the pdf note comment is not the right one, so right-click it to change. Choose Properties, then a dialog box pops out where you can choose. See the illustration.

 image

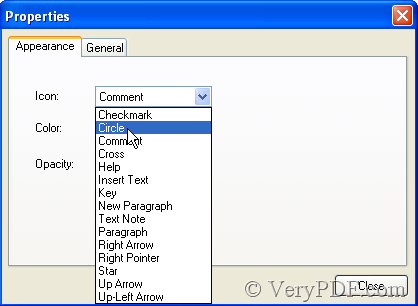
Thus you get the right pdf note comment.

image

But by use of Comment you can add pictures that’s kept in your computer, this function in Annotation can’t be achieved. Next the article adds a picture that doesn’t exist in Annotation.

 image

Then a dialog box pops out where choose a picture.

image

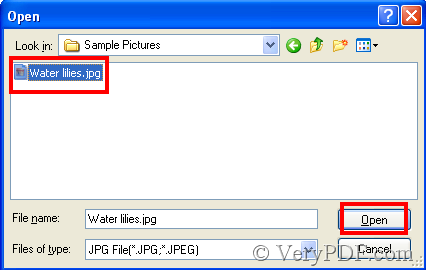
Click Open button, then the picture is added.

3. There is a function called Pencil Tool in Comment, but not in Annotation. With the function you can draw something according to your meaning.  Here the article omits.

VN:F [1.9.20_1166]
Rating: 0.0/10 (0 votes cast)
VN:F [1.9.20_1166]
Rating: 0 (from 0 votes)
html converter (htmltools)

How to convert rtf to jp2?

JPEG2000,also called JP2,is the next generation of JPEG file format.The more an image is compressed when saving a JPEG, the smaller the file size will be but also the more the quality deteriorates. JPEG2000 files on the other hand can be compressed to much smaller file sizes with far less deterioration in image quality, which makes it an ideal format for people to save images.

So if you want to convert rtf files to image files,JP2 file format is a good choice.

You can use HTML Converter Command Line to convert rtf to jp2 format.Because HTML Converter Command Line is a powerful software which can allow you to create previews or thumbnails of web pages in a number of different formats, such as TIF, TIFF, JPG, JPEG, GIF, PNG, BMP, PCX, TGA, JP2 (JPEG2000), PNM, etc. It also allows you to convert web pages to PDF, PS (postscript), WMF, EMF vector formats.

HTML Converter Command Line can be downloaded at https://www.verypdf.com/htmltools/htmltools.zip .When just be downloaded,HTML Converter Command Line is a zip file and need to be unzipped to be used.But you will find the functions of the software are limited because of no registering.

So you should register HTML Converter Command Line in cmd.exe first.

Registering steps

1.Run cmd.exe program by “Windows” + “R” and input “cmd” in “open” edit box,then click “OK” button.Please see Figure1.

image

                                    Figure1.

There is one other way to open the dialog box showed in Figure1.You can click image button and click “run” in start menu,then do the same work as above.

2.In cmd.exe dialog box,change the current directory to installation directory of HTML Converter Command Line with the dos command “cd” which means change directory.Then input the register code under installation directory and click “Enter” button.HTML Converter Command Line will be used without any limitation after that.

The contents below are the steps to convert rtf to jp2 which you can follow.

Step1.Run cmd.exe program.

Step2.Input the command lines in cmd.exe dialog box.The command lines should include called program,source file and target file.Please see Figure2.

image

                                                                      Fiugre2.

The commands are "C:\Documents and Settings\admin\Local Settings\Temp\htmltools\htmltools.exe" "C:\Documents and Settings\admin\Desktop\jingle bells.rtf" "C:\Documents and Settings\admin\Desktop\New Folder\bells.jp2"

"C:\Documents and Settings\admin\Local Settings\Temp\htmltools\htmltools.exe"   is the path of htmltools.com which is the called program in the conversion of rtf to jp2.

"C:\Documents and Settings\admin\Desktop\jingle bells.rtf"  is the path of source rtf file.

"C:\Documents and Settings\admin\Desktop\New Folder\bells.jp2"  is the path of target file which is specified by yourself.

NOTE:If you don’t specify the path of target file,it will be saved in current directory.If you don’t name the target file,it will be saved as pdf file by default.

Step3.You can find the target file in the specified directory after converting rtf to jp2.Please see Figure3.

image

                                                                     Figure3.

VN:F [1.9.20_1166]
Rating: 0.0/10 (0 votes cast)
VN:F [1.9.20_1166]
Rating: 0 (from 0 votes)
docprint pro

How to delete page number in docPrint preview application?

With the VeryPDF docPrint preview application, you can add and edit page numbers, watermarks,  comments on each page of your document. You can also delete everything you add on pages. When you want to delete a watermark, you can click the Delete button in  the Watermark Option dialog box. When you want to delete comment, you can right click on the comment and choose the option Delete on the drop down menu.  When you want to delete a page within the file, you can right click the page and choose Delete This Page to delete the selected page. But when you want to delete page numbers, you can find any button or option titled Delete that you can click or choose.This article will show you how to delete page numbers in VeryPDF  docPrint.

First of all, let’s add page numbers on each page of a PDF file.

1.1 run VeryPDF  docPrint application

  • Open the PDF file in Adobe.
  • Press Ctrl+P to to open the Print dialog box.
  • Select docPrint as the printer in the Print dialog box.
  • Press OK in the Print dialog box  to open the docPrint dialog box.

image

1.2 add page numbers

In the docPrint dialog box as illustrated as following, you can preview the PDF file. And you may also find a little dialog box titled Option Settings appears on the screen as soon as you open the docPrint dialog box. In the Option Settings  dialog box, you can select options to add and delete page numbers.

image

To add page numbers, you should click the arrow on the Page Number combo box, and select an option from the second one to the last one. For example, you can choose Center Bottom, then a page number will appear at the center bottom of each page.

image

image

Secondly, let me show you how to delete page numbers. As a matter of fact, it is very simple. You should choose the first option None on the pull down listing in the Page Number combo box to delete number pages.

image

image

As you can see, the page number disappears from this page. In fact, when you choose None, you delete all the page numbers on the pages of your file.

To learn more about how to use docPrint, you can read articles at https://www.verypdf.com/wordpress. If you want to get more information about VeryPDF docPrint,  please visit https://www.verypdf.com/artprint/index.html.

VN:F [1.9.20_1166]
Rating: 0.0/10 (0 votes cast)
VN:F [1.9.20_1166]
Rating: 0 (from 0 votes)
html converter (htmltools)

How to convert rtf to gif

RTF files are supported by many kind of  word processor, including Wordpad, Notepad, Word and Star Office.But according to some people’s needs, rtf format files should be converted to gif format files.So you may think about the question:how to convert rtf to gif and what kind of software can be used.

There are many kinds of converting software,but the one you choose must be a cheap,fast,the most important,easy to learn and use.HTML Converter Command Line is a such kind of software.

HTML Converter Command Line allows you to create previews or thumbnails of web pages in a number of different formats, such as TIF, TIFF, JPG, JPEG, GIF, PNG, BMP, PCX, TGA, JP2 (JPEG2000), PNM, etc. It also allows you to convert web pages to PDF, PS (postscript), WMF, EMF vector formats.

HTML Converter Command Line  can be downloaded at the website https://www.verypdf.com/htmltools/htmltools.zip. You can get many information about HTML Converter Command Line at https://www.verypdf.com/htmltools/index.html and if you want to know more about it,please visit https://www.verypdf.com/htmltools/index.html.

By reading this article,you can get the whole details of converting rtf to gif and you will find the command line application of HTML Converter Command Line is convenient to call and easy to use.

The following part are the contents to convert rtf to gif.

Step1.Run cmd.exe program

You can take two methods to run cmd.exe.

Method1.Click start menu and click “run” in the menu.Please see Figure1.Then input “cmd” in “open” edit box of the popup dialog box showed in Figure2 and click “OK” button.

image_thumb2

                                  Figure1.

image_thumb3

                                 Figure2.

Method2.You can also press “Windows” + “R” on your keyboard at the same time to open the dialog box showed in Figure2.Then input “cmd” and click “OK”.

Step2.Input command lines.

In the popup cmd.exe dialog box,you should input the commands to convert rtf to gif format.The commands should contain called program,source files and target files.Please see Figure3.

image_thumb1

                                                                          Figure3.

The commands are "C:\Documents and Settings\admin\Local Settings\Temp\htmltools\htmltools.exe" "C:\Documents and Settings\admin\Desktop\jingle bells.rtf" bells.gif

Interpretations to command lines

"C:\Documents and Settings\admin\Local Settings\Temp\htmltools\htmltools.exe"  is the path of called program—htmltools.exe which is the executable file in HTML Converter Command Line.It is the most important key to batch convert rtf to gif format files.

"C:\Documents and Settings\admin\Desktop\jingle bells.rtf" is the path of source file.

bells.gif  is the name of target files,including file name and extension name.

NOTE:If you don’t name the target file,it will be converted to pdf file and saved in the same location with source file as the same file name.If you don’t specify the directory of target file,it will be saved in current directory by default.Or the target file will be saved in the path you have set.

Step3.Find the files in current directory.Please see Figure4.                                                       

image_thumb2[1]

                                                                        Figure4.

VN:F [1.9.20_1166]
Rating: 0.0/10 (0 votes cast)
VN:F [1.9.20_1166]
Rating: 0 (from 0 votes)
pdf to image converter

I want to convert Ukrainian PDF to TGA, what could help me?

PDF To Image Converter v2.1 is your best choice if you want to convert Ukrainian PDF to TGA. Here is its main page: https://www.verypdf.com/pdf2tif/index.htm#dl. and in the next paragraphs, you will know how to convert your Ukrainian PDF to TGA in PDF To Image Converter v2.1.

Step1. Please look over on the interface of your PDF To Image Converter v2.1, you can see the functional field named “Batch process”, there are a form and several buttons below it. Click “Add” button first, you will get a pop window, then click your Ukrainian pdf there and press down “Open” button, this will make your Ukrainian pdf route displayed in that form.

快照201

Step2. Please move your eyes onto the gray field in PDF To Image Converter v2.1, there are some icons above it, the little printer icon is used for your printing pdf, and the little yellow folder icon could help you open your Ukrainian pdf file in the gray field, so we click it and you will see there is a window out again, then double-click your Ukrainian pdf, you could use the other icons to review your Ukrainian pdf file.

快照202

Step3. In batch process functional field, there are also “File type” and “Destination folder”, those edit-boxes could provide users to choose objective file format and target folder. So here we click the edit-box of “File type”, choose TGA in that dragging menu of its; also click the edit-box of “Destination folder”, then input your destination folder route, the another method of choosing objective folder is to click “Browse” button and choose a folder in the window, then click “Ok” button at last if you like.

快照203

Step4. To make your Ukrainian tga more clear, you could enlarge DPI, the greater your DPI is, the more clear your Ukrainian tga is, and the bigger size and dimension your Ukrainian tga is, too. And about DPI, DPI stands for dots per inch, it represent for resolution in raster images, and resolution is commonly related to output machines like printers and scanners connected to the computers, adjusting resolution of raster digital images could help output machines produce different printing images in quality just like adjusting DPI, it is the same also for browsing our images in our computers. So here we input 200 in the edit-boxes of DPI after you click them first, also you could type into other greater values as you like.

快照204

Step5. Click “Convert” button, you will get your Ukrainian tga through the processing of PDF to TGA in PDF To Image Converter v2.1.

快照205

VN:F [1.9.20_1166]
Rating: 0.0/10 (0 votes cast)
VN:F [1.9.20_1166]
Rating: 0 (from 0 votes)