pdf to image converter

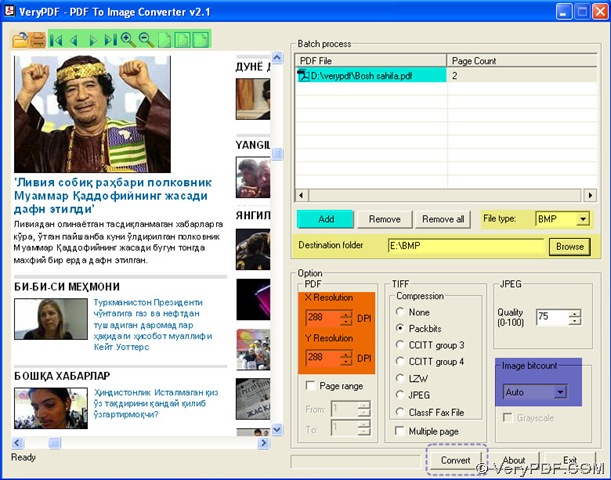
How could we convert Uzbekistan pdf to bmp clearly?

You could convert Uzbekistan pdf to bmp clearly in PDF To Image Converter v2.1, where there is DPI set up.

Here we could introduce DPI shortly: DPI stands for dots per inch. DPI is ofter used for describing the resolution, is applied to some output like printers and scanners. Especially for raster image format like bmp, jpg etc., the clearness of raster image could be better along with the enlargement of DPI.

I will show you how to convert Uzbekistan pdf to bmp clearly through using PDF To Image Converter v2.1.

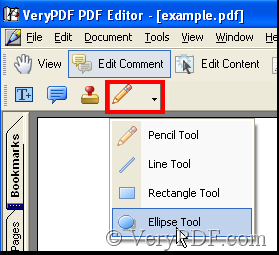
  • Open your Uzbekistan pdf in PDF To Image Converter v2.1 to look over it carefully: click open >double-click your pdf, then it can be shown for your preview; click partly or full or other icons to check on your Uzbekistan pdf. To print your pdf, click print when your technician get it set well.
  • Add your pdf into process field: click add >double-click your pdf in the window, then this window will be closed and you can get your pdf route in the form of “Batch process”.
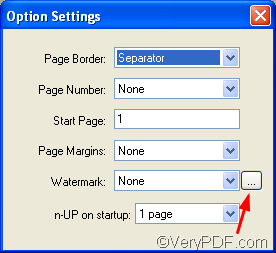
  • Set your target file type and get your target folder: click the edit-box of “File type”>BMP,  and click browse >choose a target folder in the window>click “ok” button, your target route of folder will be in the edit-box of “Destination folder”.
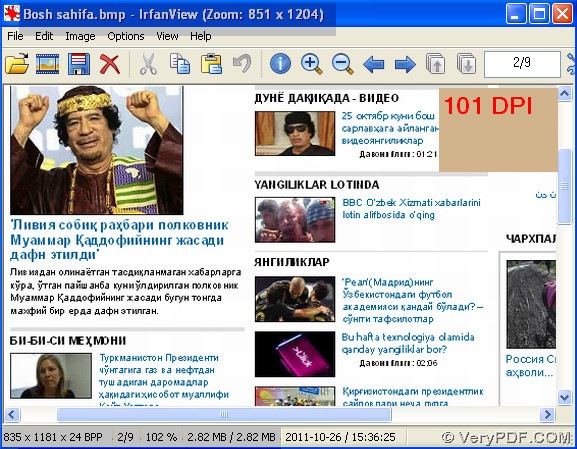
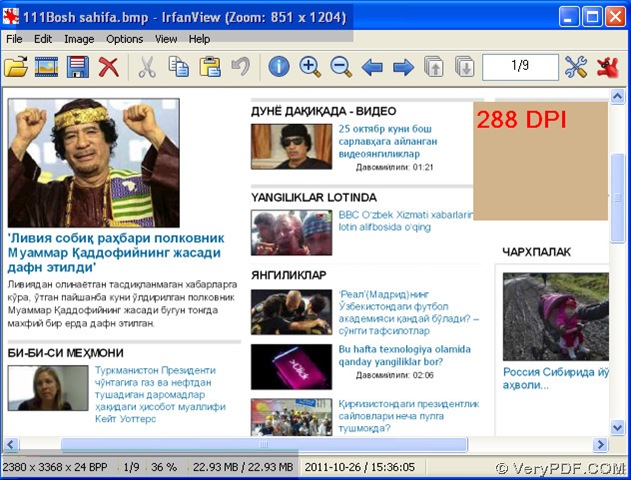
  • Adjust DPI to make your bmp clearly: click the edit-box of DPI>input a value to each DPI, this value must be larger than the original 101. Here we type 288 into them.
  • Keep other edit-boxes and click-boxes unchanged especially “Auto” in the edit-box of “Image bitcount”, auto is equal with 24, which is a true color value, and it can guarantee the quality of color of bmp.
  • Process your converting Uzbekistan pdf to bmp through clicking convert in PDF To Image Converter v2.1. You will get more clear bmp.
  • Shut down PDF To Image Converter v2.1.

快照152

快照153

快照154

You could visit the website of PDF to Image Converter v2.1: https://www.verypdf.com/pdf2tif/index.htm#dl to know more about this converter.

VN:F [1.9.20_1166]
Rating: 0.0/10 (0 votes cast)
VN:F [1.9.20_1166]
Rating: 0 (from 0 votes)
html converter (htmltools)

How to convert mhtml to jpeg?

JPEG file format is often used on digital camera memory cards. The JPEG file is wonderfully small, often compressed to perhaps only 1/10 of the size of the original file, which is a good thing when modems are involved. JPEG uses lossy compression (lossy meaning "with losses to quality"). Lossy means that some image quality is lost when the JPEG data is compressed and saved, and this quality can never be recovered.But the feelings of images from people will not change.

To convert mhtml to jpeg format,you can use a kind of powerful software-- VeryPDF HTML Converter.This software has two versions,one is GUI application and the other is a command-line application.GUI is not always convenient. Suppose you want to process an image dynamically from a web script or you want to apply the same operations to many images or repeat a specific operation at different times to the same or different image. In these cases, the command-line image processing utility is appropriate.

This article will tell you how to use HTML Converter Command Line to convert mhtml to jpeg.

Step1.Click start menu and click “run” in the menu,then input “cmd” in “open” edit box and click “OK” button to run cmd.exe.You also can use hot key “Windows” + “R” to realize the same function.Please see Figure1 and Figure2.

image

                                   Figure1.

image

                   Figure2(“Windows”+ “R”)

Step2.Input the command lines in cmd.exe to convert mhtml to jpeg.You can see Figure3.

image

                                                                      Figure3.

The commands in the dialog box are "C:\Documents and Settings\admin\Local Settings\Temp\htmltools\htmltools.exe" "C:\Documents and Settings\admin\Desktop\Google.mht" google.jpeg

"C:\Documents and Settings\admin\Local Settings\Temp\htmltools\htmltools.exe"  is the path of htmltools.exe.It is the executable file of HTML Converter Command Line and it is also the key of the whole conversion of mhtml to jpeg.

"C:\Documents and Settings\admin\Desktop\Google.mht"   is the path of mhtml format file .

google.jpeg  is the name of target file which includes file name and extension name.

Step3.Then you can find the jpeg format file in current directory.Please see Figure4.

image

                                                                           Figure4.

VN:F [1.9.20_1166]
Rating: 0.0/10 (0 votes cast)
VN:F [1.9.20_1166]
Rating: 0 (from 0 votes)
docprint pro

How to add a translucent watermark on each page of my document?

For the sake of security, sometimes, users may need to add translucent watermarks on their documents. The print preview application within VeryPDF docPrint allows you to add a watermark on each page of your document. docPrint supports you to add a watermark with an optional transparent degree on each page of the document, avoiding covering Watermarks Headers and Footers: Watermark, header and footer option allows documents to be marked with specific text other pictures or photographs in the page.

The following part of the article would like to show you how to add a translucent watermark on each page of your document.

First of all, you should open the selected document you want to add watermark, for instance, a PDF file.

Second, run the docPrint application. You should press Ctrl+P to run the Print dialog box > select docPrint as the printer and press OK in the Print dialog box. Then, usually two dialog boxes  are supposed to appear on your computer screen at the same time: The docPrint dialog box and the Setting Option dialog box. 

image

Thirdly, click the little button next to the Watermark combo box to open the Watermark Options dialog box as illustrated below, and add a watermark, for instance “VeryPDF docPrint ”.

image

image

  • To add a watermark, you should click New in the Watermark Option dialog box as illustrated above> type the new name in the little dialog as illustrated as following > OK

image

  • To delete watermark on the file you have just added, you can click Delete in the big Watermark Option dialog box
  • To change the watermark name, you can click Rename and type the new name you want to change from the former one in the  little dialog box as illustrated below .> OK

image

Fourthly, set the watermark as translucent. You should select the proper degree of transparence in the Transparence combo box, for example, 40. The little  the number, the  lighter the color of the watermark.

image

The following two watermarks show you the effect of transparence. The transparence of the first one is 100, the transparence of the latter one is 45.

image

image 

To be more briefly, if you want to add a translucent watermark on each page of the document, only two steps are required. The first step is to add a watermark, the second step is to change the transparence of the watermark.

VN:F [1.9.20_1166]
Rating: 9.0/10 (1 vote cast)
VN:F [1.9.20_1166]
Rating: 0 (from 0 votes)
verypdf blog

How to convert pcl to pdf?

Do you have a mass of bills or notes stored in pcl format? Do you have to process a number of documents stored in pcl format? Are you going to convert those documents of pcl to pdf for publishing or transmitting? VeryPDF PCL Converter must be your best choice. VeryPDF PCL Converter is a powerful program that supports to convert Printer Command Language files to Portable Document Format, pcl to pdf. VeryPDF PDFPrint has both GUI and command line version. This article will present some descriptions of its GUI version.

You can get your VeryPDF PCL Converter at https://www.verypdf.com/pcltools/index.html#dl. Install it into a directory of your system and you find it with name of “VeryPDF PCL Converter 2.0” in your application list. You can follow the menu path to launch the application. Select [start] –> [All Programs] –> [VeryPDF PCL Converter 2.0] –> [VeryPDF PCL Converter 2.0], and a dialog of registration will pops up. You can press the button of “try” to evaluate this program without any function limitation. You can also launch the program by double-clicking on the icon of the program in the directory where VeryPDF PCL Converter is installed. After pressing the “try” button or registering the software, you will see the main window of VeryPDF PCL Converter as presented in the following screen snapshot.

image

Now you can convert supported formats, such as, pcl, pm, pxl and px3, to pdf. Before converting, you need to add those files into the file list in the main window. There are four methods of adding files to the file list.

  1. Select menu [File] –> [Add Files], and then browse to the files in the popup file picker dialog.
  2. Select menu [File] –> [Add], and then browse to the directory where the files are stored.
  3. Press “Add File(s)” button in the main window of PCL Converter, and then browse to the files to convert.
  4. Drag those files from the Windows Explorer and drop them into the file list in the main window of VeryPDF PCL Converter.

After adding the files to be converted into the file list of the main window, next step is to set the target format. For this article, the target format is “PDF”. There are two methods to start the dialog for setting the target format.

  1. Select menu [File] –> [Settings], and a setting dialog titled “VeryPDF PCL Converter 20” will pop up.
  2. Press the button of “Setting” in the main window of PCL Converter, then comes out the same setting dialog as the first method.

In the dialog as displayed in the following screen snapshot, select the tab of “Base Setting”, choose “.pdf” in the dropdown list of “Output format”, select “0” in the dropdown list of “Rotate angle”, select “a4” in the dropdown list of “Page Size”, select “Portrait” radio button in group box of “Page Orientation”, check the “View after conversion” check box and then press “OK” button. Before press the “OK” button, you may set other parameters in other tabs, such as “Save PDF Mode”, “PDF Info” and “PDF Security”.

image

Then come to the main window of PCL Converter after completing the settings above. Press the “start” button in the main window of VeryPDF PCL Converter, and choose a directory for storing those target files in the popup “Save As” dialog. Those files in the file list will be converted from pcl to pdf, pxl to pdf and px3 to pdf.

Using the similar method, you can convert your files of pcl to formats of jpg, ps, bmp, etc. There are more function descriptions of VeryPDF PCL Converter at https://www.verypdf.com/pcltools/pcl-tools-help.htm. If you want to use the official version of PCL Converter without any limitation, please go to https://www.verypdf.com/order_pcl2pdf_end.html and buy one license for your software.

VN:F [1.9.20_1166]
Rating: 0.0/10 (0 votes cast)
VN:F [1.9.20_1166]
Rating: 0 (from 0 votes)
pdf editor

How to draw an ellipse-shaped comment in my pdf file with VeryPDF PDF Editor?

Ellipse-shaped comment is inserted in some books as annotation, then some words are added to the annotation, thus ellipse-shaped comment plays a role in further explanation. And in astronomy ellipse is an universal issue, the track of stars is an ellipse, so with PDF PDF Editor we can produce the kind of track. Here in order to contact with VeryPDF PDF Editor ellipse-shaped comment is called pdf ellipse, from the preceding introduction we have knowledge of pdf ellipse that is a footnote where you need write some words. Next is the operation for adding pdf ellipse.

Download VeryPDF PDF Editor at www.verypdf.com, then add a pdf file to it, thus the software is enabled.

Later steps follow the illustration below:

image

Click Edit Comment in the toolbar thus there are four icons in active state, click the last one marked by the red rectangle and choose Ellipse Tool.

After that the cursor has been changed into a cross shape, then slide the new cursor in the space of the pdf file according to your meaning, thus pdf ellipse emerges. Look at the illustration below:

image

The pdf ellipse has been added, but how to write some words in it? Please go on with the illustration below:

Double-click the pdf ellipse, then a textbox pops out where you can write.

image

For example in the Ellipse-admin of pdf ellipse enter www.verypdf.com. Double-click in Ellipse-admin and begin to write.

image 

The Ellipse-admin of pdf ellipse can be concealed, if you want it appear again, double-click pdf ellipse anew.

VN:F [1.9.20_1166]
Rating: 0.0/10 (0 votes cast)
VN:F [1.9.20_1166]
Rating: 0 (from 0 votes)