pdf editor

How to add Webding annotations to PDF files by use of VeryPDF PDF Editor?

People use webding annotations in Microsoft Word document, now in VeryPDF PDF Editor you can also use them.  There are 223 pictures about webding annotations, all of them are cartoon pictures. Next let’s recognize them.

Step 1: Open VeryPDF PDF Editor and add a PDF file to it.

Step 2: See the illustration below:

image

image

in the ten categories choose Webdings

image

This is the webding annotations window, in which you can select these pictures as annotations, next say the operation, it is below:

Double-click the picture, thus the the picture is added to the PDF file.

Next I give an example:

image

image 

The size of the picture is changeable, click the picture, then the picture is enclosed, the illustration follows below:

image

put the cursor on the red point and left-click holded, then drag the picture

You can also edit it, double-click the picture, a textbox pops out where you can edit.

image

The textbox can be concealed when you close it, and double-click the picture again, it comes out, and its size can be altered through drag when you put the cursor on any edge of its four lines. 

VN:F [1.9.20_1166]
Rating: 0.0/10 (0 votes cast)
VN:F [1.9.20_1166]
Rating: 0 (from 0 votes)
pdf to powerpoint

Can I preserve graphics of my PDF file when I convert the file to PPT format?

  If you use VeryPDF PDF to PowerPoint Converter to convert the PDF file to PPT format, it can keep the graphics in it.

  Graphics can be functional or artistic. The latter can be a recorded version, such as a photograph, or an interpretation by a scientist to highlight essential features, or an artist, in which case the distinction with imaginary graphics may become blurred. As to the functional, it could be used to show some data in a table. But Graphics is not special, it is just constituted by many little units.pdf2ppt can convert it quite well.

Then please see the operation procedure as follows.

1. Download , install, run.

pdf2ppt as a software, you need to download it from the professional website.https://www.verypdf.com/pdf2ppt/index.html  or you can buy it directly from this link.  https://usd.swreg.org/com/shop/102518/cart/2575402101   Please save pdf2ppt.exe in your computer then install it. Uncompress the package and let it run in your pc.

2. Add file, choose options and save new PPT file.

  • Take “limiting.pdf”for example.There is a graphics in it. By this example to see the  way of converting.

Snap11

  • Add file and choose options. If it has password,please input it. Then convert it.

Snap12

  • It only takes 4-5 seconds to finish the converting. The new PPT file converted from PDF file shows up in the opening status.

Snap14

The graphics is kept tact.

VN:F [1.9.20_1166]
Rating: 0.0/10 (0 votes cast)
VN:F [1.9.20_1166]
Rating: 0 (from 0 votes)
pdf to powerpoint

Can I preserve images of my PDF file when I convert the file to PPT format?

If you convert PDF file to PPT by PDF to PowerPoint Converter, it can preserve the images in the converted PDF file. 

 PDF to PowerPoint Converter(pdf2ppt) is a format converter which can accurately preserve text, pictures, and layout of the original PDF;Convert PDF files to editable PowerPoint presentations, with all the original text, images, graphics, layout and formatting exactly preserved in the converted PPT documents;

Operation sequence as follows.

  • Downloading it here:https://www.verypdf.com/pdf2ppt/index.html  You can buy it at different price according to the quantity. Once enter homepage successfully, please save “pdf2ppt.exe” then let it run in your computer. Once you enter the key words, you can use it.

Snap4

  • Take “internet_gambling.pdf” for example.

Snap5

  1. Add this file to PDF to PowerPoint Converter.

Snap6

2.Choose output options, page range on the menu bar, if source file has password. please input it.

3.Then you can convert it and name the new PPT file, do not forget to save it.

Snap8

4.Then you will get a PPT file with the picture in it.

Snap9

Note:The picture is preserved in the PPT file, but current picture can not be edited in it. If you want to edit it as a single unit, you’d better copy it to professional picture editor, then copy it back again.  However, the picture could be used as background. Also it could be  extracted as a whole.  Please see it like this. This special function will be helpful for those who are designers and needs collecting images every day or who want to reuse the background to add new content.

Snap10

VN:F [1.9.20_1166]
Rating: 0.0/10 (0 votes cast)
VN:F [1.9.20_1166]
Rating: 0 (from 0 votes)
pdf editor

How to add textbox annotation to PDF files by use of VeryPDF PDF Editor?

There are thirteen textboxes in VeryPDF PDF Editor, except one that is special, the left whose difference lie in color and in the area the color covers. Next is the illustration of these textboxes:

image

Next introduce how to add them to PDF files:

Step 1: Open VeryPDF PDF Editor and add a PDF file to it.

Step 2: See the illustration below:

image

image

in the ten categories choose TextBox

image

Step 3: Left-click any textbox, then move the cursor to the PDF file and slide the cursor, thus the textbox is added to the PDF file.

Next I give an example:

image

image

This is the process about how to add textbox annotation to PDF files by use of VeryPDF PDF Editor. Next I give more examples to direct users to find these textboxes’ difference.

image

image

image

The color of these textboxes is changeable, the way is as follows:

right-click the textbox when it’s added to the PDF file and see the illustration below:

image

image

the color of the textbox refers to three places that can be changed, here I omit the illustration 

In the textbox you can edit.

Double-click the textbox, then you can edit in it.

image

Also, you can move the textbox to a new place in the space of the PDF file or change the size of the textbox.

Put the cursor on any point of the eight points of the textbox and drag, the size of the textbox is changed, put the cursor in the space of the textbox and drag, the location of the textbox is changed.

VN:F [1.9.20_1166]
Rating: 0.0/10 (0 votes cast)
VN:F [1.9.20_1166]
Rating: 0 (from 0 votes)
pdf to image converter

How could I convert my PDF file to single page GIF files and how to combine these GIF files into one GIF animation file?

First I think you need to learn how to convert PDF file to single page GIF files. You can choose PDF To Image Converter v2.1 to convert your PDF file to single page GIF files easily. You will know more on PDF To Image Converter v2.1 here: https://www.verypdf.com/pdf2tif/index.htm#dl or buy it online and download it here: https://www.verypdf.com/pdf2tif/pdf2image.exe.

Step1. Add PDF file to PDF To Image Converter v2.1: click “Add” button >choose PDF file in prompt window> “open”--->your pdf file will be below “PDF File” title.

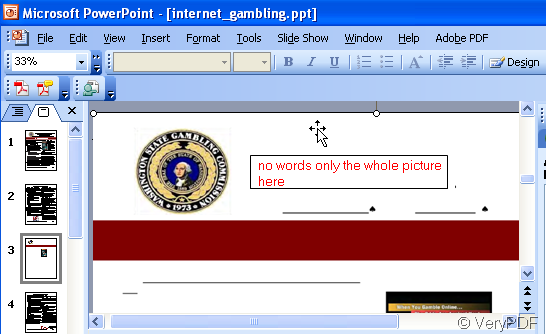
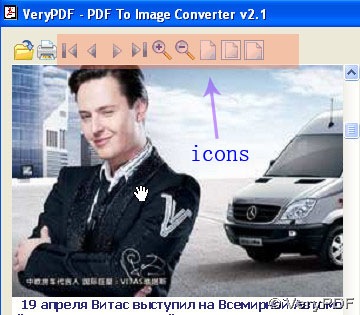
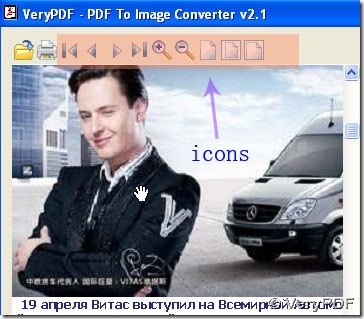
Step2. Click the route of you PDF---> preview activated, you can use icons to check on PDF file.

preview panel of PDF to Image Converter

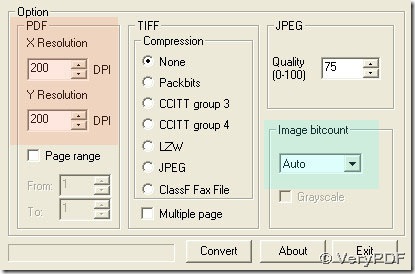
Step3. Select your target file type and target folder for your GIF image:

panel for selecting destination folder and targeting file type

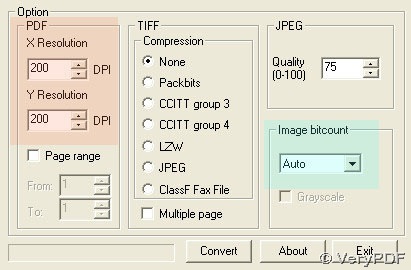
Step4. GIF is a raster image format, so we can set “DPI” larger than original one in Resolution field like below in PDF To Image Converter v2.1. For getting several pages single GIF, we do not activate “Page range” unless we need partly pages from setting in “From” and “To” so that getting page range. And “Image bitcount”, just keep “Auto” stay in optional menu of its  which is a defaulting set(if users want to get grayscale image, just choose “8” and “Grayscale” to get it).

panel for selecting resolution and image bit-count

Step5. Click “Convert” button to convert PDF file to single page GIF files in PDF To Image Converter v2.1.

Here we get 5 pages single GIF images(PDF To Image Converter v2.1 can not support animation format). And now we should think about how to combine these GIF files into one GIF animation file with simple solution, then do not hesitate to choose “imgconv.exe” “docPrint Pro v5.0” and read the next part of this article for we got a great one.

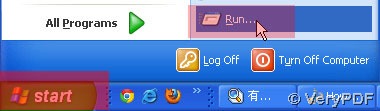
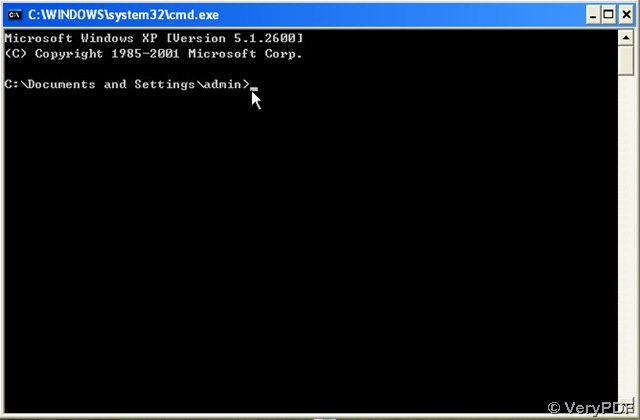
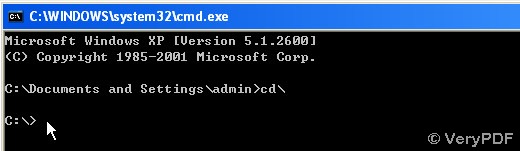
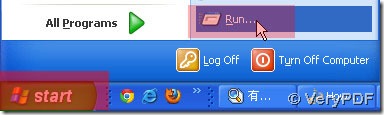
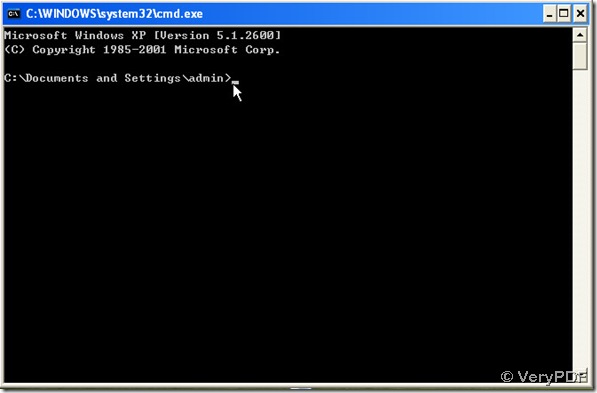
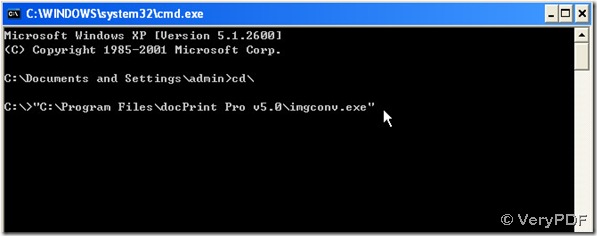
1. Click “start” in your pc> “Run”>cmd>enter/ “ok”--->a black window pop out:

click start and select run to open command prompt window

command prompt window at the beginning

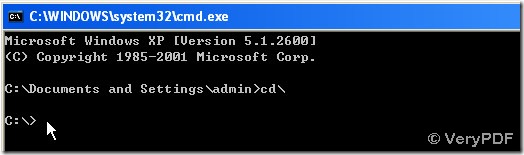
2. In this window, input “cd\”--->enter, you can get this like figure below:

type CD to go back to main directory of C disc

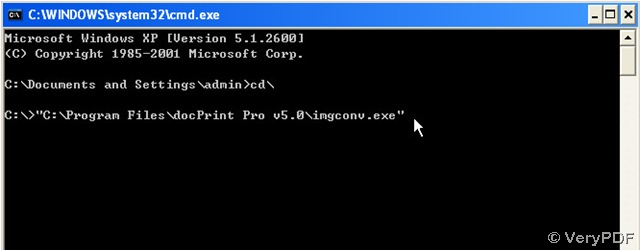
3. Then input your route of “imgconv.exe” in your pc into this black window, you will see it like this:

type path of "imgconv.exe" for using it later

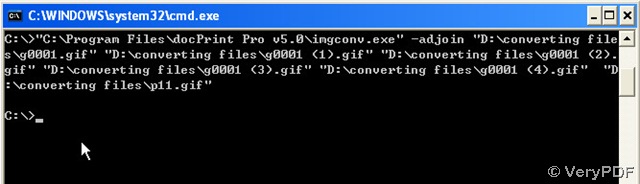
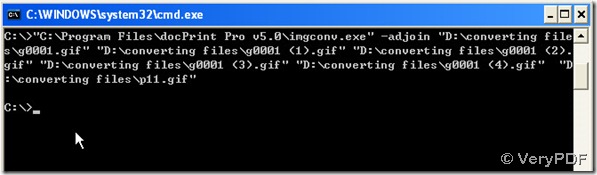
And click “space” button on your keyboard to get a space in black window, too, input “-set delay 200 –adjoin”, still click “space” again, then input those 5 route of 5 GIF images one by one into this black window and type “space”.

4. Then type a route of folder in your pc which you store your GIF animation and enter, you will get the picture below and your GIF animation is done.

command prompt window after you type a route of folder in your pc which you store your GIF animation and enter

If you want to get time interval longer ,you can input “-set delay 300” for example in the following of “…imgconv.exe.”

VN:F [1.9.20_1166]
Rating: 0.0/10 (0 votes cast)
VN:F [1.9.20_1166]
Rating: 0 (from 0 votes)