Showing the content of the MS Office Excel is not the only way that shows the Excel itself to the people. Show Excel in the form of picture is another way to have a try. Say you can insert the picture of the Excel to your existed document. Together with Excel content you can also show some other ideas to your audience. If you have the need to convert Excel to tif or other image formats, please read this article.
Converting Excel to tif by an powerful software named docPrint Pro, by which you not only can save the ink, paper and precious time during the printing but also you can convert the entire printable file to other file formats, such as Excel to tif, pdf to eps. Taking converting Excel to tif for example, show you how to do the conversion by docPrint Pro.
- Download docPrint Pro.
The software itself is the most important part to end the conversion. So we should visit its homepage to know more about it. This is the link of its homepage https://www.verypdf.com/artprint/index.html If you need to know more about the operation, you can refer to this page. https://www.verypdf.com/artprint/document-converter/help.htm If you feel its functions can satisfy your needs, download the free trial version is also available here.
- Detail operations for this software.
1. Add file to docPrint Pro
After downloading the software icon will be shown on the desktop, double click it then you can enter its interface. Simply dragging the Excel to the banks from its folder is the easiest way for adding. If you like, you can click the button add file at the bottom of the interface to add files. Take an random Excel for example.

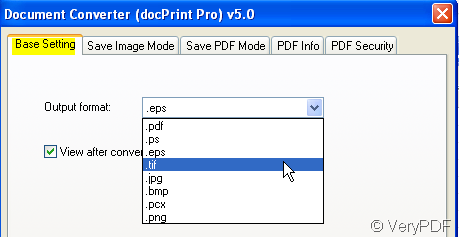
2. Choose the options for output tif file.
Click the button setting at the bottom to set the output file as tif. If you need to set the color depths and color resolution for tif file, please go to save image mode page. Click the button ok to end the setting.
3. Start conversion.
All the preparative work has been done; the last step is to end the conversion by clicking the button start. In this step, you need to choose a folder to save the converted tiff file. The conversion lasts a few seconds then the tiff file will be kept in the chosen folder.
Kindly reminder: limited by the image property, maybe the excel file will be converted to many tiff files if source Excel file has many sheets. It will be difficult to find the exact sheet or part you want to converted from Excel to tif. Suggestion is that you can only add the detail part you want to be converted to docPrint Pro.