DCX is the index used by a FoxPro database, which improves the efficiency of searching and sorting items in the database. docPrint Document Converter Professional can give you an easy and convenient way in the conversion from MS Office Excel document of xls to dcx or xlsx to dcx. After you finish in reading this article, you will get some useful information.
docPrint Document Converter Professional which is also called as docPrint Pro for short is an expert document converter with the ability of converting types of printable documents to image formats. By using docPrint Document Converter Professional, you can fulfill the conversion within three steps.
There are three applications in docPrint Pro, which are designed for different purposes. The GUI application can be used to make batch conversion, the command line application is a good helper if you want to develop software. The virtual printer application can be used to save paper and ink. At the same time, the virtual printer docPrint is also a document converter with a friendly interface, which can print any printable documents to 50+ graphics. Please see the specific introduction to the conversion from xls to dcx in the following contents.
1. Run the printer driver.
Please open an Excel document and click “File”—“Print” to open “Print” dialog box in which you can choose the current printer as “docPrint” in “Printer” combo box and click “Print” button. If you want to use some other way to open “Print” dialog box, please press “Ctrl”+ “P” on the keyboard at the same time. There is also an other situation. If docPrint is the default printer on your computer, you just need to right click the Excel document and click “Print” option, which can run docPrint directly. It is really convenient than the former method.
2. Open “Save As” dialog box.
You should open the “Save As” dialog box in the popup docPrint window form. There are three methods offered here and you can choose anyone of them.
- Click “File” and click “Save as” in the dropdown list.
- Click the “Save File” button which seems like a floppy disk in the toolbar.
- Press “Ctrl”+ “S” on the keyboard, which is a common way used by many people.
3. Save the target files.
In the “Save As” dialog box which is shown in Figure1, you should follow the operations below to complete the conversion from xls to dcx.
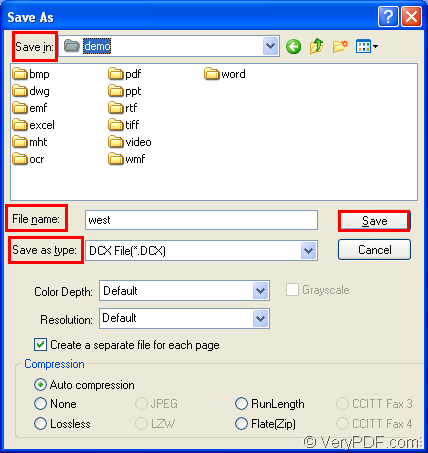
Figure1.
- Please choose a suitable location for all the target files in “Save in” combo box.
- Input the name for the target files in “File name” edit box.
- Choose the right output format for the target files in “Save as type” combo box.
- Click “Save” button to save all the changes.
With the click on the “Save” button, you will see the conversion from xls to dcx run itself. A green progress bar at the bottom of docPrint window form can remind you the conversion progress and the bar will be empty again when the conversion is over. Please browse your target files in the specified location.