How to convert OpenOffice to Postscript?
VeryPDF docPrint Pro can easily help you convert OpenOffice to Postscript. This article will show you how to do it.
Step 1: Run VeryPDF docPrint Pro
Double click the icon of VeryPDF docPrint Pro to run the application. Then you will see the panel of docPrint. Near the bottom of the panel, there are six buttons as following:

The first three buttons are the most useful ones.
Step 2 : Add files
Click the first button “Add File(s)” to add the files you want to convert from OpenOffice to Postscript, or keep pressing Ctrl and select all the files you want to convert, then, release the Ctrl key and drag all the files to the list box.
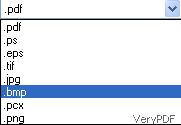
Step 3: Set output format
Click the second button “Setting”, and select the output format to “.ps” on the dialog. Then, click “OK”. Because you want to convert OpenOffice to Postscript, the output format should be “.ps”.
Step 4: Start converting
Click the third button, then a “Save As” box will pop out. Select a path and create a new file by type a new file name in the add box next to “File name”. After that, click “Save” to start converting OpenOffice to Postscript.
![]()
Converting OpenOffice to Postscript will only take you seconds.