pdf to powerpoint

Who can help me translate a German pdf file to English?

    PDF to PowerPoint Converter can translate the German pdf file to English for you.

    PDF to PowerPoint Converter  is a software which can convert the pdf file to editable PowerPoint and it supports nearly all kinds of languages such as English, French, German, Italian, Chinese Simplified, Chinese Traditional, Czech, Danish, Dutch, Japanese, Korean, Norwegian, Polish, Portuguese, Russian, Spanish, Swedish, etc. After converting the pdf file  to PowerPoint, you can put the text to any translation tools.  So I bet you can read the German pdf file by this way.

Now I will show the detail ways to translate it.

  • Get this software by clicking here. https://www.verypdf.com/pdf2ppt/index.html#dl Please read the usage and introduction carefully.
  • Enter the interface, add your German pdf file to it and think about the menu options well then choose them.
  • Choose the page range and input the password at the “PDF File” option if the source file has.
  • Convert it and do not forget to save it.
  • Copy the German to the  translation tools then you can read it.

Then I will show the steps by pictures. I take a German pdf file for example. The content has been shown in picture 1. Please follow the steps as I marked in the picture 1.  Then a PowerPoint with the same content in pdf file will bounce to the screen in  a few seconds,like picture 2 .The last you need to is copying the content to translation tools.

Snap3

                                     picture 1


 Snap4

                                  picture 2

VN:F [1.9.20_1166]
Rating: 9.0/10 (1 vote cast)
VN:F [1.9.20_1166]
Rating: 0 (from 0 votes)
docprint pro

Can your docPrint and docPrint PDF Driver support Arabic characters? Please show me an example.

Yes, both VeryPDF docPrint and VeryPDF docPrint PDF Driver support various languages including Arabic characters. To check this feature,  the following Word document as illustrated  below will be employed as a test  sample. In this document, “VeryPDFdocPrint، أداة عظيمة ويجب أن يكون سطح المكتب. انتقل لمحاولة شرائه.”, which means “VeryPDFdocPrint, a great and  must have desktop tool. Go to try and buy it.”, is repeated for three times at different size.

image

Now let’s open the Word file and go to convert this document from Word to PDF files via VeryPDF docPrint and VeryPDF docPrint PDF Driver respectively.

Convert Word to PDF via VeryPDF docPrint

  • Press Ctrl+P
  • Specify the Name to docPrint in the print dialog box>OK
  • Set the options in the docPrint dialog box>OK
  •  Click image >Save the file converted from Word to PDF in the Save  As dialog box.

The following screenshot illustrates the file with Arabic language text converted from Word to PDF via VeryPDF docPrint:

image

  • Press Ctrl+P
  • Specify the Name to docPrint PDF Driver in the print dialog box>OK
  • Save the file converted from Word to PDF in the Save  As dialog box.

The following screenshot illustrates the file with Arabic language text converted from Word to PDF via VeryPDF docPrint PDF Driver:

image 

As you can see in the two screenshots above, the PDF files converted via VeryPDF docPrint and VeryPDF docPrint PDF Driver keep high quality from the source Word document. Hence, both VeryPDF docPrint PDF Driver obviously support Arabic languages.

VN:F [1.9.20_1166]
Rating: 0.0/10 (0 votes cast)
VN:F [1.9.20_1166]
Rating: 0 (from 0 votes)
pdf to image converter

What could help us convert PDF to TIFF image?

PDF To Image Converter v2.1 will help you with converting pdf file to tiff image easily as you wish.

PDF To Image Converter is an application program based on Windows platform, which can directly convert PDF files to kinds of image formats, such as TIFF, JPG, GIF, PNG, BMP, EMF, PCX, TGA etc..

You can get more details on this link: https://www.verypdf.com/app/pdf-to-image-converter/try-and-buy.html

If you would like to try PDF To Image Converter v2.1, here is another link for you to get a trial version: https://www.verypdf.com/pdf2tif/pdf2image.exe. Download PDF To Image Converter v2.1 here and experience it with your unimportant file for there will be a watermark on your file after you convert it in PDF To Image Converter v2.1.

How can we convert pdf file to tiff image in PDF To Image Converter v2.1? First we should know some information on TIFF image format briefly.

TIFF is short for Tagged Image File Format, a variable-resolution bitmapped image format developed by Aldus in 1986. The TIFF format is widely supported by image-manipulation applications, by publishing and page layout applications, by scanning, faxing, word processing, optical character recognition and other applications.Adobe Systems, which acquired Aldus, now holds the copyright to the TIFF specification. TIFF has not had a major update since 1992, though several Aldus/Adobe technical notes have been published with minor extensions to the format, and several specifications, including TIFF/EP (ISO 12234-2), TIFF/IT (ISO 12639),TIFF-F and TIFF-FX have been based on the TIFF 6.0 specification.

The following paragraph is some points on TIFF:

  • No compression.
  • TIFF Class F. Class-F is the TIFF extension for fax documents.
  • TIFF CCITT. These are compressed TIFF files that are commonly used for FAX transmission and document imaging.
  • TIFF CCITT Group 3  is more advanced and more compressed than TIFF CCITT. CCITT Group 3--Dimensional Modified Huffman RLE.
  • TIFF CCITT Group 4. These are TIFF CCITT files in a format that is more advanced and more compressed than TIFF CCITT Group 3.
  • PackBits compression - a form of run-length ecoding.

Run your PDF To Image Converter v2.1, there will be its interface like below:

interface of PDF to Image Converter

In this picture, you can see kinds of icons above the gray field that is for your preview, which are used for looking over your pdf file in different angles. For this, you should click the first yellow icon to choose a pdf file in pop-out window, then press down “open” button in this window:

click open icon to add PDF to preview PDF

Also you can move your mouse onto your preview area when there will be a hand tool on it like the following red loop, then keep clicking your left button without pressing up on your mouse to move your mouse, your preview pdf will be moved together. In the green loop, it is a printing icon, which is used for printing when you need.

adjust PDF with little hand

You will notice that in the right field of PDF To Image Converter v2.1, there is a table under the “PDF File” and “Page Count” subjects. You need to click “Add” button below it to show your route of your pdf file that is in preview field:

click add to add PDF

In the pop window like above, choose your pdf file by double-clicking or clicking “Open” button after clicking your pdf file here:

PDF path in table and remove buttons

In the blue loop, you can press down “Add” button to add another route like this, which is located in the green loop in the figure above; You can use “Remove” or “Remove all” button to delete your pdf or delete all your pdf files one time quickly after you click your route that just appeared like the meaning that purple and green loops show us.

Look at your “File type” on the interface of PDF To Image Converter v2.1, click the dragging optional menu to choose your target file format and click “Browse” button to select destination folder for your tiff image,then click “ok” button in the pop window:

set objective format

click browse to set objective folder and click ok

edit box and button for setting objective folder

In “Page Count” subject, you can understand there are 4 pages from your pdf file, you have to activate “Page range” option, then you will get “From” and “To” active, too, keep the value in “From” as “1” still and change the value in “To” as “4” or the one greater than 4. Here is a rule, which is that keep the value in “To” equal or larger than the greatest number in the “Page Count” column when there are lots of pdf files to get all images without missing.Also you just do not click the “Page range” button to get all images converted from pdf file too. If you want some segment pages of your pdf file converted, you just need to set your values in “From” and “To” as the range you want. For example, when “From”=3, “To”=4, you will get the third image and the fourth image converted from pdf file here.

At the beginning of this article, we mentioned about the compression of TIFF,so here we click “None” option at the same time choose “Multiple page” selection to make your images continuously in just only one tiff file. And click “Image bitcount” to “Auto” mode if you would like. Here we need to mention that between “1”, “4”, “8”, “24” and “Auto” mode:

  • For getting colorful images, you can choose “4” and “24” mode, “24” is equal with “Auto” in PDF To Image Converter v2.1, also “8” when you do not activate “Gray scale”. The greater your value is, the more clear your image is;
  • For getting black and white images, you could choose “1” and “8” when you just only choose “Grayscale”  mode after you choose “8” mode in optional dragging menu in “Image bitcount”;

set DPI, image bit-count and compression and click convert

Click “Convert” button on the panel of PDF To Image Converter v2.1, then close PDF to Image Converter.

VN:F [1.9.20_1166]
Rating: 0.0/10 (0 votes cast)
VN:F [1.9.20_1166]
Rating: 0 (from 0 votes)
docprint pro

In the docPrint Document Converter application, how can I combine DOC, DOCX, PPT, PPTX, XLS, XLSX, HTML, etc. various formats into one PDF file?

The docPrint Document Converter application provides a regular console interface and GUI (Graphical User Interface) to batch convert document files including Microsoft Word, HTML, Web Pages, RTF, Text, Excel, PowerPoint, Visio, AutoCAD drawings, Adobe PDF, PS, EPS, e-mail etc. files to PDF, Postscript (PS), EPS, EMF, WMF, JPEG, TIFF, BMP, PCX, PNG, GIF, TGA, PSD, PCD, MNG, PIC, PBM, PNM, PPM, AVS, JBG, JP2, JPC, WBMP, XBM, XPM, XPS, PCL etc. You can use docPrint Document Converter to merge several document files to create a single PDF file, or convert each document file to a PDF file.

When you need to combine DOC, DOCX, PPT, PPTX, XLS, XLSX, HTML, etc. various formats into one PDF file, you should follow the following steps:

1. Input all the documents you want to convert into application. There are two conditions you may face:

  • Some documents can be dragged to the interface directly on condition they are the so called "Supported files" which includes  DOC files, RTF files, XLS files, PPT files, VSD files, HTM files,PS files, EPS files, PDF files.
  • Some documents can not be  dragged to the interface directly because they are not included in the "Supported files". But you can add them as follows:

Click Add Files>specify the File of type as All Files>select the file you want to convert and click it> click OK to add to the list box.

image


You can repeat the steps above until you add all the documents  to the list box.

2. Set the PDF Mode to combine documents to one PDF file. You can do as follows:

Click Setting>click Save PDF Mode>select combine documents to one PDF file>OK

image

3. Click Start to start converting.

You will get a PDF file containing all the documents you want to combine in a PDF file in seconds.

The following screen shows you the effect of conversion form multiple document in different formats to a PDF file.

image

VN:F [1.9.20_1166]
Rating: 0.0/10 (0 votes cast)
VN:F [1.9.20_1166]
Rating: 0 (from 0 votes)
docprint pro

A guide to use docPrint Document Converter with GUI

The file conversion tool docPrint Document Converter is a powerful software for converting files from and to commonly used formats. There are three approaches to converting your document with docPrint Document Converter: virtual printer, command line and Graphical User Interface (GUI). The two former approaches are introduced in articles here and here. The article is trying to provide a simple guide of using docPrint Document Converter with its GUI.

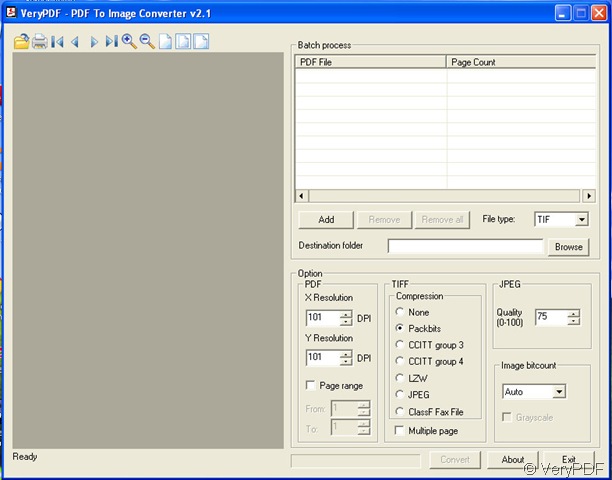
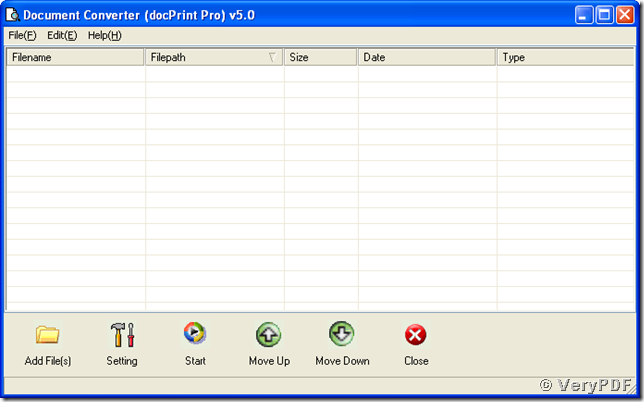
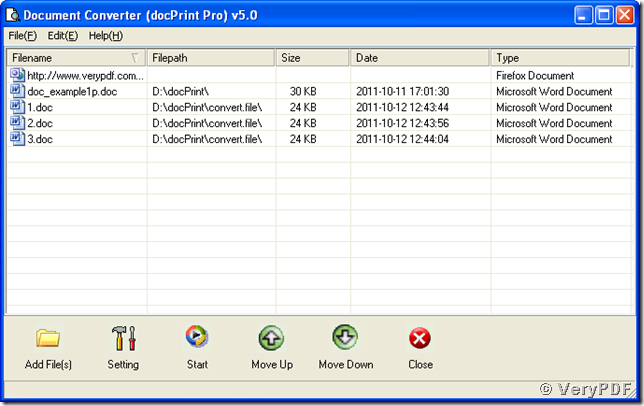
If you decide to use docPrint Document Converter, you should download it from https://www.verypdf.com/artprint/index.html#dl and install it onto your PC with Windows Operating System installed. You must find an executable file named “doc2pdf_win.exe” in the destination installation directory and a shortcut linked to the file in the “All Programs” list of “Start” menu of your Windows system. Run the program “doc2pdf_win.exe” and you will see a GUI window titled “Document Converter (docPrint Pro) v5.0”as presented in the following snapshot.

image

The following words are descriptions of the GUI.

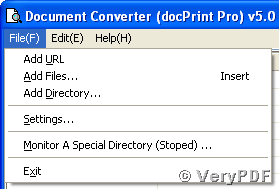
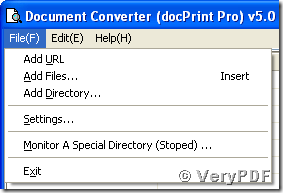
1. The following picture is the “File” menu where

“Add URL” is for adding a url (http/https web address) to convert,
“Add Files…” is for adding a document of any supported formats to convert,
“Add Directory…” is for adding a directory in which all the documents of supported formats will be converted,
“Settings…” calls the setting dialog that will be described in the latter paragraphs,
“Monitor a Special Directory …” is to activate the automatic conversion function that will be described in the latter words, and
“Exit” is to exit the program.

image

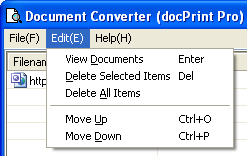
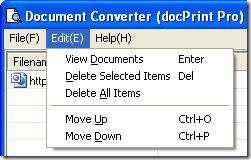
2. The next snapshot is of the “Edit” menu:

“View Documents” calls the format-associated application to view the selected document in the file list,
“Delete Selected Items” deletes the selected items of documents that will not be converted,
“Delete All Items” removes all items in the file list,
“Move Up” and “Move Down” reorder the sequence of items in the file list for converting multiple documents to a single one.

image

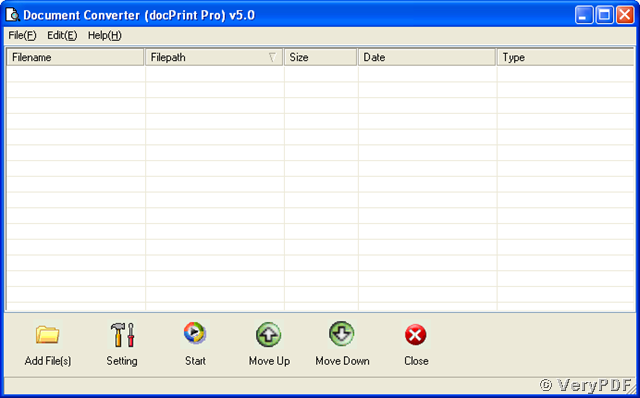
3. The following snapshot is from the file list that displays the items of documents to convert.

image

The coming words will present a simple example of converting doc to pdf, which illustrates the basic functions of docPrint Document Converter.

These are the steps:

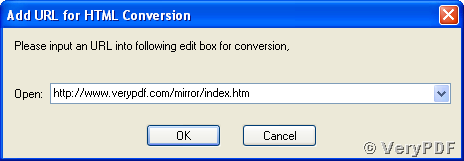
1. Follow the menu path “File –> Add URL” and continue to the popup dialog of “Add URL for HTML Conversion”. Input the URL to convert into the “Open” editable combo box as shown in the following snapshot.

image

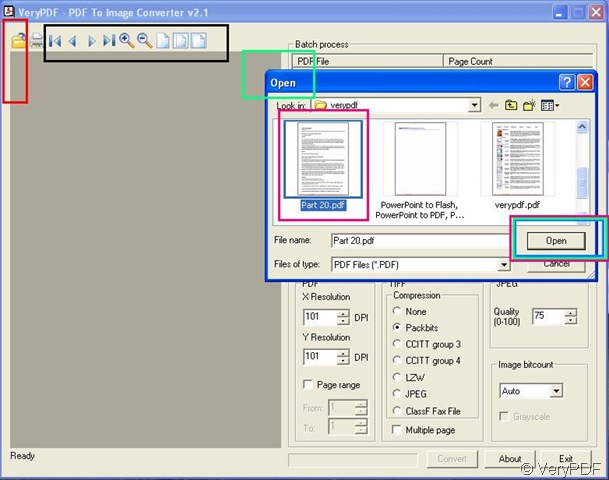
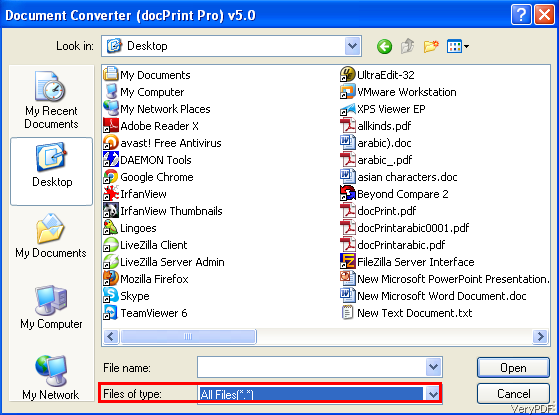
2. Choose “File –> Add Files” to call the system file picker interface, explore to and select the documents to convert.

3. Use “File –> Add Directory” to call the system directory selector, explore to the directory containing the documents to convert.

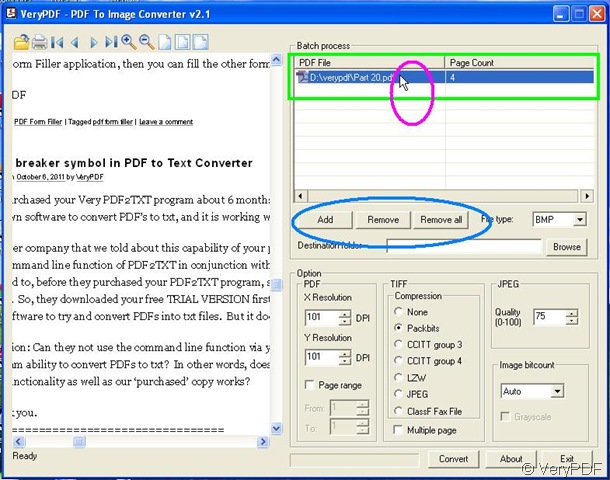
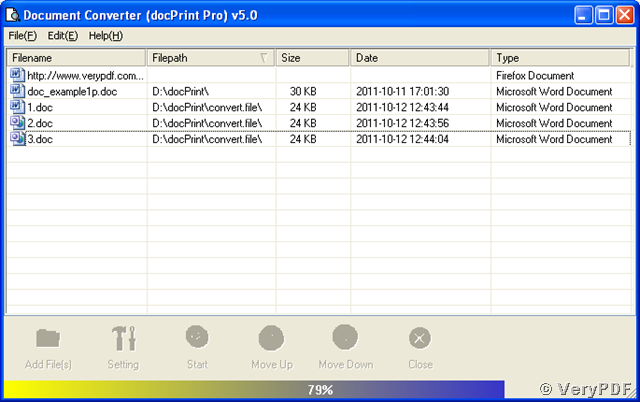
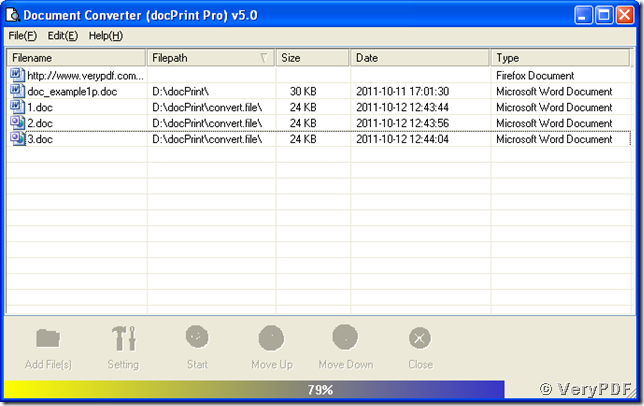
The following snapshot of the docPrint Document Converter GUI shows that five items in the file list are added for conversion.

image

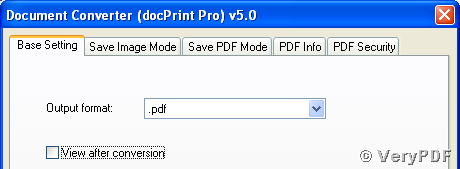
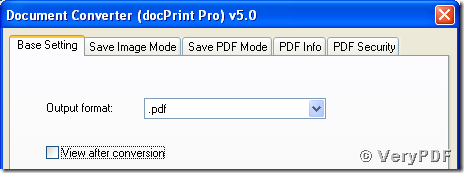
4. Select “File –> Settings” or press the “Setting” button in the GUI window to activate the setting dialog as presented in the following snapshot. In the “Base Setting” tab of the dialog, choose the target output format in the “Output format” dropdown list (pdf selected for converting doc to pdf). Check the “View after conversion” box if you want to view the conversion target documents using associated applications, or uncheck it for viewing the documents manually (suggest to uncheck for converting to more than one target document).

image

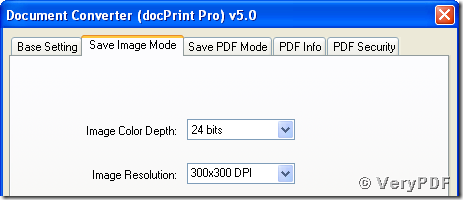
In the “Save Image Mode” tab as shown in the next snapshot, select the “Image Color Depth” and the “Image Resolution” in the dropdown lists (They are ignorable for converting to pdf).

image

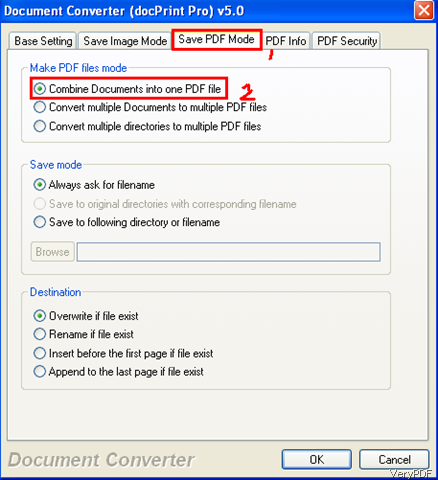
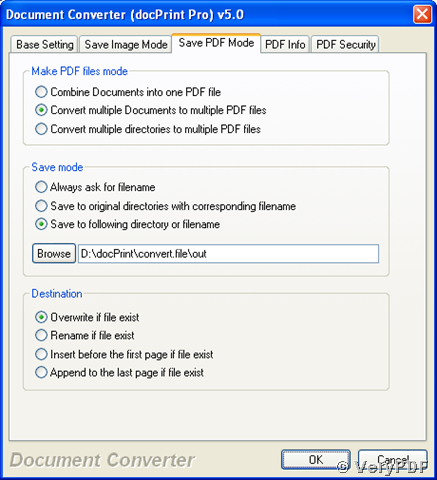
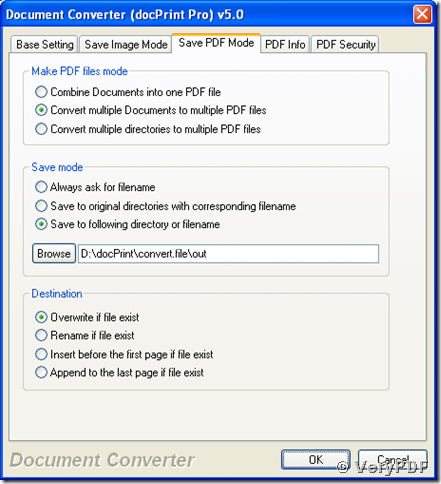
In the tab of “Save PDF Mode”, the “Make PDF files mode” group box determines how to create the target pdf document: combine all documents into one single pdf file, create a target file for each source file (chosen for this case) or merge the documents in the same directory into one single pdf file. the “Save mode” group box provides three modes to save the conversion target documents (A customized output directory “D:\docPrint\convert.file\out” is specified for this case). “Destination” group box defines four policies for writing target converted documents. The last two tabs, “PDF Info” and “PDF Security” are for defining the document copyright and permissions. Press “OK” button after setting all the parameters and return to the main interface of docPrint Document Converter.

image

5. Press “Start” button in the main window and you will see a progress bar in the bottom as presented in the next snapshot.

image

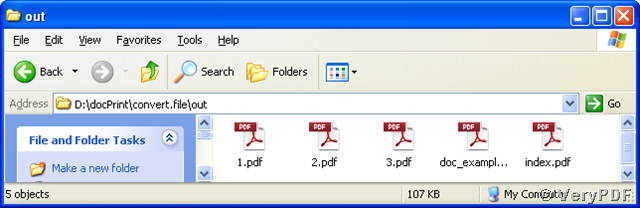
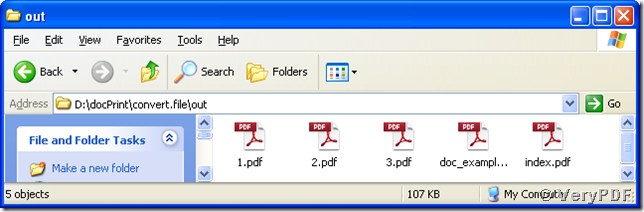
The documents/url are converted into five pdf files as displayed in the following snapshot of Windows Explorer.

image

At last, it is a guide of an advanced function of docPrint Document Converter, automatic conversion. You can command docPrint Document Converter to convert your newly added documents of specified formats in specified directories, and save into specified formats and specified directories automatically. Below are the steps:

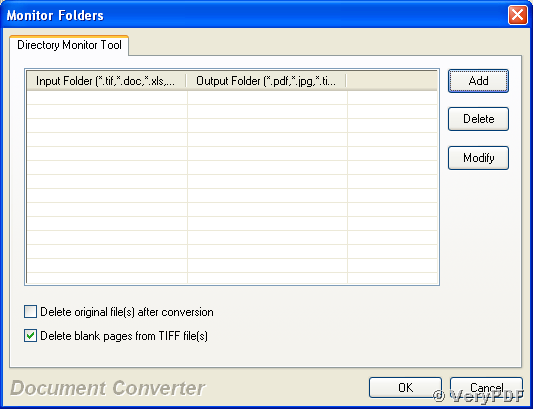
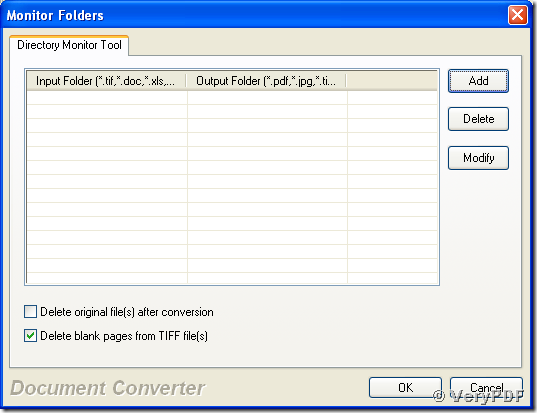
1. In the main window of docPrint Document Converter, choose “File –> Monitor a Special Directory” and continue to the “Monitor Folders” dialog as follow. You may also check/uncheck the boxes of “Delete original file(s) after conversion” and “Delete blank pages from TIFF files(s)” in the bottom of the dialog box to meet your specific demands.

image

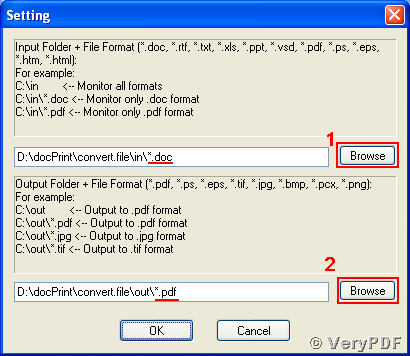
2. Press “Add” button in the “Monitor Folders” dialog box and proceed to the “Setting” dialog as presented below.

settings

3. In the “Setting” dialog, browse to the directory that is to be monitored via pressing the upper “Browse” button and explore to the directory that is for saving converted document with pressing the lower “Browse” button. All the documents of supported formats will be converted, however, you can specify a format to monitor with adding “wildcard character (*).extension” (*.doc for converting doc to pdf) to the end of the input path, and a target format with adding “wildcard character (*).extension” to the end of the output path (*.pdf for converting doc to pdf). Then press the “OK” button and come to the “Monitor Folders” dialog.

4. In the “Monitor Folders” dialog box, press the “OK” button and then docPrint Document Converter automatically converts the documents of specified formats in specified directory and saves the converted documents in specified formats and directory.

For more information about docPrint Document Converter, please go to https://www.verypdf.com/artprint/index.html.

VN:F [1.9.20_1166]
Rating: 0.0/10 (0 votes cast)
VN:F [1.9.20_1166]
Rating: 0 (from 0 votes)