docPrint Pro will do you a great favor when you convert MS Office excel to ps format file.docPrint Document Converter Professional is a software product that dynamically converts MS Office 97/2000/XP/2003/2007, WordPerfect, AutoCAD DWG, PostScript, Adobe Acrobat PDF and many other document types to Adobe Acrobat PDF, PostScript, EPS, XPS, PCL, JPEG, TIFF, PNG, PCX, EMF, WMF, GIF, TGA, PIC, PCD and BMP etc formats. It works in both GUI version and Command Line version. With docPrint Document Converter Professional you can convert your documents from and to 50+ formats easily.
The download website of docPrint Pro is https://www.verypdf.com/artprint/docprint_pro_setup.exe. When you install it in your computer,the wizard will remind your whether to set docPrint Pro as your default printer.You can choose “Yes” or “No”.If you click “No”,there is an other way to set docPrint Pro as default printer.
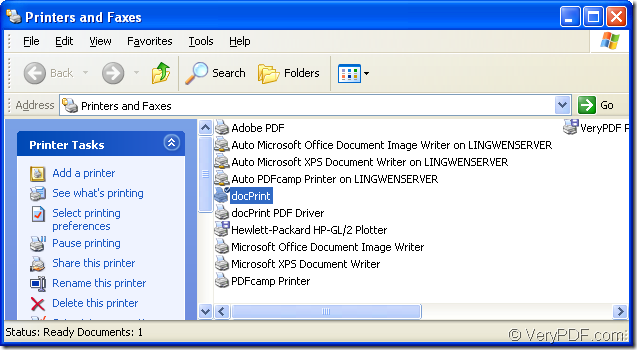
Please click “Start” button at the left bottom of desktop and click “Printers and Faxes” option in start menu.It will pop up a dialog box showed in Figure1 in which you can see all the printers and faxed installed in your computer.Then right click “docPrint” and choose “Set as default printer” in dropdown list.After that,you will find there is a small check pattern above docPrint,which means the setting is successful and docPrint Pro is the default printer now.
Figure1.
The operations below are the details to help you convert excel to ps format file.If you are reading this article,the following steps will give you a clear guide.
1.Run printer driver.
If docPrint Pro is the default printer in your computer,you can run it like this:
- Find the excel document and right click it to choose “Print” option.
- Open the excel document and click the icon
 in the toolbar.
If not,you should open excel document first and operate like the following steps:
- Click “File” and click “Print” in dropdown list.
- Press “Ctrl”+ “P” on the keyboard.
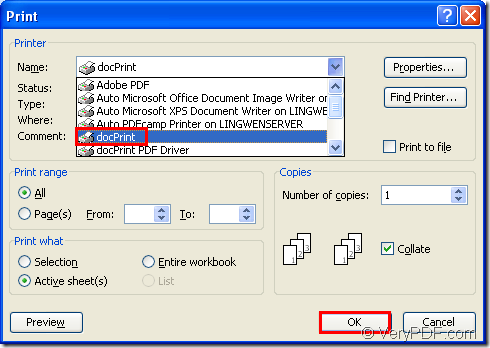
Then you will see a “Print” dialog box appears showed in Figure2 in which you should set current printer as “docPrint” in “Name” combo box and click “OK0” button to enter the next dialog box.
Figure2.
2.Open “Save As” dialog box.
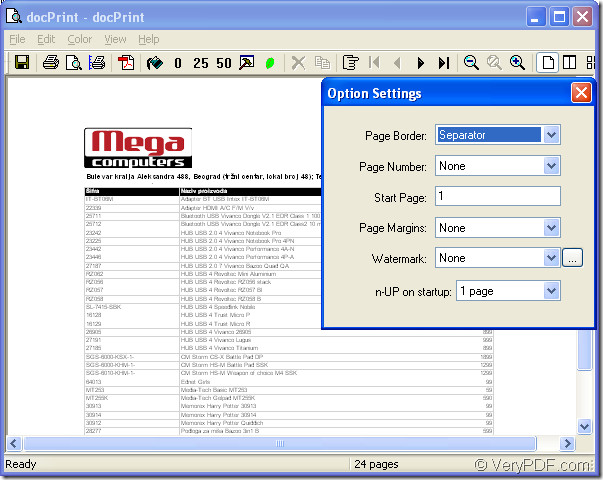
To open “Save As” dialog box in popup “docPrint” dialog box showed in Figure3, you can:
Figure3.
- Click “File” and click “Save as” in dropdown list.
- Click the icon
 in the toolbar.
- Use the hot key “Ctrl”+ “S”.
3.Set and save the target file.
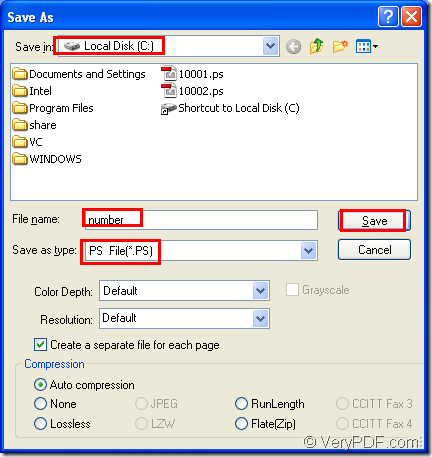
Then the dialog box “Save As” showed in Figure4 will pop up.You can do the following operations to set and save the output file.
Figure4.
- Specify the path for the target file in your computer in “Save in” combo box.
- Make sure the name of output file in “File name” edit box.
- Choose the file type for the target file in “Save as type” combo box.
- Click “Save” button to run the conversion of excel to ps.
If the size of excel document is not very big,the speed of the conversion will be very fast.If not,you should wait for a while.To find the target file in specified location marks the end of the conversion of excel to ps.If you still have any questions,you can read some other articles about docPrint Pro about same function at https://www.verypdf.com/wordpress/. If you want to learn more information about docPrint Pro,please visit it home page https://www.verypdf.com/artprint/index.html.


