To convert scanned image to PDF document, you will use the document converter which is able to convert image to PDF document also with the OCR tech embedded inside. The application you can try is VeryPDF Image to PDF OCR Converter. There are two versions of the application—GUI version and command line version. In this article, you will see how to make the conversion with these two kinds of applications.
To download Image to PDF OCR Converter or Image to PDF OCR Converter command line, please access its homepage. It is easy to install the application on your computer. Just by double clicking the setup file and following the installation wizard, you will be able to fulfill the installation procedure.
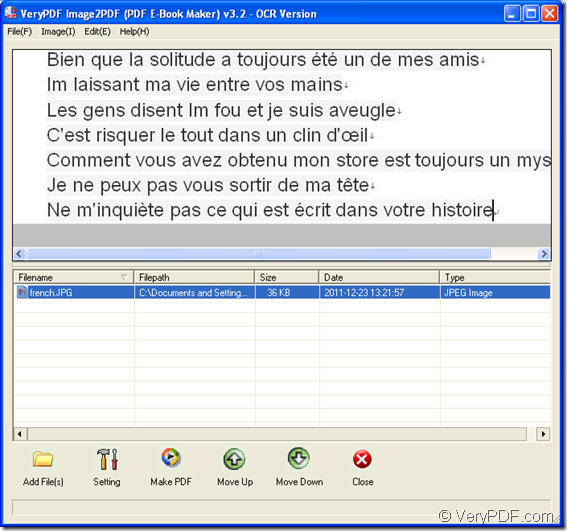
Then please see the specific steps for converting scanned image to PDF document in the contents below. You need to open the GUI application by double clicking its desktop icon or you can click “Start”—“All Programs”—“Image2PDF OCR v3.2”—“Image2PDF OCR v3.2” to open the application. Please see its main window in Figure 1.
Figure 1
Then please add scanned image file into the application. You can click “Add File (s)” button below the file list or click “Files (F)”—“Add Files” above the preview frame to open file picker window from which you can choose the image file you want to convert. In addition, you can also drag and drop the file you need into the file list. When you want to remove the file, please right click it and click “Delete Selected Item” option in floating item.
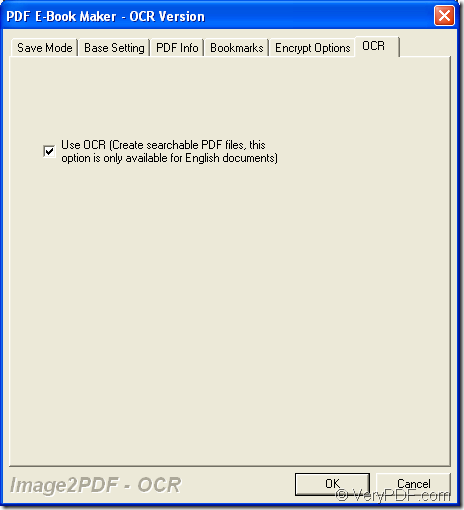
Click “Setting” button after that and you will see “PDF E-Book Maker-OCR Version” dialog box which contains several tabs in a tab control panel. Just click “OCR” tab and check “Use OCR” option if you don’t want to set other parameters for the target file. Then please click “OK” button. Please see the dialog box in Figure 2.
Figure 2
The interface will return to the former one and please click “Make PDF” button and two options will appear besides the button. You need to choose “Convert selected 1 file into one pdf file” or you can right click the file in file list and click “Convert selected 1 file into one pdf file” option in floating item. Then please save the target file in “Save as” dialog box and run the conversion from scanned image to PDF by clicking “Save” button.
As mentioned above, you can also use the command line application Image to PDF OCR Converter Command Line to make this conversion. The following contents will put emphasis on showing you the conversion way.
You need to open MS-DOS command prompt window at first. Please click “Start”—“Run” to open “Run” dialog box and input “cmd” in “Open” combo box and click “OK” button.
The command line to be inputted in the window contains called program, options for setting parameters for the target file, output file and input file. Please see the basic usage of the command line below:
img2pdf [options] <-o output> <images>
If you want to better understand the template above, please see the following example:
img2pdf -x 1 -b –1 -r 300 -o c:\sample.pdf c:\input.pdf
In the command line,
img2pdf stands for the called program img2pdf.exe which is the executable file in unzipped package of the application.
-x 1 is to create searchable PDF file from input image file.
-b –1 means that not to use bookmark for the target file.
-r 300 is to set resolution for target file.
-o c:\sample.pdf stands for the path of source file.
c:\input.pdf stands for the path of target file.
At last, please run the conversion from scanned image to PDF by hitting on “Enter” button on your keyboard. Several seconds later, you will get your target file in the location you have just set.

