PNM is a kind of bitmap image which is created in the Portable Any Map format. PNM files store one image and do not use compression method. If you want to print pnm to emf format image, you are recommended to use the virtual printer VeryPDF Demo EMF Printer which is the internal application of the SDK Mini EMF Printer Driver for the printer has the ability to print any printable documents to EMF image format within one step.
Mini EMF Printer Driver supplies callable virtual printer and interfaces for software developers for developing their own applications basing on the SDK to realize the function of printing any printable documents to image formats. The SDK also supplies command line application which can be called in applications, too. If you want to use VeryPDF Demo EMF Printer, you should click here to download Mini EMF Printer Driver and install it on your printer.
After the installation, you can change the name for VeryPDF Demo EMF Printer in the printer list. Pleaser click “Start”—“Printers and Faxes” to open the printer list and find VeryPDF Demo EMF Printer. Just right click on it with your mouse and click “Rename” option to change the name in the file name frame.
You can also buy the developer license at the following link: https://www.verypdf.com/order_miniemfprinter.html. If you successfully buy it, you will never need to pay any other fees for the SDK any more. You can freely distribute your own software or redistribute the components about Mini EMF Printer Driver to your applications.
To learn how to print pnm to emf with VeryPDF Demo EMF Printer, please see the following contents.
You need to open PNM image with some kind of image viewing or processing program such as IrfanView. Then please click “File”—“Print” to open “Print Preview” dialog box. In “Printer” dropdown list, you will see all the printers installed on your computer and you should choose “VeryPDF Demo EMF Printer” as the current one. Then please click “Print” button to print pnm to emf. You can see the printing process in Figure 1. To open this dialog box, you can also use the hot key “Ctrl”+ “P”.
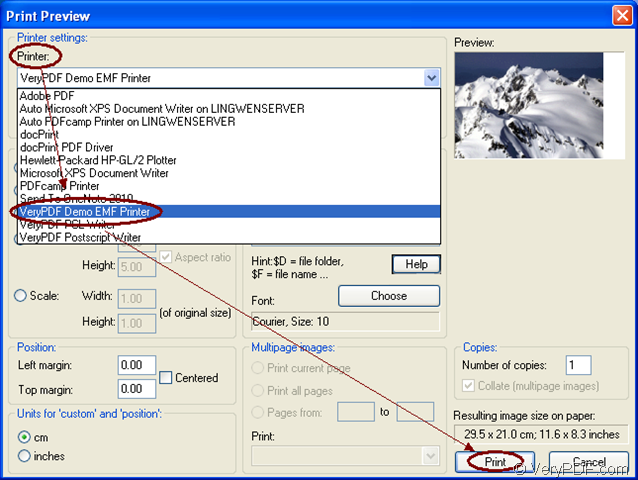
Figure 1
The target file will be saved in the default output location C:\. If you want to change it as another one, please open the initialization file in the installation of Mini EMF Printer Driver by clicking the path “C:\Program Files\VeryPDF Mini EMF Printer v2.0\emf_printer_driver\option.ini” and rewrite “C:\” as the new location.
If you want to learn more information about Mini EMF Printer Driver, you can visit its homepage by clicking the following link: https://www.verypdf.com/artprint/mini-emf-printer-driver.htm.