JBIG is bitonal image created in the JBIG format. JBIG can store a black and white (1-bit) raster graphic using lossless compression. The JBIG standard was replaced by the JBIG2 specification (.JB2 files), which compresses bi-level images more efficiently. Another name of JBIG is JBG which is used more often than JBIG.
You can convert the document of Microsoft Office ppt to jbig with docPrint which is an application in docPrint Document Converter Professional.
docPrint is a Windows printer driver that saves ink, paper and time by controlling printed output. It supports to print 2, 4, 6, 8 or 16 pages on a single sheet of paper. It also supports to scale A0, A1, A2, A3 papers to standard Letter or A4 paper sizes.
docPrint is also a document converter. It allows to converting any printable document to 50+ graphics. docPrint supports various image formats, resolutions and compressions. docPrint is easy-to-use, just print a document to docPrint, you will be able to start using Document Printer software.
To use docPrint, you should download docPrint Document Converter Professional which also contains two other applications—GUI application and command line application at https://www.verypdf.com/artprint/docprint_pro_setup.exe. The following contents can be seen as a guide to teach you how to convert ppt to jbig.
1. Run the printer driver
If docPrint is not the default printer, please open the PPT document which needs to be converted and click “File”—“Print” to open “Print” dialog box in which you can choose “docPrint” as current printer. Then click “OK” button. If docPrint is the default printer, some operations will be ignored. You can just right click on the PPT document and choose “Print” option to directly run docPrint.
2. Open “Save As” dialog box
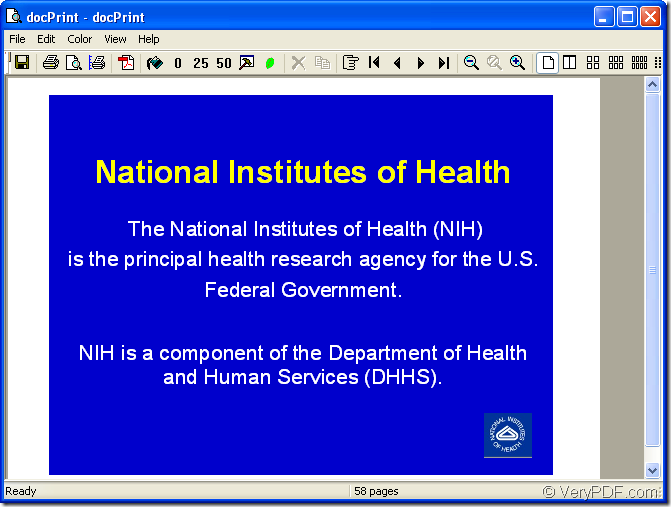
In popup “docPrint” dialog box showed in Figure1, you have several methods to open “Save As” dialog box which is the last one in the conversion from ppt to jbig. You can click “File” and click “Save as” option in dropdown list or use the icon which looks like a floppy disk in the toolbar. You can also take the hot key “Ctrl”+ “S” to help you open “Save As” dialog box.
Figure1.
3. Save the target files
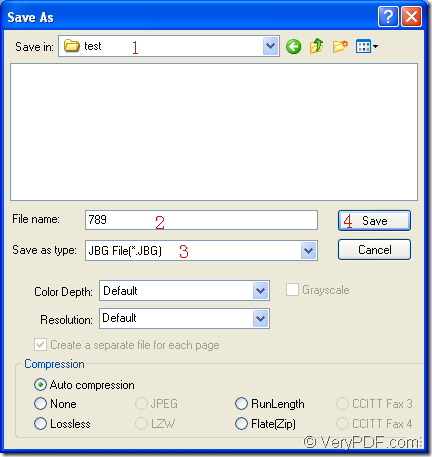
The target files can be saved and the conversion from ppt to jbig can be run in “Save As” dialog box. Before running the conversion, you should finish the following operations. (1). Please select a path for the output files in “Save in” combo box no matter in the existed and a created one. (2). Please input a good name for the output files in “File name” edit box. (3). In “Save as type” combo box, you should choose the output format for the target files. (4). Click “Save” button. Please see Figure2.
Figure2.
You will see a green progress bar appears at the bottom of “docPrint” dialog box. When it is empty again, the conversion from ppt to jbig is over and you are able to browse the target files in specified location.

