There are only four steps to convert scanned PDF to Excel file when you use the application VeryPDF PDF to Excel OCR Converter. This application supports to recognize six kinds of languages, including Italian. So to extract the characters from your scanned Italian PDF document is only a piece of cake for PDF to Excel OCR Converter. In addition, the application also supports some other functions which will be mentioned in the following contents.
Please download the free trial version of PDF to Excel OCR Converter at its homepage where you can also get some more features about the application. After the evaluation, if you want to use the application without any limitations, you need to buy it also at the homepage.
Now please see the steps about converting scanned PDF to Excel.
1. Open the application.
There are four ways that you can choose according to your conditions.
- Find the installation folder to open it and double click the executable file winpdf2excel.exe.
- Click “Start”—“All Programs”—“VeryPDF PDF to Excel OCR Converter v2.0”—“VeryPDF PDF to Excel OCR Converter v2.0”.
- Double click the application icon if you have created one when you install the application.
- Right click the icon and click “Open” option in dropdown list.
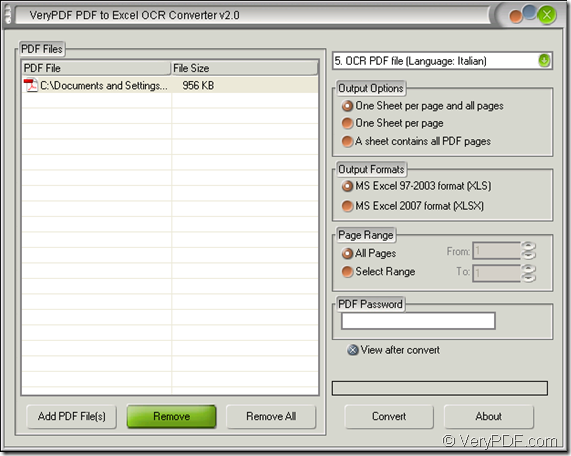
You will see the main window of PDF to Excel OCR Converter on the screen. Please see in Figure 1.
Figure 1
2. Add scanned PDF document
Three ways are for you reference to add scanned PDF document into the application.
- Right click file list. A floating item will come out, in which click “Add files” option to open file picker window where you can choose PDF document to be converted.
- Click “Add PDF File (s)” button to open the same file picker window.
- Drag the scanned PDF and drop it into the file list.
3. Activate OCR and set parameters for target file
On the right of application interface, you are able to activate OCR function and set the parameters for target file.
- Choose the fifth option: OCR PDF file (Language: Italian) in top right dropdown list.
- Choose one output layout in “Output Options” group box.
- Select “XLS” or “XLSX” format as output format in “Output Formats” group box.
- Specify page range in “Page Range” group box.
- Input the open password of the encrypted scanned PDF document in “PDF Password” edit box.
- Check “View after convert” option if you need to browse target file the first time when conversion from scanned PDF to Excel is over.
4. Run the conversion
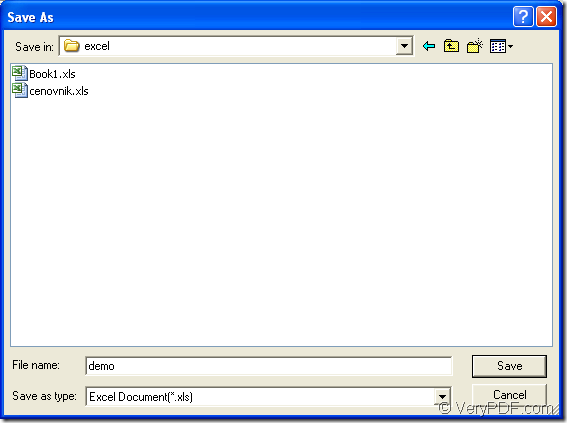
Please click “Convert” button to open “Save as” dialog box and you need to do operations as follows:
- Specify output location for target file in “Save in” dropdown list.
- Input name in “File name” edit box.
- Choose the right output format in “Save as type” dropdown list if you didn’t choose the one when you set parameters in last step.
- Click “Save” button to run the conversion from scanned PDF to Excel file.
Please see “Save as” dialog box in Figure 2.
Figure 2
If you still have any questions about the conversion or the application, welcome to leave a message or come to our live chat support and we will give you a satisfied answer as possible as we can.

