Check this link first to download a trial version of PDF To Image Converter v2.1 here: https://www.verypdf.com/pdf2tif/pdf2image.exe
There will be a watermark in your file cause you need to buy PDF To Image Converter v2.1 which is a full version without any watermark in your confidencial files when you use PDF To Image Converter v2.1. So after i tell you the information above, you should use an unimportant file of yours for practice how to convert pdf file to pcx image.
But what is PCX?
PCX is an image file format that uses a simple form of run-length encoding. It’s lossless. The ZSoft Corporation of Marietta, Georgia, USA developed it as the native file format for their PC Paintbrush graphics program, which used to be quite popular with early PCs’ users. Nowadays it has been largely replaced by GIF, JPEG and PNG which support better compression.
However, it is still necessary to mention it and support it in PDF To Image Converter v2.1 cause some users may need it in different working situation. Here you will understand how to convert pdf file to pcx image in PDF To Image Converter v2.1:
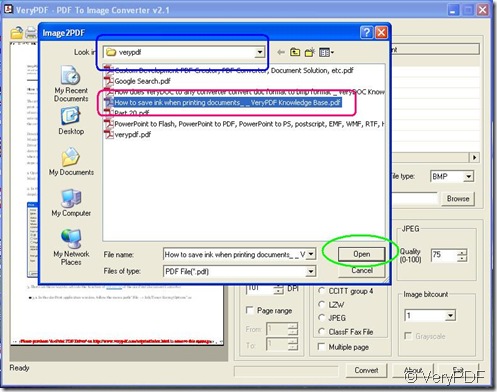
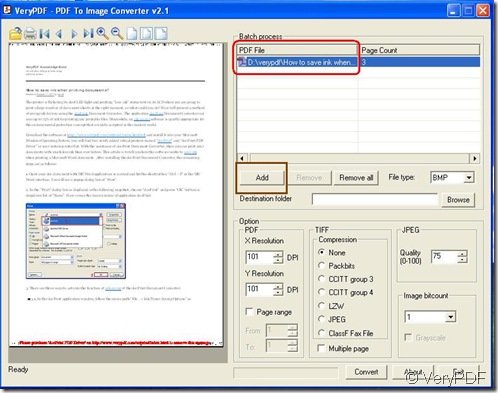
Step 1. Make your route of your pdf file appear under “PDF File” functional field after choosing your pdf file and click ![]() button in the pop-out window when you click
button in the pop-out window when you click ![]() button. You can still add more pdf files when you need, just repeat your action just now. If you chang your mind just want one pdf file here, you can press
button. You can still add more pdf files when you need, just repeat your action just now. If you chang your mind just want one pdf file here, you can press ![]() down after you choose this route. Reasonably,
down after you choose this route. Reasonably,![]() can remove all pdf files one time.
can remove all pdf files one time.
Step 2. Be sure that your pdf file is great one when you really need to convert pdf file to pcx image which is needed in your daily work. For that, you can press ![]() down or double-click your title of your pdf file in another pop-out window after selecting your pdf file that is the same one as that in step 1 with clicking
down or double-click your title of your pdf file in another pop-out window after selecting your pdf file that is the same one as that in step 1 with clicking ![]() button. You need to look over your pdf file detailedly by pressing down these kinds of buttons above your preview
button. You need to look over your pdf file detailedly by pressing down these kinds of buttons above your preview ![]() ,
,![]() ,or
,or ![]() with others which is on the same row like the picture above.
with others which is on the same row like the picture above.
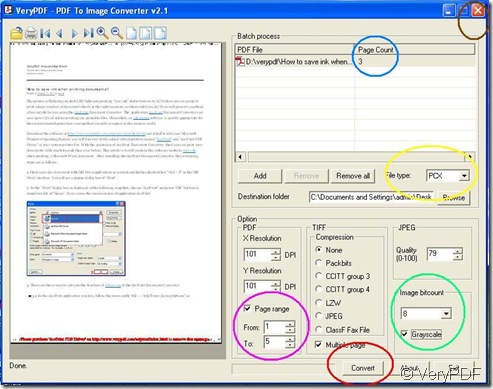
Step 3. Select your target file format in “File type” optional menu, here we choose “PCX” ,and give your PCX image a space by clicking ![]() button to choose your destination folder.
button to choose your destination folder.
Step 4. In step 1, you can notice the number “3” under “'Page Count” subject, which make you change the number in “To” after you make “Page range” subject active. Here we can set this number as “5” to get all pages converted from your pdf file. So there will be a conclusion in your mind, which is that you must set this parameter equal or larger than the number of your pages originally from your pdf file to guarantee the amount on your PCX images are strictly depending on the quantity of your pdf pages other than just one page. Or you just do not need to activate “Page range”,which means you want all pages converted to images you want. If you want partly pages converted, just set the serial numbers as the range of the images that you want to get.
Naturally, you may ask: what about many pieces of pdf files? Do not worry, PDF To Image Converter v2.1 can solve this problem, too. You just need to set your numerical value about “To” equal or larger than the most largest one between the values under “Page Count” subject still.
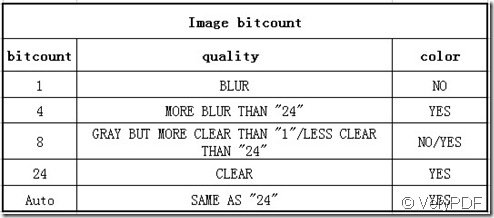
Step 5. Look at “Image bitcount” and drag the optional menu down by clicking that black arrow, you will see there are 5 choice offered in PDF To Image Converter v2.1, here you can refer to the following excel to set:
Here we choose “8”. Then you will see “Gray scale” active and avoid to choose it. You will get a colorful PCX image file other than a gray one with clicking “Gray scale”.
Step 6. At last, when you finish all actions above, click ![]() button to convert pdf file to pcx image,by now, your operation on how to convert pdf file to pcx image is finished, you can close your PDF To Image Converter.
button to convert pdf file to pcx image,by now, your operation on how to convert pdf file to pcx image is finished, you can close your PDF To Image Converter.
For more details, you can click this link: https://www.verypdf.com/app/pdf-to-image-converter/try-and-buy.html


